
Original image
step 1 of 22
As I said in the description...because of some not so good resolution feather areas I had to select only one piece (the clearest one, in my opinion).
I used only this piece to recreate the hair.
I used only this piece to recreate the hair.

step 2 of 22
This is the image of a lion statue that I used.
I duplicated the layer, desaturated it and changed the blending mode to hard light, in order to get some shadows and highlights as reference.
I duplicated the layer, desaturated it and changed the blending mode to hard light, in order to get some shadows and highlights as reference.

- : source
step 3 of 22
I colorized my lion for reference. Changed blending mode to soft light.

- 1: source 1
step 4 of 22

step 5 of 22
Using the selection I started playing with warping, resizing, flipping and came up with different hair shapes.
As I created more shape I blended them into each other using layers masks.
I really wanted details so you can imagine it did take quite a lot layers to reproduce hair texture as good as possible.
I also sharpened some pieces of hair.
In this step you can see how I started with the face.
As I created more shape I blended them into each other using layers masks.
I really wanted details so you can imagine it did take quite a lot layers to reproduce hair texture as good as possible.
I also sharpened some pieces of hair.
In this step you can see how I started with the face.

- 3: source 3
step 6 of 22
Based on same methods described in step 5, I continued with the mouth.

- 4: source 4
step 7 of 22
I got more thinner hair pieces and warped them more curved for some areas which I intented to only slightly reveal later on.
In this particular step you can see how I started with the left side. (Same methods as described in step 5)
In this particular step you can see how I started with the left side. (Same methods as described in step 5)

- 5: source 5
step 8 of 22

step 9 of 22
Main part of the hair. This part wasn't going to be permanent in the final result as I found some areas too alike....so I decided to add more fur....later on...!

- 7: source 7
step 10 of 22
Added ear, some fur areas to make smoother transitions into the rest of the fur and the beard.

- 8: source 8
step 11 of 22

step 12 of 22
Added extra fur on some areas that I wasn't satisfied with and blended them better.
Also selected eyes using the eliptical marquee tool, duplicated layer, changed blending mode to screen, added gaussian blur to get a vibrant look.
Also selected eyes using the eliptical marquee tool, duplicated layer, changed blending mode to screen, added gaussian blur to get a vibrant look.

- 10: source 10
step 13 of 22
I removed the backround by using a soft black brush on top of the unwanted parts and I shaped the eyebrows better using....of course....my favourite tool: the warp tool.

- 11: source 11
step 14 of 22
Here you can see the rough look of my primary shadows and highlights using a soft brush with different grey tones.

- 12: source 12
step 15 of 22
This is how it looked after I changed the blending mode of the grey layer to overlay.
I also added some very fine red veins on the eyes using a free lightning brush colorized in red.
I also added some very fine red veins on the eyes using a free lightning brush colorized in red.

- 13: source 13
step 16 of 22

step 17 of 22

step 18 of 22

step 19 of 22

step 20 of 22

step 21 of 22

step 22 of 22

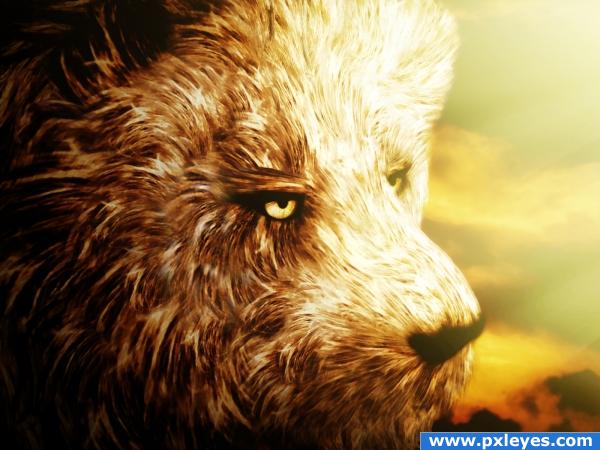
Final result
Pxleyes
Photography and photoshop contests
We are a community of people with
a passion for photography, graphics and art in general.
Every day new photoshop
and photography contests are posted to compete in. We also have one weekly drawing contest
and one weekly 3D contest!
Participation is 100% free!
Just
register and get
started!
Good luck!
Follow us:


© 2015 Pxleyes.com. All rights reserved.