
Original image
step 1 of 8
First thing first, I downloaded the original source. Then I open my Photoshop and as always; I start with a blank canvas then pick a gray color & make the background with a gray 50% with Alt+Backspace to Fill.
I create a new layer, name it to Sketch, then start to sketch my forest idea.
After that I drag & drop the imagesource of the black sheep & create a Layer Mask after that I mask everything not necessarily need and leave the sheep only.
I create a new layer, name it to Sketch, then start to sketch my forest idea.
After that I drag & drop the imagesource of the black sheep & create a Layer Mask after that I mask everything not necessarily need and leave the sheep only.

step 2 of 8
After that, as always, I create my gray values; but this one, I just paint them over the background with the Oil Brush that I set to Scattering with 120% Scatter.
I'm facing a lack of memory because of loads of applications running on my PC, that's why I try to make less layers as possible.
I'm facing a lack of memory because of loads of applications running on my PC, that's why I try to make less layers as possible.

step 3 of 8
I begin to fill my colors to a new layer & name it to Color, so the Mode is also set to Color. I paint everything on the Color layer, so it's just my habitual action with a simple palette to prevent the brightness to much vivid in this case.

step 4 of 8
In this stage, I create an Adjustments layer & choose Curves. I set a little darken then apply it on top of the image_source then make a clipping mask in order to make the sheep's brightness looks naturally blend to the background colors.

step 5 of 8
I create a new layer, rename it to Rim Lights & Shadows.
I paint a little yellowish gray to the top of the sheep. Apply a bit grayish blue to the shadows & create the expressions of the sheep as well as the smoke coming from the cigarette.
I paint a little yellowish gray to the top of the sheep. Apply a bit grayish blue to the shadows & create the expressions of the sheep as well as the smoke coming from the cigarette.

step 6 of 8
I create another new layer & rename to Cast Shadows.
I set the layer mode to Multiply, the Opacity to 60% & paint some shadows with a dark brown.
I'm not following the image_source's shadows because of the wrong directional to this kind of lighting.
I set the layer mode to Multiply, the Opacity to 60% & paint some shadows with a dark brown.
I'm not following the image_source's shadows because of the wrong directional to this kind of lighting.

step 7 of 8
In this stage, I just add the Adjustments layer. Set the filter to Cyan. So you could see the sheep's shadows on their body turned into the same as the background.
That final color adjustments will create a visual impact to the viewers to see the color balance of this piece.
That final color adjustments will create a visual impact to the viewers to see the color balance of this piece.

step 8 of 8
This final step is hide the Sketchy lines.
Now you could see the clearly blended visual of the sheep & the background.
Then I save my project's PSD & save as the piece to upload that into this contest.
Thanks for viewing the SBS. I know it's kind of boring & novice things to some of you people. But I hope you'll find this SBS useful.
Now you could see the clearly blended visual of the sheep & the background.
Then I save my project's PSD & save as the piece to upload that into this contest.
Thanks for viewing the SBS. I know it's kind of boring & novice things to some of you people. But I hope you'll find this SBS useful.

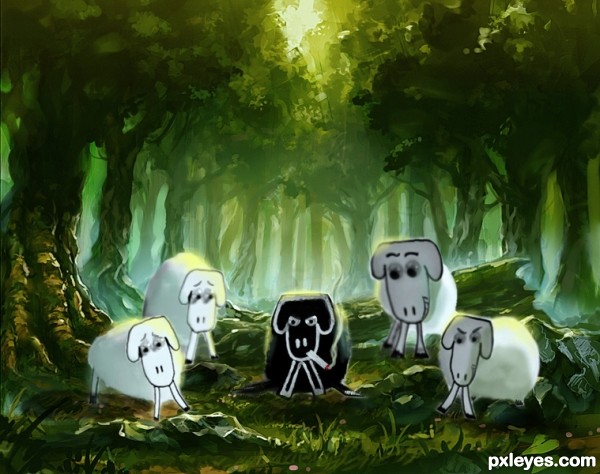
Final result
Comments
Pxleyes
Photography and photoshop contests
We are a community of people with
a passion for photography, graphics and art in general.
Every day new photoshop
and photography contests are posted to compete in. We also have one weekly drawing contest
and one weekly 3D contest!
Participation is 100% free!
Just
register and get
started!
Good luck!
Follow us:


© 2015 Pxleyes.com. All rights reserved.
Thanks for the votes, guys.
(5 years and 3308 days ago)