
Original image
step 1 of 5
For the texture i used some parts of a stone wall tutorial - but made it myself.

- : source
step 2 of 5
Making the stairs was one of the hardest things to do. I hadto pay attention to the 3d in a 2d picture, and make them look the most realistic possible.

step 3 of 5
The egg is from a Pxl contest, link is below. I just used it for a shape reference1
The final egg was made using a tutorial ( link below ) even though i didn't agree with all of it.
I used overlays of white for highlights and i even made a distorted reflection of the inside of the tower if you watch closely in the lower part of the egg.
And I added the winter tree from imageafter.
The final egg was made using a tutorial ( link below ) even though i didn't agree with all of it.
I used overlays of white for highlights and i even made a distorted reflection of the inside of the tower if you watch closely in the lower part of the egg.
And I added the winter tree from imageafter.

step 4 of 5
In this step i blended the tower into the background - i experimented a bit with diff. sources.
I also added the icicles from sxc.hu warped them and painted them.
You can see i added the ivy and blended the bridge with the path & grass. Man i wasted so many hours!! ha ha.
I also added the icicles from sxc.hu warped them and painted them.
You can see i added the ivy and blended the bridge with the path & grass. Man i wasted so many hours!! ha ha.

step 5 of 5
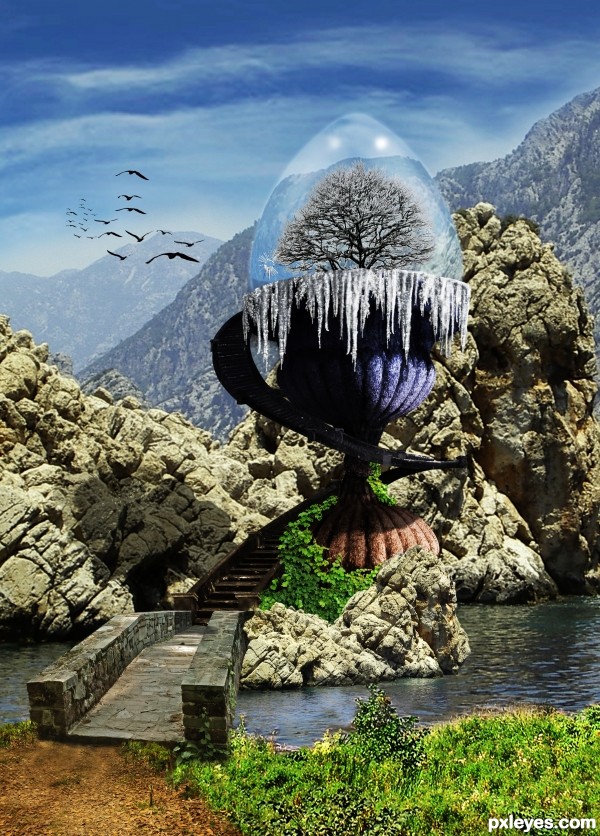
In the final step i created the crack, by painting overlaying and repainting the highlights o nthe cracks. I also added the icicles on it so that it looks like winter escaped - you should see this in high res.
I also distorted the image seen in the egg- background- as i saw on the internet the image in snowballs magnifies and doesn't turn upside down.
I added shadows, displaced them and made final color adjustments.
Thanks for reading my SBS.
I also distorted the image seen in the egg- background- as i saw on the internet the image in snowballs magnifies and doesn't turn upside down.
I added shadows, displaced them and made final color adjustments.
Thanks for reading my SBS.

Final result
Pxleyes
Photography and photoshop contests
We are a community of people with
a passion for photography, graphics and art in general.
Every day new photoshop
and photography contests are posted to compete in. We also have one weekly drawing contest
and one weekly 3D contest!
Participation is 100% free!
Just
register and get
started!
Good luck!
Follow us:


© 2015 Pxleyes.com. All rights reserved.