
Original image
step 1 of 13
First using the pen tool I quickly blotched out the position of the creature. And the rock he is on.

step 2 of 13
Next I stretched out the snout of the gas mask a bit, as well as extended the top of the head up a little. Then using the cheek of the mask, I guess you could call it, I made the pieces of the body. Just transformed and warped the chunks a bit to make them fit the way i wanted.

step 3 of 13
Next I started in on some shading. I decided my light source was going to be from the top right so I painted in shadows accordingly. Using a few different brushes, the chalky texture brushes that are in the regular photoshop brush pallet.

step 4 of 13
More rough painting over top of everything.

step 5 of 13
Still just more painting. I kept making a new layer and painting for a while then turning it off and on a few times to see if I liked where it had gone. Often I would scrap the layer and start again. Or just lower the opacity of the new paint layer then merge it down and then start on a fresh layer.

step 6 of 13
Ok now I created the tube. First thing I did was just make a line with the pen tool. Then set up my brush to a hard one at the width I wanted. then I stroked the path (without simulating pressure).

step 7 of 13
I applied a layer style of a slight bevel emboss to it. Then I took the piece from the mask that is the edge of the other eye hole that you can see a bit, and used it to make the little pieces on either end of the tube.

step 8 of 13
Then, using the same path as before I reset my brush to a higher opacity and a smaller softer brush. Then stroked it again on a new layer this time using pen pressure. I did this a few times and move them around to get reflections that I liked.

step 9 of 13
Then I stroked the path with a bigger softer brush once more and added that to the bottom of the tube.

step 10 of 13
I then took the piece I had created and copied it and warped it and all that fun stuff and put it in various places. I moved them around a lot till I found something I liked.

step 11 of 13
Next I took the circle piece from the mask, which by the way at some point earlier I added a few more to the face....anyway I warped that piece a few different ways and painted it a little darker then put it on the arm and a few more on the head. Just to add some detail. Next on a next layer with the layer style bevel emboss turned on, I painted some lines with a small hard brush to make it look like he was made up of many metal pieces. then with that same small circular brush on the same layer I added a bunch of screws.

step 12 of 13
Then I used some render clouds to add a smoky effect. I masked out most of it, and set the color overlay in the layer style to a dull green color. I also painted a bit in the top right corner with a huge soft white brush to add to the haziness.

step 13 of 13
After adding some smoke coming out of the "mouth" I just did a bunch of minor tweaking. I smart sharpened it a bit and up the contrast a little that sort of thing and then it was done :D

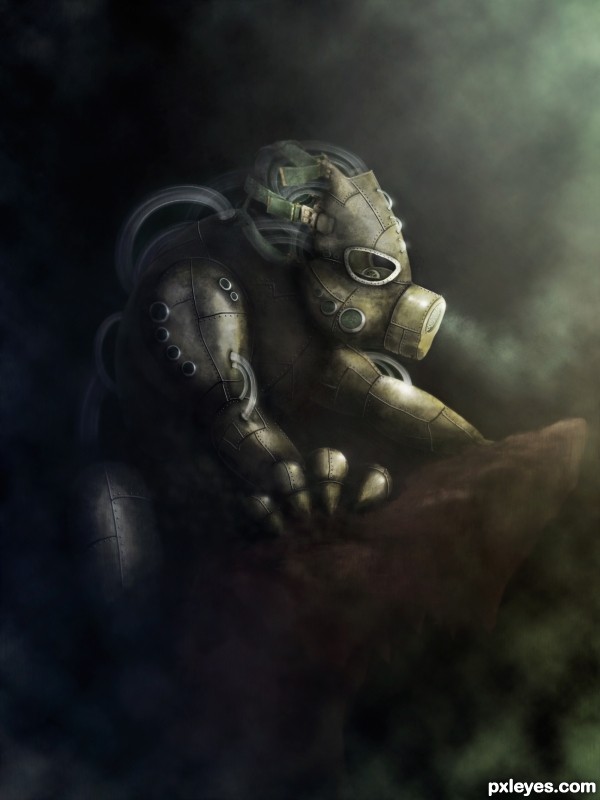
Final result
Votes
| user | voted |
| AdhirAnimator | |
| IDt8r | |
| Nickk | |
| athenya | |
| Toothpick134 | |
| Lamantine | |
| Zakfuego | |
| Nator | |
| birdhm | |
| Drivenslush | |
| Disco | |
| Score: 8.91 | |
Pxleyes
Photography and photoshop contests
We are a community of people with
a passion for photography, graphics and art in general.
Every day new photoshop
and photography contests are posted to compete in. We also have one weekly drawing contest
and one weekly 3D contest!
Participation is 100% free!
Just
register and get
started!
Good luck!
Follow us:


© 2015 Pxleyes.com. All rights reserved.