A Work in Progress: Blown away


This guide was made for entry:
Blown away
In Contest:
mixed manipulations 2


step 1 of 35

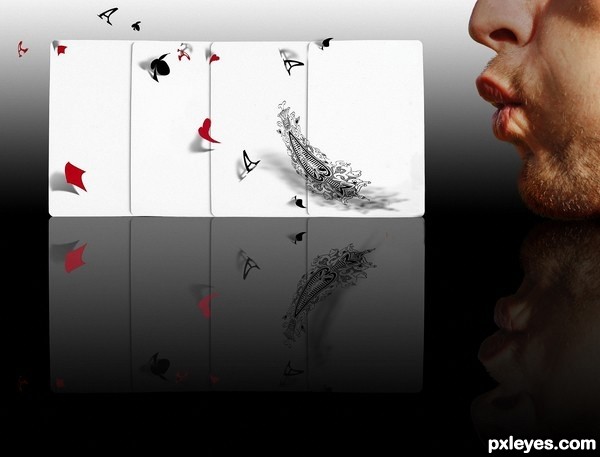
Open the card source image into photoshop

File>open

Then browse to where you have stored it on your pc.

Creation of Blown away: Step 1

step 2 of 35

The first thing we want to do is create a copy of the source image. Do this by left clicking on the layer that says "Background" and dragging onto the "New layer" icon at the bottom of the layers palette. It's the one next to the icon that looks like a dustbin.

Creation of Blown away: Step 2

step 3 of 35

Now we want to separate the symbols from the cards. Make sure you have the copied layer active (it will be blue if it is) The goto SELECT>COLOR RANGE
Left click on any RED symbol and you will see the marching ants around all the red parts of the cards.

Creation of Blown away: Step 3

step 4 of 35

This is what you should see. The color range pop up menu. The fuzziness slider tells PS how accurate to select the color you have chosen.

Creation of Blown away: Step 4

step 5 of 35

Okay so now you have the red selected. Go to LAYER>LAYER VIA COPY
This will now copy the red symbols onto their very own layer.

Creation of Blown away: Step 5

step 6 of 35

Selecting the black symbols will not be so easy, as the image sits in a black background. So first we have to remove the cards from the BG. Do this by clicking on the rectangular marque tool (Left tool bar, at the top) It looks like a square. Then drag a selection around the cards, staying inside the playing cards.

Creation of Blown away: Step 6

step 7 of 35

Again we go LAYER>LAYER VIA COPY. To copy the cards onto their own layer.

Creation of Blown away: Step 7

step 8 of 35

The we go SELECT>COLOR RANGE and click on anyone of the black symbols on the cards you have just cut out.

Creation of Blown away: Step 8

step 9 of 35

This is what your selection should like.

Creation of Blown away: Step 9

step 10 of 35

Then we go LAYER>LAYER VIA COPY. This will make a copy of the black symbols onto their own layer.

Creation of Blown away: Step 10

step 11 of 35

Add a new blank layer just above the copy of the original image. Do this by clicking on the copy of the original image to activate it then clicking on the new layer icon at the bottom of the layers palette. When you have the blank layer, go across to the left tool bar and click on the paint bucket tool. Make sure the foreground color is set to white. You can do this by clicking on the FG color and choosing white from the colors palette. When you have the paint bucket tool, and the FG color set to white, click on the image anywhere, making sure you selected the blank layer, and it is active first. You will now have to turn off every layer except the white layer and the RED and BLACK symbols layers. What you will see is some debris left from the selection. Chances are this is from the BLACK selection. Click on your black symbols layer so it is active, then go across to the left tool bar and select the eraser. Simply erase any parts that shouldn't be there. Like the the lines left in this image.

Creation of Blown away: Step 11

step 12 of 35

When you have done that you should be left with a clean white BG and all the symbols nice and tidy with no debris.

Creation of Blown away: Step 12

step 13 of 35

Now go to the red symbols layer and make it active by clicking on it, then select the symbols on that layer by holding CTRL and left clicking on the layer thumbnail. This will put marching ants around the red symbols. You will have to fill these with RED paint because of the way COLOR RANGE selection works it will leave holes in your symbols. So with these selected, make your FG color RED and then go to EDIT>FILL. Make sure you have the drop down box set to Foreground color" then click okay. It will fill these symbols with red paint and make then nice and crisp again.

Creation of Blown away: Step 13

step 14 of 35

Turn of the red symbols layer by left clicking on the little eyeball at the left of the layer. Then activate the black symbols layer. You will see that there is some debris left over. Select the eraser tool and simply rub these out.

Creation of Blown away: Step 14

step 15 of 35

This is what you should be left with.

Creation of Blown away: Step 15

step 16 of 35

Turn ALL the layers off by left clicking on their respective eyeballs. Then turn on the Copy of the original image. Make sure the layer is active, then select the clone stamp tool from the left hand tool bar.

Creation of Blown away: Step 16

step 17 of 35

You want to clone out the symbols from the card with the white from the card. To do this move your mouse over a white part of the card then hold ALT and left click, this means the stamp will clone from that area of the card(Hopefully white if you got it right) Go over the symbols and left click on them. They should disappear under white. You may have to keep ALT+left clicking to reset your target area to always keep it white.

Creation of Blown away: Step 17

step 18 of 35

Now we want to get rid of the reflection of the cards. Simply drag out a selection with the rectangular marquee tool and then fill the selection with black paint.

Creation of Blown away: Step 18

step 19 of 35

Creation of Blown away: Step 19

step 20 of 35

Now we want to create our own reflections of the cards so go to SELECT>COLOR RANGE. And click on the white cards. Make sure you have the fuzziness slider all the way to the right. We want to keep the shadows in between the cards!

Creation of Blown away: Step 20

step 21 of 35

Creation of Blown away: Step 21

step 22 of 35

Make a copy of the cards you have just selected by going LAYER>LAYER VIA COPY, or the shortcut keys CTRL+J

Creation of Blown away: Step 22

step 23 of 35

Flip the cards vertically by going EDIT>TRANSFORM>FLIP VERTICALLY. The reflections need to be upside down, even though they are just white.

Creation of Blown away: Step 23

step 24 of 35

Hold shift down and with the move tool (Shortcut key V) move the cards down till they look like this.

Creation of Blown away: Step 24

step 25 of 35

Add a layer mask to the reflections layer by clicking the "NEW LAYER MASK" icon at the bottom of the layers palette. It looks like a little camera. (Strange, but true!)

Creation of Blown away: Step 25

step 26 of 35

with the layer mask active, (click on it) select the gradient tool. If you can't see the gradient tool in the left tool bar, click and hold on the paint bucket symbol a little fly-out menu will appear. just select the gradient tool from that. Then go to your image and holding down the SHFT key. left click at the bottom of the image and drag the gradient up to around the middle of the cards that are not the reflections, and let go. You should see this when you've done.

Creation of Blown away: Step 26

step 27 of 35

So now come the REALLY TEDIOUS part. You have to make individual copies of ALL the symbols. For this reason I'm only going to show you this procedure on the first ace. Got to your black symbols layer and make it active. Make sure you can see it to by left clicking on the eyeball and opening it. Now zoom in so you can see the symbols quite close. (CTRL+ CTRL-, zoom in, zoom out) Hold the space bar down and left click on the screen, drag it around until you can see the symbols you want to copy. Select the rectangular marque tool and drag a selection around the symbol you want. The press CTRL+J. You will see a new layer appear in your layers palette rename it with something that you can remember (lots of layers coming up) Create a new group in the layers palette. Do this by going to the bottom of the palette and clicking on the folder icon. You will see a new group layer appear at the top of the layers palette. Rename it (Symbols, or whatever is easiest to remember) Click and drag the symbols you have just copied ontop of the new group layer and let go, that layer will now be in that group, and will help keep your workspace tidy.

Creation of Blown away: Step 27

step 28 of 35

Creation of Blown away: Step 28

step 29 of 35

Okay, so you have separated ALL of your symbols and they are sat nicely in their own groups. Go to the BLACK group you created wher you put all your individual black symbols and select the main Symbol, the fancy scrolly thing on the main ace of spades. The goto EDIT>TRANSFORM>WARP

Creation of Blown away: Step 29

step 30 of 35

you will find that clicking anywhere in the wirebox that appears over your symbol, and dragging, the symbol will start to "warp" well, you want a blown appearance so practice and see what you like. When you're satisfied, hit the ENTER key, or the green tick on the main toolbar above the layers palette.

Creation of Blown away: Step 30

step 31 of 35

To make the shadows for each symbol, you will have to make a copy of each symbol! (I know, more tedious copying lol) I suggest that you do this as soon as you have warped the symbol you are working on. (You might forget and there will LOTS of layers) So make the copy of the symbol CTRL+J and move it slightly to the left, or right of the original symbol. The at the top of the layers palette, turn the opacity down. Remember the closer to the cards the shadow will be darker(Never fully black!!!) The further away you want the symbols to appear from the cards the lighter(Less opacity) The shadows will have. Then when your happy with how your shadow looks at a bit of blur. Just to soften the edges slightly (The further away you want the symbol from the card, the more blur you should add) FILTER>GAUSSIAN BLUR
I used between 1.0 and 3.6 pixels worth of blur on my symbols. Play around see what you find best. When you're happy just click on OKAY to apply the blur to the shadows.

Creation of Blown away: Step 31

step 32 of 35

Here you can see the card that I have completed. Study the shadows and see how their position, opacity and blur, all effect how far from the card the symbol appears. You need to repeat this procedure for ALL the symbols (Except the reflections)

Creation of Blown away: Step 32

step 33 of 35

Make a copy of the GROUP with the black symbols in (Only when you have finished warping, positioning, and shadowing them) DO this by dragging the group layer (The one with the folder on) to the "Make new layer" Icon at the bottom of the layers palette. This will create a duplicate of that group. Right click on that duplicate group and select "Merge group" This will put all the symbols on to a separate layer for you to create the reflections. When you've done that, do this. EDIT>TRANSFORM>FLIP VERTICALLY
This will flip the merged symbols upside down. The holding the SHFT key drag the layer down so it sits just under normal cards.

Creation of Blown away: Step 33

step 34 of 35

So now you have the reflections. We need to put a gradient on them. So add a layer mask to the layer then select the gradient tool. holding SHFT drag the gradient tool upto the middle of the normal cards. Now you will have a nice reflection of the card and symbols above. This image is about repetition and layers. Think the image through logically. Have fun trying this, I enjoyed making it. :-)

Creation of Blown away: Step 34

step 35 of 35

Animated GIF of the SBS

Creation of Blown away: Step 35

Final result

Creation of Blown away: Final Result

LOGIN or REGISTER FOR FREE
to rate this guide and create your own guides.


Comments

avatar arca
arca says:

Great tutorial ... truly explains what you did!

(5 years and 3115 days ago)
author says:

Thanks for that arca It must be 2.5 years since I did this image first time around. I did it on a laptop with no mouse! All that warping and copying smoothed my fingertips right out! lol. Recreating this image in CS5 was no easier. The tedium of copying and warping drove me nuts hehehe. I hope it helps you and others. The one thing I learned from this image was that the simplest ideas ie, symbols blown off the card faces, are sometimes the hardest to achieve...... Thanks for the appreciation. Keep up the good work yourself arca

(5 years and 3115 days ago)