
Original image
step 1 of 7
I made a pattern out of the umbrella and selected all single parts from the statue. So the right
arm, the left arm, the head and so on.
For every single part, I applied the pattern overlay seperately with blending mode set to overlay.
arm, the left arm, the head and so on.
For every single part, I applied the pattern overlay seperately with blending mode set to overlay.

step 2 of 7
The hands I made in the same way, but set the opacity of the pattern overlay to 65%.

step 3 of 7
I arranged the two statues and the rope. For the hands, that are holding the statues, I used a standard PS pattern, set the blending mode to overlay and the opacity to 62%.
For the knots I used a lot of colour adjustments to get the same colour as the rope.
For the knots I used a lot of colour adjustments to get the same colour as the rope.

step 4 of 7
The stars were added with blending mode set to screen. The left version is the normal one, the right version the one with the blending mode.

step 5 of 7
The curtain was added with blending mode set to colour dodge. That gave it a pink colour, what I didn't want. So I changed the colour via colour balance to get the blueish colour.

step 6 of 7
I added shadows, used dodge and burn and placed the statues and the hands with the horses behind the curtain. Furthermore I lowered the opacity to 60%.

step 7 of 7
Finally I added a dark yellow photofilter and copied the layer, used gaussian blur and set the blending mode to soft light.

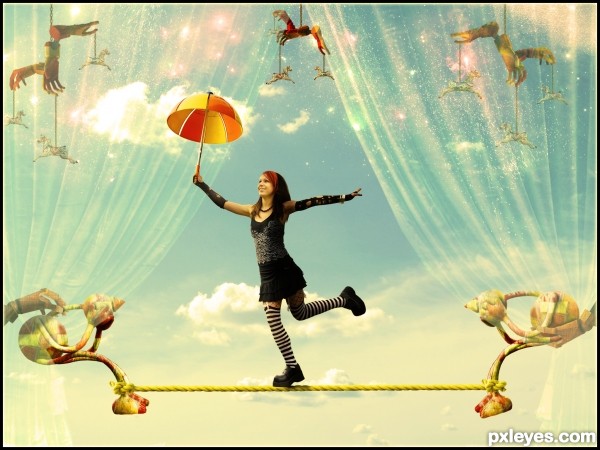
Final result
Pxleyes
Photography and photoshop contests
We are a community of people with
a passion for photography, graphics and art in general.
Every day new photoshop
and photography contests are posted to compete in. We also have one weekly drawing contest
and one weekly 3D contest!
Participation is 100% free!
Just
register and get
started!
Good luck!
Follow us:


© 2015 Pxleyes.com. All rights reserved.