
Original image
step 1 of 12
First: select the umbrella and the middle hand
Paste into new image as separate layers. Hide layer with the hand, then select umbrella layer. Transform umbrella til standing upright. Make separate layers of the umbrella, separating out the top, the underside, and the handle. Select the handle layer and free transform the handle making it broader across. Render clouds on handle, then set the following color curves.
Paste into new image as separate layers. Hide layer with the hand, then select umbrella layer. Transform umbrella til standing upright. Make separate layers of the umbrella, separating out the top, the underside, and the handle. Select the handle layer and free transform the handle making it broader across. Render clouds on handle, then set the following color curves.

step 2 of 12
Change hue and saturation:

step 3 of 12
while still selecting JUST the handle of the umbrella, set the wave filter as follows to give a twisted looking stem in tie dyed colors.

step 4 of 12
select just the under part of the umbrella on its separate layer. Use palette knife filter on it, then add just a bit of white with a 18 soft brush. Use the smudge tool to smudge it back and forth for texture.

step 5 of 12
Select the layer holding the top of the umbrella. Paint in separations on the umbrella to make it a solid cap. Add shadows to the bottom layer to give dimension. I choose a soft brush with a 21% opacity.

step 6 of 12
Arrange layers so that the underside is on the bottom, the stem is next, and the cap is on top.

step 7 of 12
merge down so that we can copy this image to build the other mushrooms. Once merged, select the mushroom and copy it 4 or 5 times. Transform each layer to achieve the size mushrooms you want. Arrange the mushrooms in a cluster

step 8 of 12
Now make the layer with the hand visible and make the hand large enough to hold the mushrooms in the palm. Select just the thumb and copy it into a layer by itself, and group it so it is the first layer, then the mushrooms, and then the hand. Do dodge/burn to make more shadowing around the caps, stems and at the base of the stems in the hand so they aren’t floating mid air.

step 9 of 12
select the wrist piece and transform so that it makes the arm longer, like its reaching in from off the page.

step 10 of 12
make a transparent background.. add shadows under the hand. Switch light source by lightening the top of the arm, and darkening the underside of the arm.

step 11 of 12
now build the background. You need 2 transparent layers. On the first, use a yellow orange gradient tool to fill the entire thing. On the second, use splatter style brush (cs2 #192) in primary colors. Then liquefy that layer to set a swirl to the pattern. Repeat til it looks to your liking.

step 12 of 12
make visible all layers, then adjust shadows and light as needed to make the design all work. i chose to smudge the bases of the stems to give it that rooted look, like as if they were growing out of the hand.
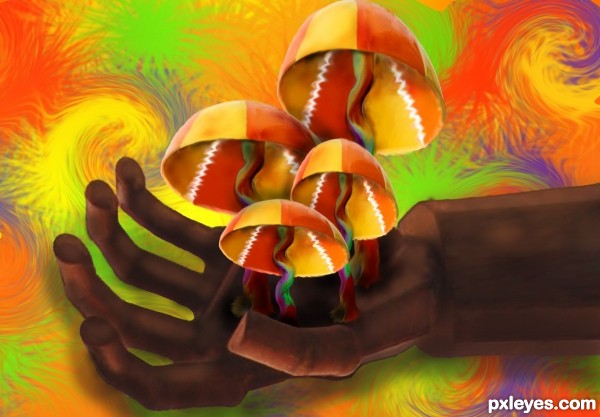
Finished piece:
Finished piece:

Final result
Pxleyes
Photography and photoshop contests
We are a community of people with
a passion for photography, graphics and art in general.
Every day new photoshop
and photography contests are posted to compete in. We also have one weekly drawing contest
and one weekly 3D contest!
Participation is 100% free!
Just
register and get
started!
Good luck!
Follow us:


© 2015 Pxleyes.com. All rights reserved.