
Original image
step 1 of 22

step 2 of 22
Placed the boat into the main image after cutting out the back wall. The ship is moved behind the background image.

step 3 of 22

step 4 of 22
I used the pen tool to crudely chop out a bit of the wall side.

step 5 of 22
After chopping up the left wall a bit as well, I used a very small, hard eraser to make ridges and chips in the broken wall portions. I also used the lasso to cut up the pipes, then used warping to bend them.

step 6 of 22
I pasted in a couple of steam puffs to blow from the broken pipes. I made these by painting in some clouds with a cloud brush (see source links), then warping them into shape.

- 2: source 2
step 7 of 22
Here I made the 3D edges for the broken wall sides. This was achieved by simply making many duplicates of the wall edge and placing them behind each other in sequence. These duplicates were then merged, darkened, blurred, and patteren lightly.

step 8 of 22
Finished 3D edges on either side of the alley.

step 9 of 22
Added in a bit of shadow. The shadows of the ship are a combination of a curve mask and a soft brush, and the pipes' are just drop shadow. The shadow that the building casts on the ship was drawn in with a transparent brush.

step 10 of 22
I began adding the debris chunks. These were made out of the wall portions that I cut out in step 4, and made 3D with the same duplication method I used for the wall edges.

step 11 of 22
Finished adding the chunks. Some of the smaller ones are cut-up copies of the larger ones.

step 12 of 22

step 13 of 22
I turned off the visibility on the dust clouds for this step. I selected the stream with the lasso so that I can turn it into a clearer body of water.

step 14 of 22
The selected stream was motion-blurred intensely and colored blue with hue/saturation. The reflections are individual warped/modified copies of parts of the image (sky, boat, and walls) each of which is set to hard light blending and made transparent.

step 15 of 22
I cut out and pasted the dingy, then significantly reduced its size. This will be the mouse's boat. The dingy's reflection was made in the same way as the others in step 14.

- 5: source 5
step 16 of 22
Inserted the mouse. I added a layer mask to it and painted over the mask to erase its lower body.

- 6: source 6
step 17 of 22
Now working with the stop sign pic, I used the clone stamp to erase the lettering. This is because the sign will either have no lettering, or because it will be turned around. I just didn't want to leave "STOP" on the backside, else it would look like a mistake.

- 7: source 7
step 18 of 22
I put the sign in the mouse's hand and did some work with curves and burning, both to the sign and the mouse.

step 19 of 22
Final edits here:
1. Lightened the right half of the boat
2. Warped the tip of the boat up a bit
3. Darkened the wall edge on the left, and adjusted the broken edge on the right.
4. Added a ripple to the water with the zig-zag filter.
5. Made the dust slightly transparent and motion-blurred the speckles
6. Brought the mouse and dingy closer to the "camera" so that they can be larger, and saturated the mouse's stop sign. Also made the pole of the sign extend onto the red surface, as this is the back of the sign.
10. Make overall touchups, including deleting some unseen excess from some of the layers and darkening the reflection of the boat (thanks, Langstrum).

step 20 of 22
This is a final step which I added at the helpful suggestion of Langstrum and Blinscientist: a nice big wave!
Here I used color range and quick mask to select the splash from the photo (see source links).
Here I used color range and quick mask to select the splash from the photo (see source links).

- 8: source 8
step 21 of 22
Placed the splash in front of the boat. I erased most of it with a layer mask, then used the same debris brushes from earlier to reveal the bottom edge, giving it a better splash effect. Gave it a zoom blur to finish.

step 22 of 22
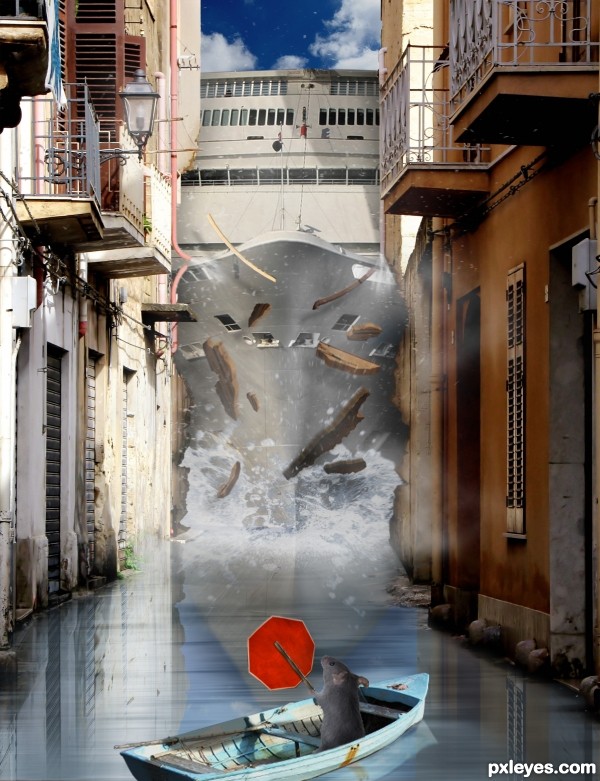
Added a reflection to the splash and voila--complete.

Final result
Pxleyes
Photography and photoshop contests
We are a community of people with
a passion for photography, graphics and art in general.
Every day new photoshop
and photography contests are posted to compete in. We also have one weekly drawing contest
and one weekly 3D contest!
Participation is 100% free!
Just
register and get
started!
Good luck!
Follow us:


© 2015 Pxleyes.com. All rights reserved.