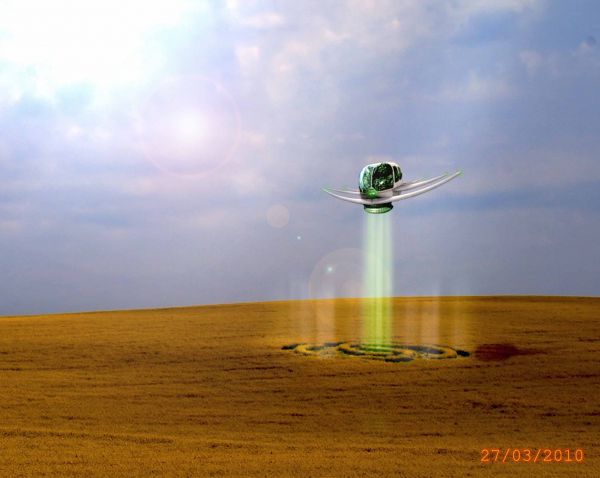
A Work in Progress: Crop Circling


This guide was made for entry:
Crop Circling
In Contest:
ufo hoax


step 1 of 20

I cut out the hull of the helicopter (source provided) and used replace color to turn the yellow to grey.

NOTE: The background here is different from the final image. The reason for this is that I changed my mind after finishing the image and stuck everything onto a different scene.

Creation of Crop Circling: Step 1
sources used for this step:

step 2 of 20

Cut and pasted the left wing of the airplane (source provided) copied it, and mirrored it to make one larger wing.

Creation of Crop Circling: Step 2
sources used for this step:

step 3 of 20

Copying more instances of the wings, I used distort and liquify to bend 3 pairs of wings into shape.

Creation of Crop Circling: Step 3

step 4 of 20

Cut out the lenses and overlay-blended them with a redish hue.

Creation of Crop Circling: Step 4

step 5 of 20

Changed my mind here and decided to make the lenses green. Use hue/saturation adjustments then an array of filters (forgot which, I'm afraid) to give them an alien look.

Creation of Crop Circling: Step 5

step 6 of 20

Added shadows on seperate masked layers with a transparent, soft brush.

Creation of Crop Circling: Step 6

step 7 of 20

Cut and pasted part of the vacuum hose from the mentioned picture.

Creation of Crop Circling: Step 7
sources used for this step:

step 8 of 20

Adjusted hue and saturation of the hose to turn it green, then fitted it underneath the ship. Needed to erase part of it here. Finally, added some touch-up shadows with a soft, transparent brush.

Creation of Crop Circling: Step 8

step 9 of 20

Dabbed the edges of the wings with a green brush, then gave them a normal-blend glow effect. I set the blend mode of the layer to screen and erased parts of the green brush blobs to fit the shape of the lights. Opacity is lowered slightly in the final result.

Creation of Crop Circling: Step 9

step 10 of 20

Painted the tractor beam with a large, hard, bright-green brush. Duplicated the layer, then patterned with a bubble pattern. Bubble pattern is set on top. I merged the bubble pattern layer with a blank layer to make the effect permanent.

Creation of Crop Circling: Step 10

step 11 of 20

Used a vertical motion blur on the bubble pattern layer.

Creation of Crop Circling: Step 11

step 12 of 20

Set the bubble pattern layer to screen over the bright-green tractor beam.

Creation of Crop Circling: Step 12

step 13 of 20

Used a very large soft eraser to delete the sides of the tractor beam and give it a more straight shape. Also lowered opacity slightly.

Creation of Crop Circling: Step 13

step 14 of 20

Used same process in step 9 to make headlights on the front of the hull.

Creation of Crop Circling: Step 14

step 15 of 20

Duplicated a merged layer copy of the spaceship, distorted it, and moved it onto the field. This will be the shadow.

Creation of Crop Circling: Step 15

step 16 of 20

Alot was done here. First, I cropped the entire image to mage it more of a landscape picture, added an omni lighting effect in the top-left corner, and gave the picture a lens flare. Shadow was made by filling in the duplicated ship with black, guassian blur, and lowered opacity.

Creation of Crop Circling: Step 16

step 17 of 20

Some more contrast adjustments and more blur to the shadow.

Creation of Crop Circling: Step 17

step 18 of 20

At this point, as you can see, I decided that the old background was lame and switched the tractor beam and spaceship onto a new background, this time containing a crop circle.

Creation of Crop Circling: Step 18
sources used for this step:

step 19 of 20

This is basically a repeat of step 16. Re-added the omni and the lens flare, desaturated the field a tad, and re-added the shadow. I made the rays coming up from the ground by duplicated the tractor beam a few times and distorting them over the crop circles. Touch-ups with a large, soft eraser.

Creation of Crop Circling: Step 19

step 20 of 20

To finish the whole image off, I added box blur, slight noise, over-exposure, and a warming filter. Also added a date stamp in the corner which is simply a "Courier New font" text string with a red glow. When I saved the final image, I did so with a low-quality setting to make it appear more like a photograph.

Creation of Crop Circling: Step 20

Final result

Creation of Crop Circling: Final Result

LOGIN or REGISTER FOR FREE
to rate this guide and create your own guides.

Votes


uservoted
iquraishi
pearlie
hereisanoop
erikuri
Score:
10


Comments

avatar hereisanoop

awesome

(5 years and 3316 days ago)
author says:

Thanks alot everyone!

(5 years and 3314 days ago)