
Original image
step 1 of 39
Preliminary sketch in PS

step 2 of 39
Preliminary face sketch in PS

step 3 of 39
Cutting out pieces of sketch and fitting them to my sketch. Used: Rotate, transform etc

step 4 of 39
Used hue/saturation image adjust to get the color scheme I wanted.

step 5 of 39
I painted in the base for the skin tones using a default spatter PS brush. Then I took my sketch layer and inverted the color under image/adjust to make it show up on my tone.

step 6 of 39
used a gradient for the background (my opacity layer for the source layer was turned down here, just so I could see the background better)

step 7 of 39
Painting in tones for face,

step 8 of 39
Used circle selections to make pupils/irises, and then painted inside them. A little more tone painting.

step 9 of 39
Painting and blending (smudge) for face

step 10 of 39
painting in nose contours.

step 11 of 39
Turned off mermaid layer group to focus on source. Turned source group back to 100% and added more source to create the right most peak on a layer behind. I used tranform tools to get The right shape as in the first source steps.

step 12 of 39
I used a selection of the source and placed it on top of the gradient layer. I transformed it to make the flow/shape of the water.

step 13 of 39
I blurred the source to death, tweaked it a bunch w/ liquify and smudge and changed the layer setting and opacity. Then I painted more on top of that.

step 14 of 39
frankly, I am not sure what I did in this step, but I'm sure it was something. I'm uploading it only to keep my order, and not screw up which step I am on. SORRY!

step 15 of 39
Hair sketch, using default spatter brush, I use this brush a lot.

step 16 of 39
More face painting.

step 17 of 39
more painting for the face, painting in rough tones for the hair as well.

step 18 of 39
More face/hair. In the last few steps I was always switching back and forth to the source layers, to tweak them (make the holes etc)

step 19 of 39
I started to paint in shadows, and highlights, (also in the iris)

step 20 of 39
More painting of tones, rough in of "makeup"

step 21 of 39
More painting, I also painted in some light rays, which I was going to tweak later, but I ended up taking out all together.

step 22 of 39
I redid the bottom lip here. Also in many of the steps, I am going to source image, and burning/shading etc.

step 23 of 39
Lip detailing

step 24 of 39
Some really rough painting in of tones and colors (that will be toned down later)

step 25 of 39
highlighting, which will be tones down as well

step 26 of 39
adding in secondary color tones. Brought in source selection to make coral.

step 27 of 39
More color tones and liquify on source to make coral. I a color layer over that for more colors after changing color of main source.

step 28 of 39
doing the same thing for the smaller other colored corals (only small)

step 29 of 39
I added more source in here around the right upper side of the opening, I was adding bits all along to fit how I wanted it to look. Here is a close up of painting on the inside of opening curve, to create a stone looking inner. some of this was done w/ brush, and some w/ smudge, going back and forth.

step 30 of 39
painted with brush es to make beginning of bubbles, and water woosh.

step 31 of 39
painted in some water plants and more details.

step 32 of 39
painting to refine her face.

step 33 of 39
roughly painting in more hair.

step 34 of 39
eyelashes and other random painting/smudging etc

step 35 of 39
more of the same. (detailing)

step 36 of 39
adding color to the new hair part.

step 37 of 39
more hair stuff, you may not be able to see it at the size of the sbs. My image is even bigger than the hi-res, but I shrank the final down, so it would be sure to fit on the screen.

step 38 of 39
more painting, I painted a lot of bubbles and the duplicated some and copied and pasted to make a bit more.

step 39 of 39
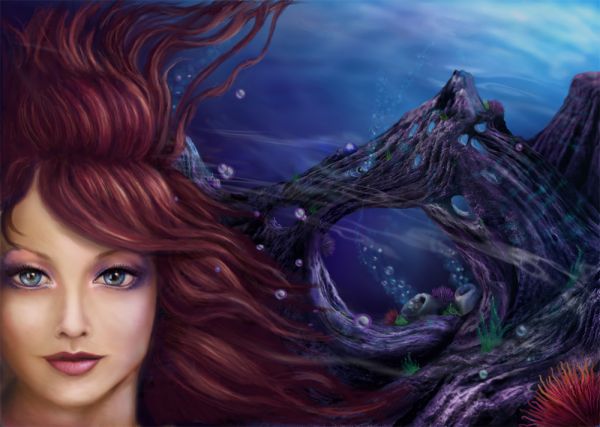
I took everything and condensed to one layer and then did final blending. and then painting on a layer on top of that to finish of hair. highlights etc.

Final result
Votes
| user | voted |
| kevinice95 | |
| DML | |
| sebykxxx | |
| DigitalDreamer | |
| cabldawg71 | |
| BDesigns | |
| jawshoewhah | |
| Maya3D | |
| Akassa | |
| loopyluv | |
| demi | |
| tapiona | |
| erikuri | |
| RAZ0R | |
| Score: 9.71 | |
Comments
Pxleyes
Photography and photoshop contests
We are a community of people with
a passion for photography, graphics and art in general.
Every day new photoshop
and photography contests are posted to compete in. We also have one weekly drawing contest
and one weekly 3D contest!
Participation is 100% free!
Just
register and get
started!
Good luck!
Follow us:


© 2015 Pxleyes.com. All rights reserved.
the only thing missing is how you made that large piece of orangey coral...this is fabulous - the chop and the sbs!
(5 years and 3818 days ago)Pearlie: sorry! The coral... I took the orange jewelry and then liquefied it beyond recognition . I then just kept messing with it, w/ smudge and I also put a color layer over it to get the different colors. It's SORT of shows it in steps 26-28, if that helps at all.
(5 years and 3818 days ago)