A Work in Progress: Flower Drawing Lessons


This guide was made for entry:
Flower Drawing Lessons
In Contest:
flowers


step 1 of 40

While most of this will seem very repetitive, it does teach some very important skills for drawing. As the saying goes, practice makes perfect, something very true in learning to draw.

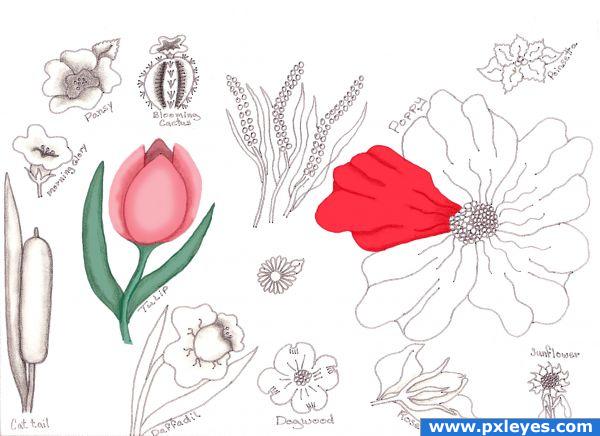
The flowers in this image was made as doodles originally when I was talking on the phone. I re drew them over and over again, until I got them to where I was satisfied with them. They are in the folk art style, which the design can be simple or as complex as you wish, it just depends on how much detail, shading and coloring you wish to put into each flower.
I had recently turned the image into a guide for my son, teaching him how to draw them, the reasoning for the Step by step being so thorough. He is just learning to draw, so I kept the flowers and the lines at beginner level.

This Step by Step is mainly teaching you how to make a guide book for the flowers, each new line is added to a new sheet of paper with the lines you have drawn already. Working on your muscle memory, completing a solid image and proportion. Never trace the existing lines on the previous pages, you will never learn to be able to repeat the drawing free handed if you do and the lesson will fail.

I drew the guide on a tablet of tracing paper and left the pages intact, it teaches you how lines will intersect, how the proportion will be, teaches you the basics and hopefully give
you confidence to explore drawing farther on your own.

Materials:
Tracing Paper Tablet
No 2 pencil
Charcoal pencil No 557-2b med
Q-tips
Totillons - paper bending stick, found at any art store
Kneadable eraser
Black Sharpie felt marker - Ultra fine point

Note: Once the guide is finished, you will no longer draw on it, the guide will be just for reference only, so once it is finished, it is committed with the black ink for preserving it.
You will be able to use it as a guide to draw the flowers free handed from then on. No Tracing allowed!!!!

We start at the last page of the Tracing tablet and work our way forward, while backwards, it teaches us line intersection and to join the lines smoothly. Our first attempt is the cat tail, it is easy to draw and a very good image to learn to make smooth lines and make them flow.

Step 1
We start with the outer portion of the leaf, please draw the line you see in the image.


Creation of Flower Drawing Lessons: Step 1

step 2 of 40

Step 2
Next sheet- draw the previous line, then add your new lines to this page.
Now draw the bottom stem of the cat tail, it will help you with deciding with the placement
of the cat tail itself. Now draw the cat tail itself, notice how it has no sharp edges, the
ends are rounded, like a round tube, add the top of the stem, it goes to a slight point at
the tip. Once this is done, you will know where to finish your leaf at the bottom.

Creation of Flower Drawing Lessons: Step 2

step 3 of 40

Step 3
Next sheet- draw the previous lines, then add your new lines to this page.
Now we will be working on a morning glory, we will start with the top of the flower, where
it opens. Draw the shape you see in the image, remember that flower petals are never perfectly
shaped, they tend to curl, bend and overlap each other in places.

Creation of Flower Drawing Lessons: Step 3

step 4 of 40

Step 4
Next sheet- draw the previous lines, then add your new lines to this page.
Now draw the small cup like bottom of the flower, where it joins the stem. then add the small
leaf like parts that had protected the bud before blooming, followed by the stem.

Creation of Flower Drawing Lessons: Step 4

step 5 of 40

Step 5
Next sheet- draw the previous lines, then add your new lines to this page.
Now add the line that shows that there is a hollowness in the center to the flower, draw
stamens as well.

Creation of Flower Drawing Lessons: Step 5

step 6 of 40

Step 6
Next sheet- draw the previous lines, then add your new lines to this page.
We are now going to start drawing our pansy flower. A pansy has a dark center of the petals
that lead to the stamen area. Please duplicate the new lines on the page.

Creation of Flower Drawing Lessons: Step 6

step 7 of 40

Step 7
Next sheet- draw the previous lines, then add your new lines to this page.
Now draw in the first petal

Creation of Flower Drawing Lessons: Step 7

step 8 of 40

Step 8
Next sheet- draw the previous lines, then add your new lines to this page.
Finish in drawing the outer petals, following the example in the image.

Creation of Flower Drawing Lessons: Step 8

step 9 of 40

Step 9
Next sheet- draw the previous lines, then add your new lines to this page.
Draw in the center stamens and a leaf, following the new lines in the image

Creation of Flower Drawing Lessons: Step 9

step 10 of 40

Step 10
Next sheet- draw the previous lines, then add your new lines to this page.
Starting our blooming cactus, duplicate the new lines. Never worry about
taking several tries to get it just right in your eyes, that's the reason
erasers were made. (the reason I use a kneadable eraser is that you can
knead the lead into the eraser, cleaning it and the kneading helps work the
fingers, it can also be shaped to the size and shape you need.)

Creation of Flower Drawing Lessons: Step 10

step 11 of 40

Step 11
Next sheet- draw the previous lines, then add your new lines to this page.
Now add the center of the flower on top of the cactus and the outer spines.
as you see in the image. ( when coloring the cactus, the spines would be a
light gray, barely seen, ready to stab those daring to touch without studying
the defensive plant first.)

Creation of Flower Drawing Lessons: Step 11

step 12 of 40

Step 12
Next sheet- draw the previous lines, then add your new lines to this page.
Now enter the center spines as seen in the image. ( the kind of cactus we
are drawing is barrel shaped, but there is indentations or gullies between
the rows of spines, the gulllies are all done with shading or coloring.
Something this guide won't be covering. later you will see lines drawn between
the spines, but that is just a guide to where depth shading will be required.)

Creation of Flower Drawing Lessons: Step 12

step 13 of 40

Step 13
Next sheet- draw the previous lines, then add your new lines to this page.
We will be starting our tulip, the petals of most common tulips are a wide
tear drop shape and the petals curl into a globe, connecting it to the next
petal until it forms a circles of sorts. Please draw your first petal, using
the lines on the image as your guide.

Creation of Flower Drawing Lessons: Step 13

step 14 of 40

Step 14
Next sheet- draw the previous lines, then add your new lines to this page.
Finish adding the rest of the petals of the tulip, using the image as your
guide for line placement.

Creation of Flower Drawing Lessons: Step 14

step 15 of 40

Step 15
Next sheet- draw the previous lines, then add your new lines to this page.
Now draw in the stem and the curving leaves, important to remember that the
leaves never join the stem at the same spot, there is always a small distance
between them, as on flower shoots, the leaves are curled around the stem as
they start growing.

Creation of Flower Drawing Lessons: Step 15

step 16 of 40

Step 16
Next sheet- draw the previous lines, then add your new lines to this page.
Starting the daffodil, this flower always reminds me of a small cup and
saucer that is missing the cup handle. Draw the cup part first, then the
opening of the flower at the top, followed by the saucer part at the bottom.
Use image as the guide.

Creation of Flower Drawing Lessons: Step 16

step 17 of 40

Step 17
Next sheet- draw the previous lines, then add your new lines to this page.
Add the stamens and little guide lines for shading, as the saucer part of
the flower tends to gather to the bottom of the cup part in places.

Creation of Flower Drawing Lessons: Step 17

step 18 of 40

Step 18
Next sheet- draw the previous lines, then add your new lines to this page.
Now draw in the stem and leaves, using image as a guide for placement.

Creation of Flower Drawing Lessons: Step 18

step 19 of 40

Step 19
Next sheet- draw the previous lines, then add your new lines to this page.
We will now start the dogwood flower. This flower is real beautiful, the
petals have irregular tips and can be quite beautiful when painted. Please
follow the drawn lines in the images, please pay attention to the shape of
the petals, notice the irregular tips.

Creation of Flower Drawing Lessons: Step 19

step 20 of 40

Step 20
Next sheet- draw the previous lines, then add your new lines to this page.
Now add the center of the flower, please keep the small circles clear, use
image as guide.

Creation of Flower Drawing Lessons: Step 20

step 21 of 40

Step 21
Next sheet- draw the previous lines, then add your new lines to this page.
Now add the lines you see in the image, the lines are a guide for small
indentations in the flower and some shading spots.

Creation of Flower Drawing Lessons: Step 21

step 22 of 40

Step 22
Next sheet- draw the previous lines, then add your new lines to this page.
Draw a small circle and then draw small narrow petals around the circle for
a small daisy like flower, the image will guide you on how it should look.

Creation of Flower Drawing Lessons: Step 22

step 23 of 40

Step 23
Next sheet- draw the previous lines, then add your new lines to this page.
Add a leaf to the daisy like flower, use image as your guide.

Creation of Flower Drawing Lessons: Step 23

step 24 of 40

Step 24
Next sheet- draw the previous lines, then add your new lines to this page.
Draw three stems, make them a little longer and thinner then for the tulip.

Creation of Flower Drawing Lessons: Step 24

step 25 of 40

Step 25
Next sheet- draw the previous lines, then add your new lines to this page.
Now start drawing in small circles in two rows above each stem, the image
will show you how to place them.

Creation of Flower Drawing Lessons: Step 25

step 26 of 40

Step 26
Next sheet- draw the previous lines, then add your new lines to this page.
Now draw in the leaves, make them vary in looks, using the image as a guide.

Creation of Flower Drawing Lessons: Step 26

step 27 of 40

Step 27
Next sheet- draw the previous lines, then add your new lines to this page.
Starting our rose bud, we want to picture how we want it to look in our mind,
allowing us to know where we will need to draw our lines. Use image as your
drawing guide.

Creation of Flower Drawing Lessons: Step 27

step 28 of 40

Step 28
Next sheet- draw the previous lines, then add your new lines to this page.
Now add the the small leaves that enclose the bud, have them spreading out
as they open to allow the bud to start blooming.

Creation of Flower Drawing Lessons: Step 28

step 29 of 40

Step 29
Next sheet- draw the previous lines, then add your new lines to this page.
Add you leaves for the rose bud, using as your drawing guide.

Creation of Flower Drawing Lessons: Step 29

step 30 of 40

Step 30
Next sheet- draw the previous lines, then add your new lines to this page.
We are going to start our Poppy, they have big petals and usually tales a
lot of shading or coloring to make them look realistic, but we are using lines
to let us know where we will shade in some areas or change coloring.

Creation of Flower Drawing Lessons: Step 30

step 31 of 40

Step 31
Next sheet- draw the previous lines, then add your new lines to this page.
Now we add the poppy seeds to the center, their color will vary depending
on how newly bloomed the flower will be.

Creation of Flower Drawing Lessons: Step 31

step 32 of 40

Step 32
Next sheet- draw the previous lines, then add your new lines to this page.
Now draw in the inner guides for shading in the center of the flower, using
the image as your guide.

Creation of Flower Drawing Lessons: Step 32

step 33 of 40

Step 33
Next sheet- draw the previous lines, then add your new lines to this page.
I added small drawings of a sunflower and a poinsetta, try to practice
drawing them.

Creation of Flower Drawing Lessons: Step 33

step 34 of 40

added some shading, the shading is just basic and to give you an idea of the way you can change the look of the flower by shading it with pencil or a variation of color

Creation of Flower Drawing Lessons: Step 34

step 35 of 40

Step 35
To show you how the shading and the adding of color can change the appearance of the flower. Bright red at 75 opacity

Creation of Flower Drawing Lessons: Step 35

step 36 of 40

Step 36
Coloring the stem and leaves of the tulip, I used a very slight variation
of the shade of green for the stem, then went a little darker for the
leaves, The opacity is set at 50%, allowing you to see the hand done
shading

Creation of Flower Drawing Lessons: Step 36

step 37 of 40

Step 37
I chose to make the back petal of the tulip a shade darker then the front and side petals will be. Opacity set at 50%

Creation of Flower Drawing Lessons: Step 37

step 38 of 40

Step 38
Coloring in the side petals, opacity is set to 50%

Creation of Flower Drawing Lessons: Step 38

step 39 of 40

Step 39
Coloring the front petal, opacity is set to 50%

Creation of Flower Drawing Lessons: Step 39

step 40 of 40

Step 40
With a soft white brush, I added highlights to the tulip petals.
I set opacity to 25%

Creation of Flower Drawing Lessons: Step 40

Final result

Creation of Flower Drawing Lessons: Final Result

LOGIN or REGISTER FOR FREE
to rate this guide and create your own guides.