
Original image
step 1 of 15
I selected all types of bread using the quick selection tool.

step 2 of 15
Strated to reconstruct the two characters keeping initial image as reference.
As usual, a lot of warping, resizing, copy/paste, flipping, rotating....
In this step I added head and piggy tails.
1. For head I selected initial face using the pen tool. I put a round bread on top of it. With the head layer selected, I pressed "Ctrl+left click" on the layer in order to get the selection of the head active. Then I moved onto the round bread layer and pressed "ctrl+shift+I" to invert. Finally I pressed "del" to cut the bread in the shape of the head. Once you get the hang of this method...it will prove itself to be very useful.
2. For piggy tails I just copy/paste one long bread and rotated it keping the center always in the same place.

- : source
step 3 of 15
I added girl's dress, collar cuffs and buttons using a lot of warping to get the different types of bread in the right position.
I also added her hands using the "Ctrl+Shift+I+Del" method described in step 2.
Added boy's head using same method.
I also added her hands using the "Ctrl+Shift+I+Del" method described in step 2.
Added boy's head using same method.

- 1: source 1
step 4 of 15
Added girl's hair, legs, arms and little boots.
Also boy's hat.
I will not describe the way I got the element as I think it is pretty self explanatory which type of bread I used for each of them.
Also boy's hat.
I will not describe the way I got the element as I think it is pretty self explanatory which type of bread I used for each of them.

- 2: source 2
step 5 of 15

step 6 of 15
Finished boy.
Added bottom part of the outfit and colorized it, hands using the "Ctrl+Shift+I+Del" method, pants, legs and shooes.
Added bottom part of the outfit and colorized it, hands using the "Ctrl+Shift+I+Del" method, pants, legs and shooes.

- 4: source 4
step 7 of 15
Created the big moon.
Used a round bread. Rotated it, duplicated layer, brought the two layers together, masked them into each other to get a more symetrical round shape.
Merged the two layers, duplicated the new shape layer, changed blending mode to screen, and added outer glow (light yellow) to get a more shiny look.
Used a round bread. Rotated it, duplicated layer, brought the two layers together, masked them into each other to get a more symetrical round shape.
Merged the two layers, duplicated the new shape layer, changed blending mode to screen, and added outer glow (light yellow) to get a more shiny look.

step 8 of 15
I started to create some initial shadows and highlights using a new layer, colored with different tones of grey using a soft brush.
This is how it looked before changing the blending mode.
The reason for which girl's head is not included is because I made it separately and then erased the layer by mistake so...I didn't have it anymore when I started creating my SBS....Sorry!
This is how it looked before changing the blending mode.
The reason for which girl's head is not included is because I made it separately and then erased the layer by mistake so...I didn't have it anymore when I started creating my SBS....Sorry!

step 9 of 15

step 10 of 15
Created the land.

step 11 of 15
Added backround, a gradient adjustment layer on top of it and then land on the botom part.

- 6: source 6
step 12 of 15


step 14 of 15

step 15 of 15
The final result was adjusted so many times that I actually lost all step-by-step information.
But I can write all modifications that you can notice from previous step:
1. I better integrated the ground (stretched it more to fill the whole bottom part of the image)
2. I shifted the shadows.
3. I added more shadows to better match the light source (burn tool).
4. I added couple of gradient adjustment layers for coloring.
5. Added birds.
6. Added high pass filter for high def.
7. Softened edges using blur tool.

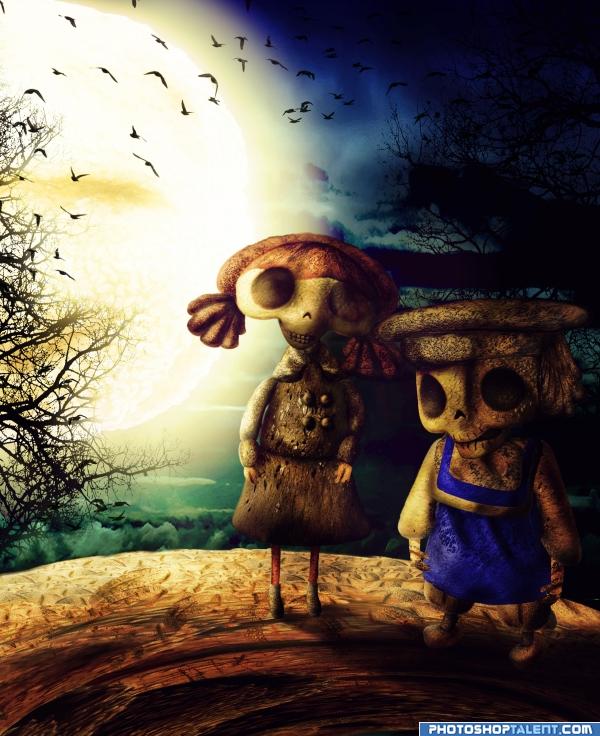
Final result
Pxleyes
Photography and photoshop contests
We are a community of people with
a passion for photography, graphics and art in general.
Every day new photoshop
and photography contests are posted to compete in. We also have one weekly drawing contest
and one weekly 3D contest!
Participation is 100% free!
Just
register and get
started!
Good luck!
Follow us:


© 2015 Pxleyes.com. All rights reserved.