
Original image
step 1 of 21
grey radial gradient, and brush scribbles to get my cave shape

step 2 of 21
first addition of contest source which I cut w/ a pen tool selection. I lowered the opacity when I made the selection so I could see the early cave shape.

step 3 of 21
I smudged the source like crazy, trying to figure out what I wanted to do with it.

step 4 of 21
I smudged the sources more to make the holes.

step 5 of 21
changing colors using hue/photo layer effects. Played with a background gradient.

step 6 of 21
blending and refining shapes with by using the smudge tool.

step 7 of 21
re-introducing the contest source, I had pretty much annihilated the first one by smudging. I did this by making selections of the contest source and layering them until everything was covered, and then I cut out what I didn't need. I also introduced a new 2 color gradient and light direction for the back.

step 8 of 21
now I lowered the opacity of the contest source to be my texture. I then went in to the contest source and made selections of some of the bumps and holes and used placed them in my image and warped them into the shapes that I wanted.

step 9 of 21
blended in the bumps and holes. (erasing smudging etc) also used color adjustments.

step 10 of 21
using basic texture brushes I painted in more bumps, living green gunk etc...

step 11 of 21
painting in high lights, playing with the background (water)
trying to figure out my mood and color scheme.
trying to figure out my mood and color scheme.

step 12 of 21
more background... and LOOK it's another contest source. "glass Sphere" I thought it could be turned into a sort of submarine.
http://www.pxleyes.com/photoshop-contest/4576/glass-sphere.html
http://www.pxleyes.com/photoshop-contest/4576/glass-sphere.html

step 13 of 21
I tweaked the second contest source into the shape I wanted and then I made the hull and the side motor shape with the pen tool (the under water vehicle has two "motors" but the other one you can't see as it's hidden from view.)

step 14 of 21
covering the "hull" with main the contest source and blended together (mostly clone tool)

step 15 of 21
used the pen tool to go along the shapes of the bubble and then filled w/ a gradient.

step 16 of 21
changed the color of the hull

step 17 of 21
painted more for the background.

step 18 of 21
Added a light colored gradient to transparent, and set the layer mode to screen, to create more light.

step 19 of 21
added the fishes and did some shading (paint brushes)

step 20 of 21
More work on the background.
between this and final I did a LOT of shading and detailing, mostly with small brushes. I added highlights, painted the little star fish, made my own bubble brush and painted in all the bubbles, motion streaks etc.
between this and final I did a LOT of shading and detailing, mostly with small brushes. I added highlights, painted the little star fish, made my own bubble brush and painted in all the bubbles, motion streaks etc.

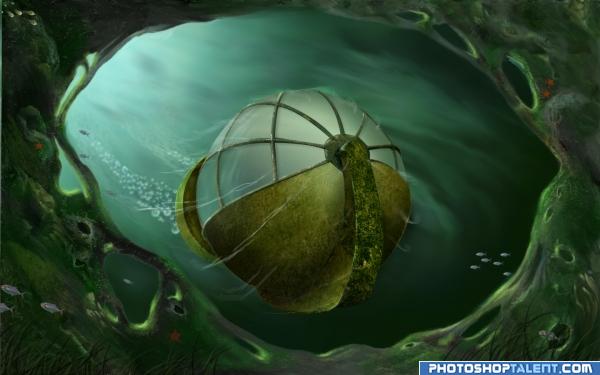
step 21 of 21
bubble brush I made :)

Final result
Comments
Pxleyes
Photography and photoshop contests
We are a community of people with
a passion for photography, graphics and art in general.
Every day new photoshop
and photography contests are posted to compete in. We also have one weekly drawing contest
and one weekly 3D contest!
Participation is 100% free!
Just
register and get
started!
Good luck!
Follow us:


© 2015 Pxleyes.com. All rights reserved.
this will help a lot on my future entries..
(5 years and 3753 days ago)Thanks for sharing. Anna..