
Original image
step 1 of 18
I started this image by creating the skull cups.
This is the first one. Selected with pen tool.
This is the first one. Selected with pen tool.

- : source
step 2 of 18
I put the skull selected from the image in contest on top of the tall cup and warped and resized it to roughly match the shape of the cup.

- 1: source 1
step 3 of 18
I have changed the blending mode of the skull to hard light and masked unwanted areas that were going outside the margins of the cup.
Then I added shadows on the cup and the skull(burn tool).
Then I added shadows on the cup and the skull(burn tool).

- 2: source 2
step 4 of 18
This is my second small tea cup selection (selection made with pen tool).

- 3: source 3
step 5 of 18

step 6 of 18
I copied the previous skull selection (source in contest) and flipped it horizontal. I merged the two skulls together and masked them. I ended up with this shape.

step 7 of 18
I resized and warped the previous skull shape to roughly match the little cup.

- 5: source 5
step 8 of 18
I changed the blending mode of the little cup to hard light, masked edges, added shadows to the cup and the skulls, just like I did on the first tall cup.
I also made the little cup's tail out of skulls put on top of each other and masked.
I also made the little cup's tail out of skulls put on top of each other and masked.

- 6: source 6
step 9 of 18
I applied same methods as described in previous steps for the tea pot.

- 7: source 7
step 10 of 18

step 11 of 18
I started to recreate the red curtains backround.
I needed more of it so I had to cover the skull and knife from the source image.
I did that by selecting different parts of the curtains, overlapping them on the source image and masking them into each other to make smooth transitions.
I needed more of it so I had to cover the skull and knife from the source image.
I did that by selecting different parts of the curtains, overlapping them on the source image and masking them into each other to make smooth transitions.

step 12 of 18
This is the result for the red curtains backround after masking.

step 13 of 18
Now comes the best part. I was looking for something to create a scene. Initially I wanted to just create a close up of the cups and tea pot, but then I've changed my mind and was looking for a table to create sort of a composition.
I found this incredible image on deviantart. You can find many more very very useful images if you visit Shoofly-Stock on deviantart: http://shoofly-stock.deviantart.com/. Believe me...you won't regret it!
I found this incredible image on deviantart. You can find many more very very useful images if you visit Shoofly-Stock on deviantart: http://shoofly-stock.deviantart.com/. Believe me...you won't regret it!

- 11: source 11
step 14 of 18
In this step I replaced the bottom table skulls with the one from our image in contest. I also colored the table to match the entire mood. Changed blending mode of the table to color dodge to make it look like it is very hot, and lowered opacity down a touch.
I also added shadows to the bottom skulls.
I also added shadows to the bottom skulls.

- 12: source 12
step 15 of 18

step 16 of 18
Started to add the flames, using a free fire brush.
The catch with creating these pretty good flames was: every flame has an initial dark orange color, then duplicated layer and changed the blending mode to color dodge. In the end I have raised the contrast and brightness and duplicated this layers a couple of times.
The catch with creating these pretty good flames was: every flame has an initial dark orange color, then duplicated layer and changed the blending mode to color dodge. In the end I have raised the contrast and brightness and duplicated this layers a couple of times.

step 17 of 18

step 18 of 18
I added shadows from left side and light from left side.
Darkened bottom part of the image, added high pass filter for high definition, added gradient fill layer in the left side (from black to transparent) and added vignette and channel mixer adjustment layer.
Darkened bottom part of the image, added high pass filter for high definition, added gradient fill layer in the left side (from black to transparent) and added vignette and channel mixer adjustment layer.

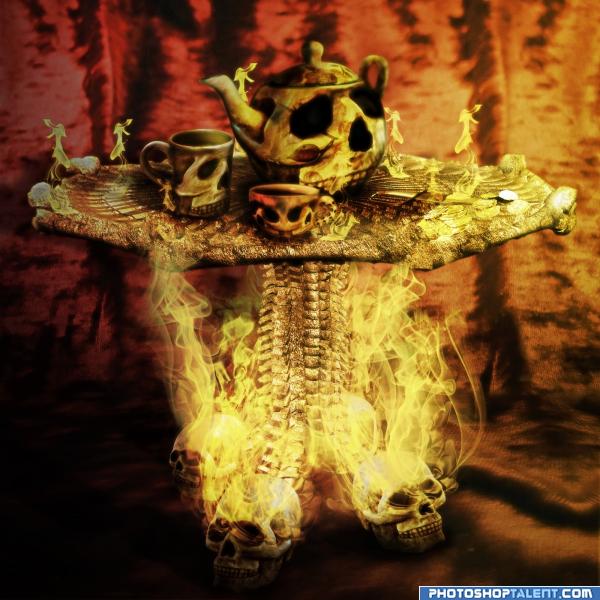
Final result
Pxleyes
Photography and photoshop contests
We are a community of people with
a passion for photography, graphics and art in general.
Every day new photoshop
and photography contests are posted to compete in. We also have one weekly drawing contest
and one weekly 3D contest!
Participation is 100% free!
Just
register and get
started!
Good luck!
Follow us:


© 2015 Pxleyes.com. All rights reserved.