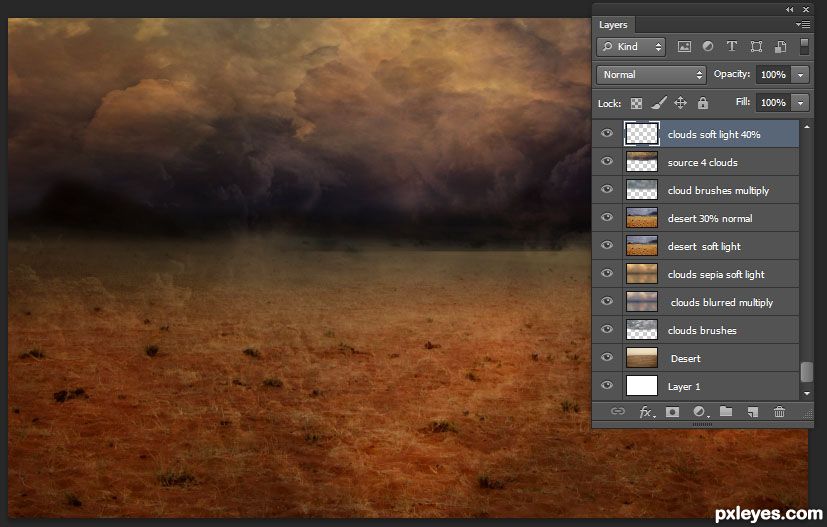
A Work in Progress: Angry Bull Robot


This guide was made for entry:
Angry Bull Robot
In Contest:
steampunk robots etc


step 1 of 8

Make Background
Layer 1... Desert source 2
Layer 2... Cloud brushes painted over sky
Layer 3...Sunset-Beautiful-Afterglow-1368065 source blurred and blended on 50% multiply mode
Layer 4... Duplicate of layer3 changed to sepia and blended on 90% soft light mode.
Layer 5...Desert source 3 blended on 100% soft light mode.
Layer 6...Duplicate of layer 5 blended on 40% normal mode.
Layer 7... more painting on sky with cloud brushes on 50% multiply mode.
Layer 8... Clouds source 4 on 90% overlay mode.
Layer 9... More cloud brushes brushed over ground area on 40% overlay mode.
Merge all background layers and save.

Creation of Angry Bull Robot: Step 1
( hi-res )

step 2 of 8

Cut out bull from bull sculpture source 1.
Make a new layer and trace around areas where the parts will eventually be placed.
Make another new layer. Select bull and flood fill selection with dark brown.
Move the dark brown layer under the light outline.
This makes a base guide for part placements. The guide layers are deleted when all the parts have been placed.

Creation of Angry Bull Robot: Step 2
( hi-res )

step 3 of 8

My own photo of armour to use as a source.

Creation of Angry Bull Robot: Step 3
( hi-res )

step 4 of 8

I marked the pieces which I used from the source for the hooves, the mouth, the ears, the eyelids, and legs. The pieces were cut out and some were flipped and merged and warped to create the various parts. I had to clone some of the original studs over the ones which were warped too much.

Creation of Angry Bull Robot: Step 4
( hi-res )

step 5 of 8

Steam engine source 8 used to make body parts as marked. The pieces were transformed and warped to fit the various areas. The ones on the lower body were duplicated and overlayed on multiply mode to darken those areas.

Creation of Angry Bull Robot: Step 5
( hi-res )

step 6 of 8

Source 6 used for face area and armour source used for ears and eye lids. All parts transformed to fit the areas.

Creation of Angry Bull Robot: Step 6
( hi-res )

step 7 of 8

Pieces from sources 9 and 10 were cut out, transformed, warped, flipped, rotated etc, to make tail, nostrils, the coil on the center of the face, the horns and the wires in the mouth area.

Creation of Angry Bull Robot: Step 7
( hi-res )

step 8 of 8

Source 7 was used to overlay mechanical parts into various areas which I marked.
Source 5 was used for eyes.
Background was made visible.
Shadows and highlights were added to various areas on body.
Bull shadows added to ground.
Dust was painted around feet using powder brushes.
Smoke was painted over nostrils using smoke brushes.
New hoof straps and studs were painted on feet.
Minor adjustments were made on color and contrast.


Creation of Angry Bull Robot: Step 8
( hi-res )

Final result

Creation of Angry Bull Robot: Final Result

LOGIN or REGISTER FOR FREE
to rate this guide and create your own guides.

Votes


uservoted
tinasedits
Score:
10