
Original image
step 1 of 9
Source photo for wedding dress.

step 2 of 9
source photo for texture layer

step 3 of 9
Flower source photo (my own)

step 4 of 9
With magnetic lasso, dress is selected and moved to a new canvas where it is color changed using desaturation tool. Dress is then moved back to original canvas and fit back on the figure. Here the liquify warp tool has been used to reshape bottom of dress.

step 5 of 9
The original dress top is still used, but a different, tiered skirt is used from the source photo of dress on the dress form. This skirt is selected with magnetic tool and moved into canvas with the girl.

step 6 of 9
Two dresses are merged and edges lightly erased to blend.

step 7 of 9
Veil and rose are being drawn in using the brush tool.

step 8 of 9
More work is done on the veil, also brushed in and a texture layer added over the image. Texture layer is reduced in opacity and also areas toward center are erased out. Flowers are chopped out of their source photo and added in layers on each side of the bride.

step 9 of 9
More work is done on the veil, also brushed in and a texture layer added over the image. Texture layer is reduced in opacity and also areas toward center are erased out.

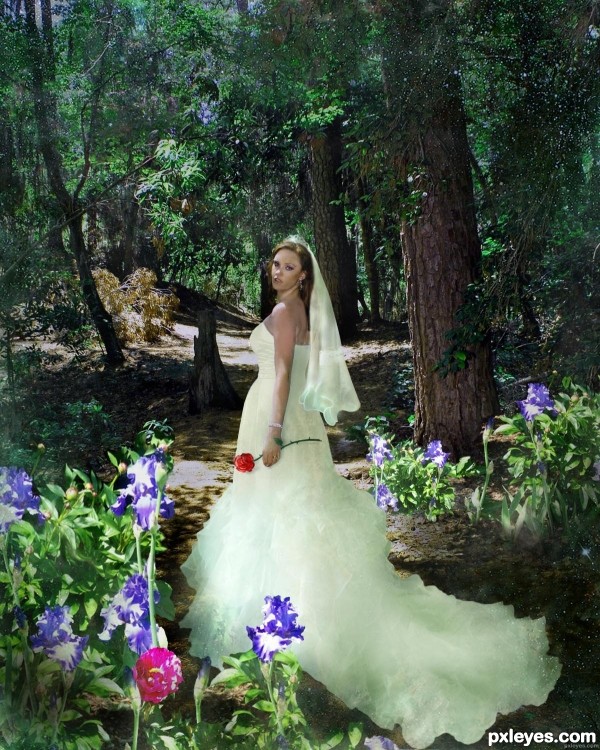
Final result
Pxleyes
Photography and photoshop contests
We are a community of people with
a passion for photography, graphics and art in general.
Every day new photoshop
and photography contests are posted to compete in. We also have one weekly drawing contest
and one weekly 3D contest!
Participation is 100% free!
Just
register and get
started!
Good luck!
Follow us:


© 2015 Pxleyes.com. All rights reserved.