
Original image
step 1 of 6
Download grass, put above the cloud layer. Download castle, put under the grass. Download tree, put above the grass layer. Remove unnecessary till we get the tree shape. Download crack image, put it under the tree layer. Open menu Edit – Transform – Perspective, remove the edge of image. Download graveyard, put above the tree layer, remove unnecessary. Remove the grass that covered the castle layer. Set position like image below.

step 2 of 6
Download cloud, put it on the bottom. Click on cloud, press Adjustment button –Curves…. Set curve to Output:97, Input:122, make it clipping mask. Click on castle, press Adjustment button – Hue/Saturation…, set Saturation:-50. Press Adjustment button – Curves..., set curve to Output:99, Input:156. Click on Crack layer, press Adjustment button – Curves…, set curve to Output:99, Input:163. Press Adjustment button –Hue/Saturation…, set Saturation:-78. Click on grass layer, press Adjustment button – Hue/Saturation…, set Saturation:-55. Click on tree layer, press Adjustment button – Photo Filter…, set color to #915603, Density:84%. Press Adjustment button – Hue/Saturation…, set Saturation:-30. Press Adjustment button – Curves..., set curve to Output:118, Input:161. Click on graveyard layer, press Adjustment button – Curves…, set curve to Output:94, Input:150. Press Adjustment button – Hue/Saturation…, set Saturation:-62. Make a new layer under the castle layer, use Brush Tool with black, set opacity to 10% brush shadow to make the cloud darker. Make a new layer under the tree layer, make shadow behind the tree.

- 5: source 5
step 3 of 6
Put the Ritter image above the graveyard layer, rotate position. Copy (ctrl+J) the image to be Ritter2, Ritter3 and Ritter4. Change the measurement and rotate the image, set position like on image. Download sword image, remove unnecessary and put it above Ritter1 layer under the tree. Remove unnecessary and rotate image. Do the same with sword2, sword3, and sword4. Download the skulls image, remove unnecessary and put it above sword1 layer. Copy the image to be skull2, skull3, and skull4. Set position like on image. Download bones image, remove unnecessary and put above skull1 layer. Copy image, rotate, remove some image and set position like on image. Download shield image and put it above bones2 layer, remove unnecessary.

step 4 of 6
Make new layer under the objects (Ritter, sword, bones, shield) and make shadow each of them.

step 5 of 6
Click on Ritter1. Download stone texture image (http://www.flickr.com/photos/joakimr/3592561529/sizes/z/in/photostream/), put above Ritter1 layer. I tell it here because there’s no space in the sources contest. Make it clipping mask and Blending Mode is Darker Color. Press Adjustment button – Hue/Saturation…, set Saturation:-60. Press Adjustment button – Curves…, set curve to Output:104, Input:150. Click on Ritter2 and do the same with Ritter1. In Curves…, set curve to Output:107, Input:122. Make a new layer and make it clipping mask, make Ritter2 bottom darker. Use the same way for Ritter3 and Ritter4, swords, skulls, and bones. We can rearrange for Hue/Saturation, Curves, and Photo Filter if you need.

- 10: source 10
step 6 of 6
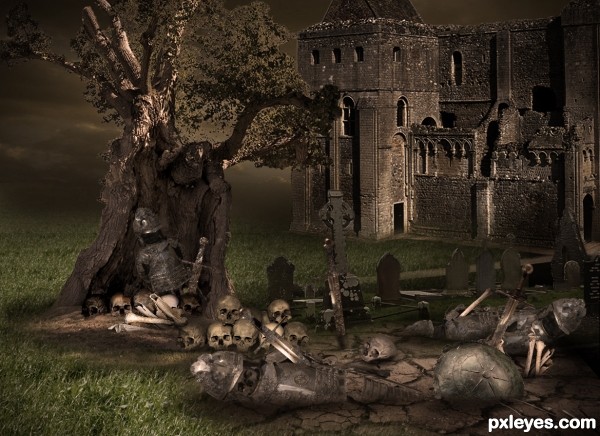
Last, make a new layer on the top, use Paint Bucket Tool and make it black. Make a vector mask and brush the big circle in the center of mask with black. Press Adjustment button – Photo Filter, set color to #f49c02, Density:50%.

Final result
Pxleyes
Photography and photoshop contests
We are a community of people with
a passion for photography, graphics and art in general.
Every day new photoshop
and photography contests are posted to compete in. We also have one weekly drawing contest
and one weekly 3D contest!
Participation is 100% free!
Just
register and get
started!
Good luck!
Follow us:


© 2015 Pxleyes.com. All rights reserved.