A Work in Progress: Mercedes-Benz S68 AMG


This guide was made for entry:
Mercedes-Benz S68 AMG
In Contest:
camera matching


step 1 of 7

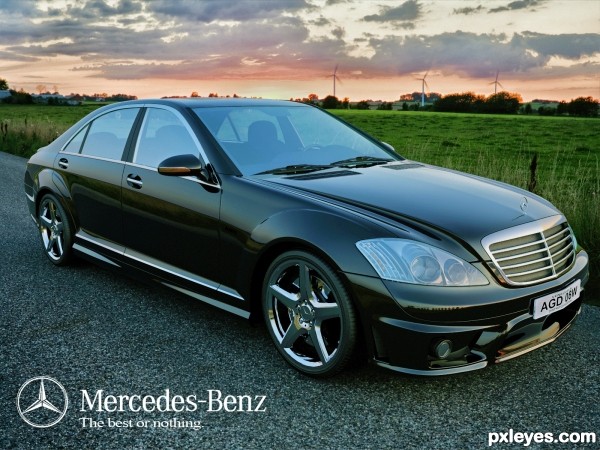
I really wanted to do a car image, so I first had to look for a car. I had a good scout around the internet and finally found a high enough quality car to place in the image. Please see source. As you can see from the screen shot the car was modelled in individual sections and was perfect for placing individual materials on each object.

Creation of Mercedes-Benz S68 AMG: Step 1
sources used for this step:

step 2 of 7

The next step was to create a "fake" road for the car, this road is not seen in the final image as I applied a vray materialwrapper on it and set the alpha contibution to -1.0. This means it would still catch the shadows and render them but not show up itself.

Creation of Mercedes-Benz S68 AMG: Step 2

step 3 of 7

Here I have the one of the backplates as the viewport background so I can align the fake road with the real one. Remember you have to place this image into the environment slot under the "rendering" drop down menu, otherwise it will not show in the render.

Creation of Mercedes-Benz S68 AMG: Step 3

step 4 of 7

Okay so I plopped the car on to the road and aligned everything with the backplate image. Getting the scale of the car was a bit fiddly as I used the old "guesstimate" method. Using the Vray cam I played around with the "Orbit, pan, and truck" options to get the thing looking reasonably aligned.

Creation of Mercedes-Benz S68 AMG: Step 4

step 5 of 7

Here are the vray Cam settings I used for this image, I wanted a fairly moody and brooding image as the S68 is a wolf in sheeps clothing. Being a family sedan, yet having massive horsepower! I set the focal length to the same as the backplate photo. This information is stamped into the details box if you right click on the image.

Creation of Mercedes-Benz S68 AMG: Step 5

step 6 of 7

So everything looks alright? Wrong! The perspective was never going to be right even after spending an hour messing around aligning the car. So to correct this, just right clicked on the vray cam and selected "Apply Cam correction Mod" Click on the guess button a couple of times and it corrects the perspective dependant on your cam settings.

Creation of Mercedes-Benz S68 AMG: Step 6

step 7 of 7

Here are the materials used in the scene (see links for some not created by me)

Okay, a word about this tutorial I found (see links) You may think the image is based around this guys tut. Trust me it's not. His tutorial is FULL of holes. it leaves a lot unexplained, an awful lot. The only thing I took from it was the HDRi links. The rest is my own work.

So now a word about HDRi lighting in this type of scene. You need 3 copies in 3 different material slots. Like so:

1)Illumination - This HDRi will control the whole scene lighting.
2)Environment- This is used to overide Vrays environment (skylight)
3)Reflect/refract- This is usd to override Vrays reflect refraction, so you have perfect reflections of the environment on the car body.

This kind of lighting only produces SOFT shadows, so if you need hard shadows then add a target direct light set to 1.0.

The post processing was done photoshop, I wanted and applied a cross processed look.

Creation of Mercedes-Benz S68 AMG: Step 7

Final result

Creation of Mercedes-Benz S68 AMG: Final Result

LOGIN or REGISTER FOR FREE
to rate this guide and create your own guides.