
Original image
step 1 of 17
Source for starlike effect

step 2 of 17
Raven source photo

step 3 of 17
Scene from girl's back is chopped to be placed on a new canvas. It will be used as the background for the witch, cauldron, etc.

step 4 of 17
Difference cloud filter is used to change background colors even more, with a redder look in behind tree.

step 5 of 17
Girl is chopped and moved into scene.

step 6 of 17
Head is isolated and duplicated then liquify warp used on nose, chin, and hands.

step 7 of 17
Black is brushed over girl's body to create witch's dress. Here the tattoo has been removed, but soon I change my mind and bring it back.

step 8 of 17
Witch has been duplicated, then arm lassoed so that it can be rotated away from body, It will be 'reattached' to replace original witch's body.

step 9 of 17
Now witch hat is brushed in using brush tools.

step 10 of 17
Witch now has been flipped horizontally to create better design. Cauldron added using brush tools at bottom left of image. and bubble pattern layer will be added just on cauldron, then trimmed w eraser tool. Bubbles are blurred w filter/render/blur tool, then soft color brushed over top

step 11 of 17
Caudron has been added here, then bubble pattern layer added to just the caudron, then lowered in opacity and blurred with filter/render/blur tool. Burn and dodge tools add shape to the cauldron.

step 12 of 17
Greenish filter is added over just background layer next, then reduced in opacity. The trees have also had spooky faces and 'hands' formed using smudge and brush tools.

step 13 of 17
Witch's hair added, and tree in background has spooky faces and hands created with brush and smudge tools. Some swirly lines are added with brush tools, which will be softened using very soft eraser tool, leaving just enough to get the feel that magic is coming off the cauldron.

step 14 of 17
Filter in greenish/blue is added over background and bat is drawn in with brush tools, then distorted slightly with liquify/wart tool.

step 15 of 17
This is my photo of a black cat used now.

step 16 of 17
Layers of star nebula are now added, rotating each layer then erasing unwanted areas.

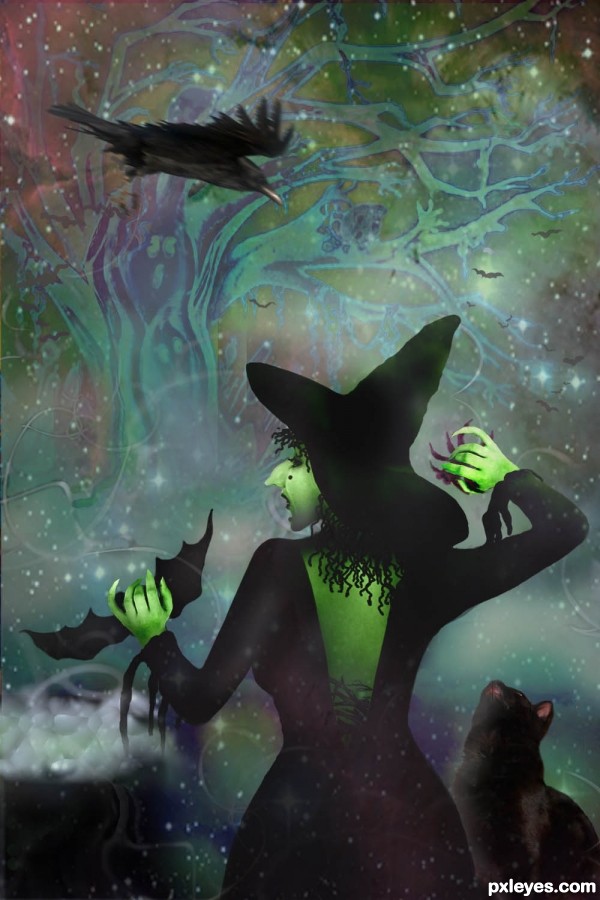
step 17 of 17
Finally, a spider is added to witch's right hand, a raven added above witch, and a cat below. These darker images are placed in a pattern to make viewers eye follow throughout the image.

Final result
Pxleyes
Photography and photoshop contests
We are a community of people with
a passion for photography, graphics and art in general.
Every day new photoshop
and photography contests are posted to compete in. We also have one weekly drawing contest
and one weekly 3D contest!
Participation is 100% free!
Just
register and get
started!
Good luck!
Follow us:


© 2015 Pxleyes.com. All rights reserved.