
Original image
step 1 of 22
this is the dragon toy that I used for the positioning of the body and wings. So far I just enlarged the crap out of it, even though it is not the highest of quality, but when all is said and done you wont actually see any of this image so it wont matter. I also turned it slightly as you can see :)

step 2 of 22
next I went back to the source image and used the patch and clone stamp tool to remove part of the coils, and build up an area of the dust texture.

step 3 of 22
i roughly cut out the dragon with the pen tool, making some slight changes to the shape of the wings and stuff to suit my liking. Then I cut the piece of dust texture out of the source. I will be warping and altering this piece to create the dragons skin.

step 4 of 22
I used the warp tool as well as the regular transform tool to reshape and size the texture from the source to start building the skin on the wings.

step 5 of 22
Continued copying and warping piece to cover the rest of the skin are. I also use the patch and stamp here to keep the patter from looking like it was obviously repeating itself everywhere.

step 6 of 22
next I pen tooled out a piece of the coil with a nice shiny glare on it. I left the untouched piece in the top left so you can see where it started. I warped that piece over and over to make the long spine spike type things of the wings.

step 7 of 22
then I cut out a piece of the fan from between to of the coils on the right side that had an interesting texture and gradient. It was not in the color scheme I was planning, but this is photoshop people so color is not and issue :)

step 8 of 22
After I had the piece warped and shapped to make the skin of the wings I went to Image/adjust/invert. This just flopped the all the colors to the opposite end of the color while and ...bightness wheel? thats not an actual thing, but you know what I mean...I hope..haha...ok moving on.

step 9 of 22
I forgot to mention I also used a fair amount of patching and cloning to keep the wing skin from looking to obviously copied again and again. In the layer styles I added a slight bevel emboss to give them a bit of depth. and I used a hue saturation layer set to colorize and found a nice warming orangy brown hue.

step 10 of 22
next I took a section of the coils fro the source and cut out everything between them. then I warped that piece to make all the little connecting pieces for the wings.

step 11 of 22
then using the pen tool I cut out part of the coil with the glare on it. Using that piece I created horns and spikes. Started to place them here and there. The further into this piece I got the more i felt he needed more spikes :) as you will see they keep popping up.

step 12 of 22
Next I copied and flattened all the piece of the skin texture so they were on one layer. In the layer styles I added a drop shadow, inner shadow, bevel emboss, satin, and gradient overlay. this gave it some highlights and depth and also darkened it a bit. The satin layer style is a great tool if you plan on lighting your subject mostly from behind. It basically adds a shadow over the middle and lets it look like light is wrapping slightly around the edges.

step 13 of 22
in the last step I also began to paint shadows and highlights on a layer set to soft light. Next I just splotched some white behind him to start thinking about where my light was going to be coming from and also separate him from the background a bit. Then I used the pen tool to cover up the mouth with black so I could then add my own teeth.

step 14 of 22
using the same piece as the horns are made out of I made some teeth. Then desaturated them and painted on top with black, this looks a little odd now, but I'll fix it don't worry!

step 15 of 22
here I thought it was time for MORE SPIKES!

step 16 of 22
Then I merged all my dragon pieces (but kept the original un merged layers just in case) and put him onto the background I wanted.

step 17 of 22
I felt the sky was just not quite dynamic enough so I found another cloud source and put it over to set to soft light then erased parts of it so it was just on the sky and not the trees. Also with a plain soft white brush on a layer on top of the dragon I clicked one to create the light that is spilling over his face. this really helps to settle him into the background.

step 18 of 22
then I did a slight gaussian blur on the background to make the dragon look closer and like he is in focus...so basically to create some depth. Then I held the apple button and clicked the dragon layer so selected him (I think its control on a PC but don't hold me to that) On a new layer I filled the shape with black. so for a second I had a silhouette of the dragon. Then I masked away most of it, letting it be brighten near the head and chest where the light is coming from and dulling down the rest.

step 19 of 22
Next I pen tooled out the rock from another source. Then masked away part of the tail and the right foot to make it look like he is stepping up over the rock.

step 20 of 22
Next I made a new layer and alt clicked between this layer and the rock layer below it to create a clipping mask. This made it so I could paint with a large soft black brush and it would go only onto the rock (if you have not tired this, do so, its quite magical!) Then I used a hue saturation adjustment layer set to a nice warm color (hue number 36) and set that layer to soft light and lowered the opacity a bit. Then alt clicked between that layer and the shading layer so once again it only affected the rock.

step 21 of 22
then I duplicated and merged my layer so the dragon was flat with the back ground. then duplicated that flattened layer and used the filter radial blur set to zoom, at an amount of about 70, and placed the center where the light is coming from. ( had to do this severa times to line it up just right and get the desired effect. the nI masked away a bit of that layer in the the middle by the light witha big soft brush. then lowered the overall opacity of the layer. This not only creates a wonder effect of creating streaky shadows that would be cast but it also sort blends everything together and gives it more photorealistic-ness, (well as photorealistic as a dragon might look) in other words its not a sharp and illustrated looking.

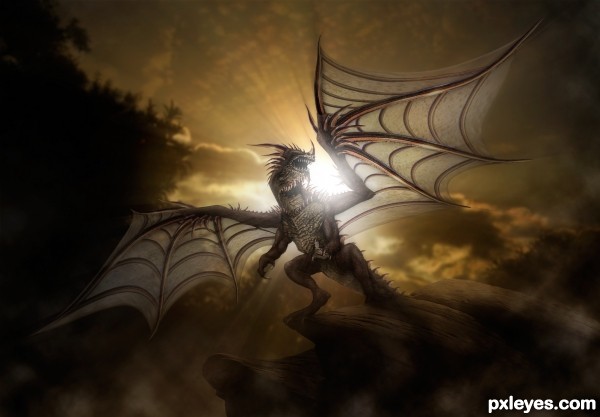
step 22 of 22
Then I used some render clouds to create a foggy cloudiness around the edges. after that just minot touches and it was finally finished!!! I hope this was helpful, let me know if you have a questions of anything! and thanks for read those of you who did :D you rock.

Final result
Comments
Pxleyes
Photography and photoshop contests
We are a community of people with
a passion for photography, graphics and art in general.
Every day new photoshop
and photography contests are posted to compete in. We also have one weekly drawing contest
and one weekly 3D contest!
Participation is 100% free!
Just
register and get
started!
Good luck!
Follow us:


© 2015 Pxleyes.com. All rights reserved.
That is just a beautiful piece of art. Good work, good SBS and good imagination!
(5 years and 3192 days ago)