A Work in Progress: ECOnomy - Working "Greener"


This guide was made for entry:
ECOnomy - Working "Greener"
In Contest:
future buildings


step 1 of 10

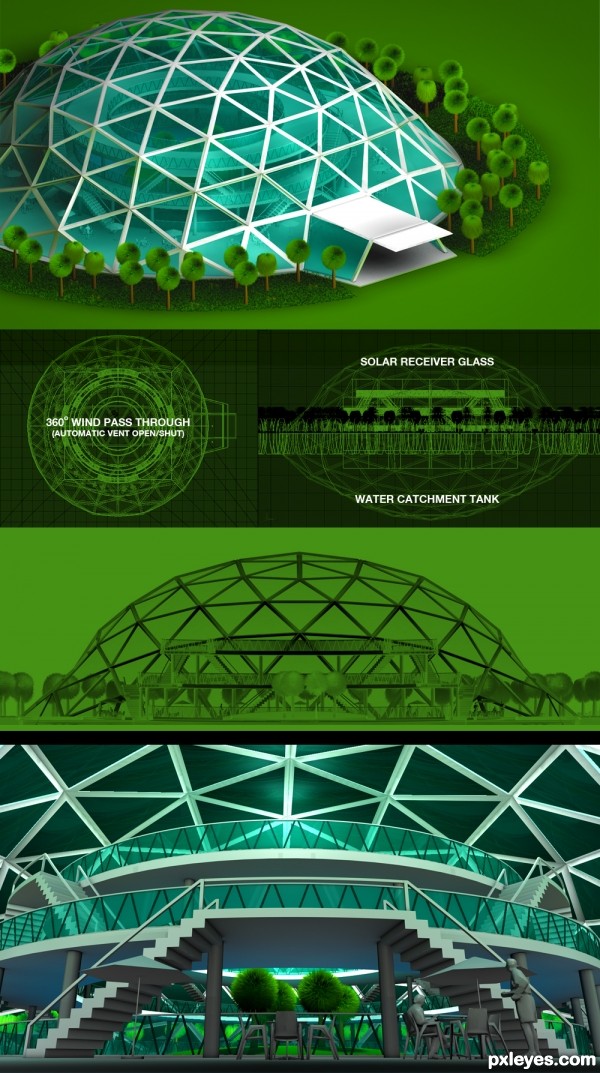
I started with a sphere (yes that entire outer skin is just one sphere) and then took all the surfaces and extruded them so that I could make distinct geometry between the steel and the glass.

I then extruded the little roof for the entrance and then squished the entire thing by 70% so that the dome would not be too high.

Creation of ECOnomy - Working "Greener": Step 1

step 2 of 10

next I created a cube for my building to sit on and then used a Boolean function with another sphere to dig out the hole for the water catchment pond.

Creation of ECOnomy - Working "Greener": Step 2

step 3 of 10

Then went on to add some geometry to the entrance. Using Cinema's symmetry function can save a lot of time and effort when creating things like this that need to be a perfect "mirror".

Creation of ECOnomy - Working "Greener": Step 3

step 4 of 10

Having some fun adding in some floors to my building. I wanted the building to have no walls so I went for these cantilevered floors... using two cylinders and the Boolean function again. (I'm not sure if these would actually be physically possible to build, but let's assume in the future they can be :)

Creation of ECOnomy - Working "Greener": Step 4

step 5 of 10

Adding some geometry to the railing around the edges of the floor plates. This was created with a disc (in C4D) and then extruded and textured parts of it (the glass and steel parts). The zig-zags are geometry and I did them with the help of MoGraph cloner (super tool - you need to learn this asap)

Creation of ECOnomy - Working "Greener": Step 5

step 6 of 10

Added some staircases. I first made a basic staircase, then used the Warp tool (you can adjust it to get the right radius etc) and then the Symmetry tool again to do the stairs going back down on the other side... looks hard but once you know how to use these tools it's really easy to create what looks hard.

Creation of ECOnomy - Working "Greener": Step 6

step 7 of 10

Added the water (a simple disc) and a island with some soil in it. The island concrete is two cylinders again using the Boolean tool, and the ground is a hemisphere scaled down on the Y axis.

Creation of ECOnomy - Working "Greener": Step 7

step 8 of 10

To give a bit more interest to the shape of the building I added a Bulge function to give the building it's flair towards the ground... this was only applied to the outer skin.

Creation of ECOnomy - Working "Greener": Step 8

step 9 of 10

Then I made some trees and plants. I love making the foliage look almost cartoonyfied, as realism is so done nowadays (lol). I made these using C4D's hair tool (by far my favorite tool ever!!

Creation of ECOnomy - Working "Greener": Step 9

step 10 of 10

Then last but not least was setting up the lighting (nothing special in this scene) and turn on the Global Illumination and Ambient Occlusion. These make the renders look more realistic in terms of the shadows and lighting. Without global illumination the shadows would appear very hard. This image is the file rendered straight out of C4D.

Then into Photoshop to compile the images for my entry and adjust some brightness and saturation... other than that nothing else.

Hope you enjoy and feel free to contact me if you have any questions.

:)

Creation of ECOnomy - Working "Greener": Step 10

Final result

Creation of ECOnomy - Working "Greener": Final Result

LOGIN or REGISTER FOR FREE
to rate this guide and create your own guides.