
Original image
step 1 of 20
First thing first, I downloaded the original source image above & drag to my Photoshop.
After that, I began to create Layer Mask & left the elephant separated from its original background.
(!) Note that my default Photoshop background turned into red to make my masking easier.
After that, I began to create Layer Mask & left the elephant separated from its original background.
(!) Note that my default Photoshop background turned into red to make my masking easier.

step 2 of 20
Then I created the new layer (renamed it to Sketch) & began to sketch my initial idea: the forsaken forest.
(!) Note that I used the gray color for the Photoshop background, this has been my behavior whenever I create concept arts.
(!) Note that I used the gray color for the Photoshop background, this has been my behavior whenever I create concept arts.

step 3 of 20
I created new layer, renamed it to Values. With 50% opacity of black & white default Chalk Brush, I began to paint the gradient values.

step 4 of 20
After taking 1 hour or so, I painted all the gray-scale values details.
As you can see. Now the tree, branches, stones & some vines for the environment started to blend each other.
As you can see. Now the tree, branches, stones & some vines for the environment started to blend each other.

step 5 of 20
Now, this is the best stage I reached. The COLOR layer! For many users that seen my SBS, they should already knew what was I talking about in this stage.
The new layer which renamed to Colors actually worked with the layer below when I changed the mode from Normal to Color.
You should try this method, as the professional concept artists & matte painters used to create their marvelous concepts.
The new layer which renamed to Colors actually worked with the layer below when I changed the mode from Normal to Color.
You should try this method, as the professional concept artists & matte painters used to create their marvelous concepts.

step 6 of 20
After done with the color, I created a new layer, renamed it to Shadows. I set the mode to Overlay & create the clipping mask to the Source Image.
(!) By doing this, you should JUST painted the shadows directly to the elephant & the background WILL NOT be affected.
(!) By doing this, you should JUST painted the shadows directly to the elephant & the background WILL NOT be affected.

step 7 of 20
In this step, I created a new layer named Fogs.
With color picker & lower opacity of Soft Round brushes (10-30%), I painted the foggy elements to the elephant in order to receive the same color corrections.
(!) Often I used 100% opacity of Soft Round brush, with Cintiq, it depends on the pen pressure.
With color picker & lower opacity of Soft Round brushes (10-30%), I painted the foggy elements to the elephant in order to receive the same color corrections.
(!) Often I used 100% opacity of Soft Round brush, with Cintiq, it depends on the pen pressure.

step 8 of 20
In this step, I updated the Fogs layer with 100% Soft Round brushes.
Darker some areas, adjust some color pick (green) for the elephant & GOT a nice idea. I found it's GREAT to make this elephant crippled with MOSS!
Thanks to MossyB, her name gave me the initial idea accidentally as well. Lol!
Darker some areas, adjust some color pick (green) for the elephant & GOT a nice idea. I found it's GREAT to make this elephant crippled with MOSS!
Thanks to MossyB, her name gave me the initial idea accidentally as well. Lol!

step 9 of 20
Getting tired to create new custom brushes, I searched my default brush set & found the DRY BRUSH!
It gave me a perfect solution to create a mossy textures over the elephant. BUT with the Scattering turned on in Brush Settings (Press F5).
It gave me a perfect solution to create a mossy textures over the elephant. BUT with the Scattering turned on in Brush Settings (Press F5).

step 10 of 20
So, here's what I mentioned before. The Dry Brush. With Scattering mode of course.
Created a new layer & renamed it to Debris. Don't ask me why'd I name it like that. I just love the name.
Created a new layer & renamed it to Debris. Don't ask me why'd I name it like that. I just love the name.

step 11 of 20
Here's the details when I created the Mossy Textures in the Debris layer.

step 12 of 20
I added a new layer with Rocks as the name.
I painted a new rocks & some of 'em were scattered.
I painted a new rocks & some of 'em were scattered.

step 13 of 20
With Polygonal Tool, I created the Sun Ray effects!
I forgot to name this new layer.
I forgot to name this new layer.

step 14 of 20
With Gradient Tool, I made the yellow color & deselected the marquee with CTRL+D.

step 15 of 20
Changed the mode from Normal to Soft Light!

step 16 of 20
I used the Gaussian Blur filter with this setting.

step 17 of 20
TA~DAA! It'll be like this after the Gaussian Blur filter.
The hard-edge sun-ray dispersed!
The hard-edge sun-ray dispersed!

step 18 of 20
Because I'm such a lazy ass... I clicked the Adjustments Layer > Curves > AUTO.
Nah, it's not my style to automate something, but in this case... pardon my laziness. But the result a little satisfy me, it's good, but not that great shoud I say.
Nah, it's not my style to automate something, but in this case... pardon my laziness. But the result a little satisfy me, it's good, but not that great shoud I say.

step 19 of 20
I edited the Rocks layer to Rocks + Vines.
In this stage, I just added the details to the statue. Made a cracks, a vines over some parts of the statue was a little entertaining to me.
In this stage, I just added the details to the statue. Made a cracks, a vines over some parts of the statue was a little entertaining to me.

step 20 of 20
Final step, added the Photo Filter Adjustments Layer with 30% density.
Quite satisfy with the result!
Well, this is the best part should I say. Since I'm in a great mood to do a new commercial projects soon... I'll leave this Elephantine for everyone.
If you like it, vote it.
Lol. Best Regards, The Ancient Author.
Quite satisfy with the result!
Well, this is the best part should I say. Since I'm in a great mood to do a new commercial projects soon... I'll leave this Elephantine for everyone.
If you like it, vote it.
Lol. Best Regards, The Ancient Author.

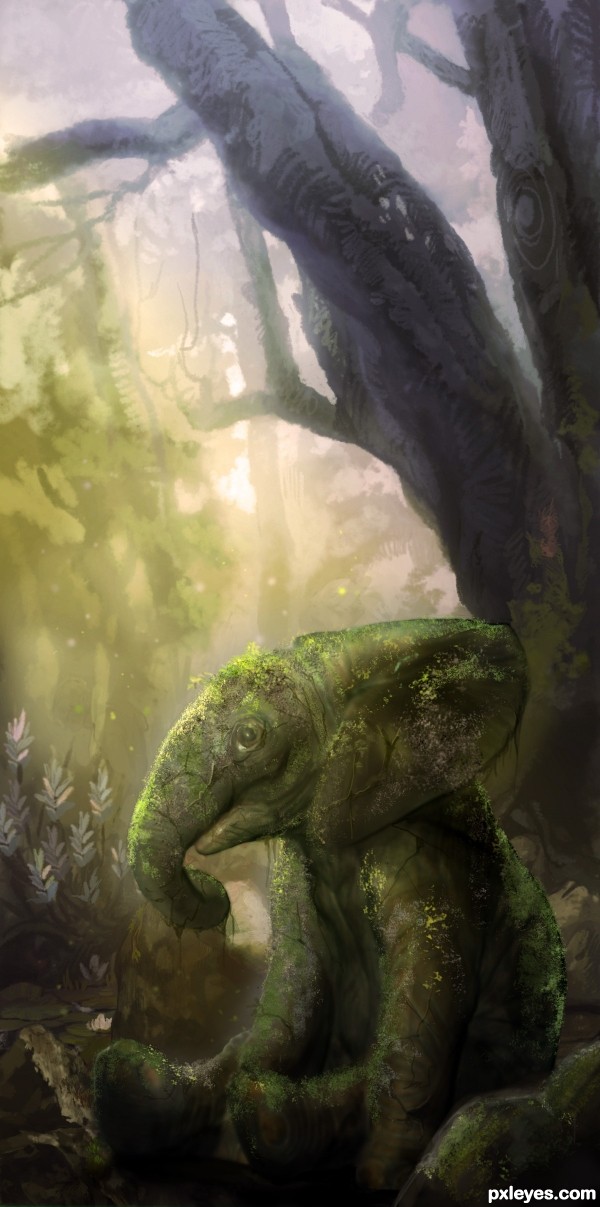
Final result
Comments
Pxleyes
Photography and photoshop contests
We are a community of people with
a passion for photography, graphics and art in general.
Every day new photoshop
and photography contests are posted to compete in. We also have one weekly drawing contest
and one weekly 3D contest!
Participation is 100% free!
Just
register and get
started!
Good luck!
Follow us:


© 2015 Pxleyes.com. All rights reserved.
Now I are a muse! Very nice tutorial for a very nice entry!
(5 years and 3280 days ago)~M
Thank you, MossyB!
(5 years and 3278 days ago)Please, Author, make a tutorial from this very good and detailed sbs. We need it!
(5 years and 3276 days ago)Thank you, CorneliaMladenova... I submitted this making into a tutorial because of your suggestion. Never submitted anything before, hope I'll improve it next time.
(5 years and 3276 days ago)