
Original image
step 1 of 13
started with a sketch.

step 2 of 13
selected areas from the source image and fitted them into the sketch using the transform tool.

step 3 of 13
added some leather strips to the side of the shoe.

step 4 of 13
added the insides of the shoe.

step 5 of 13
added the rest of the body of the shoe.

step 6 of 13
added a sole to the shoe.
using the selected area, i duplicated it and formed it around the base of the shoe.
i later cleaned the shape by erasing the excess and moved it behind the rest of the layers.
using the selected area, i duplicated it and formed it around the base of the shoe.
i later cleaned the shape by erasing the excess and moved it behind the rest of the layers.

step 7 of 13
added details to the body of the shoe.
to give it a more feathery look, i used the smudge tool around the edges. i set the strength to around 60% to 80% and used a brush size of 2px to 4px.
to give it a more feathery look, i used the smudge tool around the edges. i set the strength to around 60% to 80% and used a brush size of 2px to 4px.

step 8 of 13
i added colors to selected areas of the shoe using the Hue/Saturation adjustment layer.
i also started to add some shadows by using a new layer with blending mode set to Multiply and brushed along the edges of the shoe parts using a soft round brush with colors set to grey.
----
added a lining to the inside of the shoe using the same strip of leather used for the sole.
i also started to add some shadows by using a new layer with blending mode set to Multiply and brushed along the edges of the shoe parts using a soft round brush with colors set to grey.
----
added a lining to the inside of the shoe using the same strip of leather used for the sole.

step 9 of 13
made some adjustments to the shoelace area of the shoe using liquify and the transform tool.

step 10 of 13
here are my own photos used for the background.

step 11 of 13
i used this (own photo) as a texture for my background. i set this layer's blending mode to Overlay and adjusted the Curves.

step 12 of 13
added the background and placed a shadow on the base of the shoe.
for the shadow, i used a new layer with blending mode set to Multiply and brushed along the edges using a large soft brush with opacity to set to around 45%. i duplicated the layer several times and erased the too-dark-areas with a soft round brush and opacity set to 80%.
for the shadow, i used a new layer with blending mode set to Multiply and brushed along the edges using a large soft brush with opacity to set to around 45%. i duplicated the layer several times and erased the too-dark-areas with a soft round brush and opacity set to 80%.

step 13 of 13
added a few more details to the background.
---
selected some feathers from the source image and added them to the background.
duplicated the feathers several times and changed their shape using the transform tool.
---
selected some feathers from the source image and added them to the background.
duplicated the feathers several times and changed their shape using the transform tool.

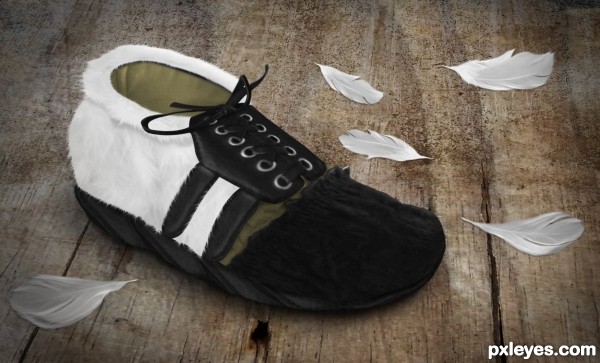
Final result
Pxleyes
Photography and photoshop contests
We are a community of people with
a passion for photography, graphics and art in general.
Every day new photoshop
and photography contests are posted to compete in. We also have one weekly drawing contest
and one weekly 3D contest!
Participation is 100% free!
Just
register and get
started!
Good luck!
Follow us:


© 2015 Pxleyes.com. All rights reserved.