
Original image
step 1 of 25
open the original file in photoshop file-open.
go to image menu and duplicate the original document (photo)
go to image menu and duplicate the original document (photo)

step 2 of 25
use the pen tool and remove the back ground

step 3 of 25
duplicate the layer
then go to image-adjustment-desaturate. and go again to image-posterize
then go to image-adjustment-desaturate. and go again to image-posterize

step 4 of 25
now be prepared for the next step:
make new empty layer layer 1
go to layer 0 copy 2 - this is the posterized layer (pa attention!!! do not forget to turn off the other ones. only turn on the posterised layer).
go to selection menu choose color range and do not forget that you can do it when you are in the posterized layer only. go to empty layer -layer 1 and fill with the selected color.

step 5 of 25
make new layer (transparent layer)
go to the posterized layer and go to select menu choose color range and fill the transparent layer - empty layer with new color. do not fill the posterised layer. fill every layer you create.
go to the posterized layer and go to select menu choose color range and fill the transparent layer - empty layer with new color. do not fill the posterised layer. fill every layer you create.

step 6 of 25
make new transparent layer
you have two options:
Layers>New Layer or left key combination Ctrl+Shift+N or down in the right side click the new Layer button in Photoshop
Go to posterised layer in the layer box then go to select menu choose color range use the eyedropper then go to bucket tool from toolbox with the selected color and fill the empty layer, not the posterised layer.(do the same step which I forgot to mention in the beginning)

step 7 of 25
make new layer from Layers menu>New Layer or use left key combination Ctrl+Shift+N.
Go to Select Menu>Color Range and select the range you wish to make it with different color. Go to swatches ot background color choose the color you wish and with the bucket tool fill the empty layer and the selection will be filled. (Repeat the next following steps till you have andy warhol style. Do not forget to use the color range option from select menu and to use eyedropper tool to choose the differnet range from the carving and fill the empty layer with bucket tool)
Go to Select Menu>Color Range and select the range you wish to make it with different color. Go to swatches ot background color choose the color you wish and with the bucket tool fill the empty layer and the selection will be filled. (Repeat the next following steps till you have andy warhol style. Do not forget to use the color range option from select menu and to use eyedropper tool to choose the differnet range from the carving and fill the empty layer with bucket tool)

step 8 of 25
Make new layer from Layers menu>New Layer or use left key combination Ctrl+Shift+N.
Go to Select Menu>Color Range and select the range you wish to make it with different color. Go to swatches ot background color from the toolbox (or go to Window Menu choose Swatches) choose the color you wish and with the bucket tool fill the empty layer and the selection will be filled. (Repeat the next following steps till you have andy warhol style. Do not forget to use the color range option from select menu and to use eyedropper tool to choose the differnet range from the carving and fill the empty layer with bucket tool)
Go to Select Menu>Color Range and select the range you wish to make it with different color. Go to swatches ot background color from the toolbox (or go to Window Menu choose Swatches) choose the color you wish and with the bucket tool fill the empty layer and the selection will be filled. (Repeat the next following steps till you have andy warhol style. Do not forget to use the color range option from select menu and to use eyedropper tool to choose the differnet range from the carving and fill the empty layer with bucket tool)

step 9 of 25
Make new layer from Layers menu>New Layer or use left key combination Ctrl+Shift+N.
Go to Select Menu>Color Range and select the range you wish to make it with different color. Go to swatches ot background color from the toolbox (or go to Window Menu choose Swatches) choose the color you wish and with the bucket tool fill the empty layer and the selection will be filled. (Repeat the next following steps till you have andy warhol style. Do not forget to use the color range option from select menu and to use eyedropper tool to choose the differnet range from the carving and fill the empty layer with bucket tool)
Go to Select Menu>Color Range and select the range you wish to make it with different color. Go to swatches ot background color from the toolbox (or go to Window Menu choose Swatches) choose the color you wish and with the bucket tool fill the empty layer and the selection will be filled. (Repeat the next following steps till you have andy warhol style. Do not forget to use the color range option from select menu and to use eyedropper tool to choose the differnet range from the carving and fill the empty layer with bucket tool)

step 10 of 25
Make new layer from Layers menu>New Layer or use left key combination Ctrl+Shift+N.
Go to Select Menu>Color Range and select the range you wish to make it with different color. Go to swatches ot background color from the toolbox (or go to Window Menu choose Swatches) choose the color you wish and with the bucket tool fill the empty layer and the selection will be filled. (Repeat the next following steps till you have andy warhol style. Do not forget to use the color range option from select menu and to use eyedropper tool to choose the differnet range from the carving and fill the empty layer with bucket tool)
Go to Select Menu>Color Range and select the range you wish to make it with different color. Go to swatches ot background color from the toolbox (or go to Window Menu choose Swatches) choose the color you wish and with the bucket tool fill the empty layer and the selection will be filled. (Repeat the next following steps till you have andy warhol style. Do not forget to use the color range option from select menu and to use eyedropper tool to choose the differnet range from the carving and fill the empty layer with bucket tool)

step 11 of 25
Make new layer from Layers menu>New Layer or use left key combination Ctrl+Shift+N.
Go to Select Menu>Color Range and select the range you wish to make it with different color. Go to swatches ot background color from the toolbox (or go to Window Menu choose Swatches) choose the color you wish and with the bucket tool fill the empty layer and the selection will be filled. (Repeat the next following steps till you have andy warhol style. Do not forget to use the color range option from select menu and to use eyedropper tool to choose the differnet range from the carving and fill the empty layer with bucket tool)
Go to Select Menu>Color Range and select the range you wish to make it with different color. Go to swatches ot background color from the toolbox (or go to Window Menu choose Swatches) choose the color you wish and with the bucket tool fill the empty layer and the selection will be filled. (Repeat the next following steps till you have andy warhol style. Do not forget to use the color range option from select menu and to use eyedropper tool to choose the differnet range from the carving and fill the empty layer with bucket tool)

step 12 of 25
Make new layer from Layers menu>New Layer or use left key combination Ctrl+Shift+N.
Go to Select Menu>Color Range and select the range you wish to make it with different color. Go to swatches ot background color from the toolbox (or go to Window Menu choose Swatches) choose the color you wish and with the bucket tool fill the empty layer and the selection will be filled. (Repeat the next following steps till you have andy warhol style. Do not forget to use the color range option from select menu and to use eyedropper tool to choose the differnet range from the carving and fill the empty layer with bucket tool)
Go to Select Menu>Color Range and select the range you wish to make it with different color. Go to swatches ot background color from the toolbox (or go to Window Menu choose Swatches) choose the color you wish and with the bucket tool fill the empty layer and the selection will be filled. (Repeat the next following steps till you have andy warhol style. Do not forget to use the color range option from select menu and to use eyedropper tool to choose the differnet range from the carving and fill the empty layer with bucket tool)

step 13 of 25
Make new layer from Layers menu>New Layer or use left key combination Ctrl+Shift+N.
Go to Select Menu>Color Range and select the range you wish to make it with different color. Go to swatches ot background color from the toolbox (or go to Window Menu choose Swatches) choose the color you wish and with the bucket tool fill the empty layer and the selection will be filled.
When you create new layer and fill it with your wished color press left Ctrl+D to diselect the new filled layer, i forget to mention in previous steps. (Repeat the next following steps till you have andy warhol style. Do not forget to use the color range option from select menu and to use eyedropper tool to choose the differnet range from the carving and fill the empty layer with bucket tool)

step 14 of 25
Make new layer from Layers menu>New Layer or use left key combination Ctrl+Shift+N.
Go to Select Menu>Color Range and select the range you wish to make it with different color. Go to swatches ot background color from the toolbox (or go to Window Menu choose Swatches) choose the color you wish and with the bucket tool fill the empty layer and the selection will be filled.
When you create new layer and fill it with your wished color press left Ctrl+D to diselect the new filled layer, i forget to mention in previous steps. (Repeat the next following steps till you have andy warhol style. Do not forget to use the color range option from select menu and to use eyedropper tool to choose the differnet range from the carving and fill the empty layer with bucket tool)
Go to Select Menu>Color Range and select the range you wish to make it with different color. Go to swatches ot background color from the toolbox (or go to Window Menu choose Swatches) choose the color you wish and with the bucket tool fill the empty layer and the selection will be filled.
When you create new layer and fill it with your wished color press left Ctrl+D to diselect the new filled layer, i forget to mention in previous steps. (Repeat the next following steps till you have andy warhol style. Do not forget to use the color range option from select menu and to use eyedropper tool to choose the differnet range from the carving and fill the empty layer with bucket tool)

step 15 of 25
Make new layer from Layers menu>New Layer or use left key combination Ctrl+Shift+N.
Go to Select Menu>Color Range and select the range you wish to make it with different color. Go to swatches ot background color from the toolbox (or go to Window Menu choose Swatches) choose the color you wish and with the bucket tool fill the empty layer and the selection will be filled.
When you create new layer and fill it with your wished color press left Ctrl+D to diselect the new filled layer, i forget to mention in previous steps. (Repeat the next following steps till you have andy warhol style. Do not forget to use the color range option from select menu and to use eyedropper tool to choose the differnet range from the carving and fill the empty layer with bucket tool)
Go to Select Menu>Color Range and select the range you wish to make it with different color. Go to swatches ot background color from the toolbox (or go to Window Menu choose Swatches) choose the color you wish and with the bucket tool fill the empty layer and the selection will be filled.
When you create new layer and fill it with your wished color press left Ctrl+D to diselect the new filled layer, i forget to mention in previous steps. (Repeat the next following steps till you have andy warhol style. Do not forget to use the color range option from select menu and to use eyedropper tool to choose the differnet range from the carving and fill the empty layer with bucket tool)

step 16 of 25
Make new layer from Layers menu>New Layer or use left key combination Ctrl+Shift+N.
Go to Select Menu>Color Range and select the range you wish to make it with different color. Go to swatches ot background color from the toolbox (or go to Window Menu choose Swatches) choose the color you wish and with the bucket tool fill the empty layer and the selection will be filled.
When you create new layer and fill it with your wished color press left Ctrl+D to diselect the new filled layer, i forget to mention in previous steps. (Repeat the next following steps till you have andy warhol style. Do not forget to use the color range option from select menu and to use eyedropper tool to choose the differnet range from the carving and fill the empty layer with bucket tool)
Go to Select Menu>Color Range and select the range you wish to make it with different color. Go to swatches ot background color from the toolbox (or go to Window Menu choose Swatches) choose the color you wish and with the bucket tool fill the empty layer and the selection will be filled.
When you create new layer and fill it with your wished color press left Ctrl+D to diselect the new filled layer, i forget to mention in previous steps. (Repeat the next following steps till you have andy warhol style. Do not forget to use the color range option from select menu and to use eyedropper tool to choose the differnet range from the carving and fill the empty layer with bucket tool)

step 17 of 25
Make new layer from Layers menu>New Layer or use left key combination Ctrl+Shift+N.
Go to Select Menu>Color Range and select the range you wish to make it with different color. Go to swatches ot background color from the toolbox (or go to Window Menu choose Swatches) choose the color you wish and with the bucket tool fill the empty layer and the selection will be filled.
When you create new layer and fill it with your wished color press left Ctrl+D to diselect the new filled layer, i forget to mention in previous steps. (Repeat the next following steps till you have andy warhol style. Do not forget to use the color range option from select menu and to use eyedropper tool to choose the differnet range from the carving and fill the empty layer with bucket tool)
Go to Select Menu>Color Range and select the range you wish to make it with different color. Go to swatches ot background color from the toolbox (or go to Window Menu choose Swatches) choose the color you wish and with the bucket tool fill the empty layer and the selection will be filled.
When you create new layer and fill it with your wished color press left Ctrl+D to diselect the new filled layer, i forget to mention in previous steps. (Repeat the next following steps till you have andy warhol style. Do not forget to use the color range option from select menu and to use eyedropper tool to choose the differnet range from the carving and fill the empty layer with bucket tool)

step 18 of 25
Make new layer from Layers menu>New Layer or use left key combination Ctrl+Shift+N.
Go to Select Menu>Color Range and select the range you wish to make it with different color. Go to swatches ot background color from the toolbox (or go to Window Menu choose Swatches) choose the color you wish and with the bucket tool fill the empty layer and the selection will be filled. Choose the color range from select menu and with eyedroper toll click the heaven (before you go to this layer do the same in previous steps to choose different ranges from the hand, shrinked finegrs clung to the palm and nails for filling every new layer with the color you wish to use)
When you create new layer and fill it with your wished color press left Ctrl+D to diselect the new filled layer, i forget to mention in previous steps. (Repeat the next following steps till you have andy warhol style. Do not forget to use the color range option from select menu and to use eyedropper tool to choose the differnet range from the carving and fill the empty layer with bucket tool)

step 19 of 25
Make new layer from Layers menu>New Layer or use left key combination Ctrl+Shift+N.
Go to Select Menu>Color Range and select the range you wish to make it with different color. Go to swatches ot background color from the toolbox (or go to Window Menu choose Swatches) choose the color you wish and with the bucket tool fill the empty layer and the selection will be filled. Choose the color range from select menu and with eyedroper toll click the heaven change the normal mode to overlay mode or what ever mode you wish to use (before you go to this layer do the same in previous steps to choose different ranges from the hand, shrinked finegrs clung to the palm and nails for filling every new layer with the color you wish to use)
When you create new layer and fill it with your wished color press left Ctrl+D to diselect the new filled layer, i forget to mention in previous steps. (Repeat the next following steps till you have andy warhol style. Do not forget to use the color range option from select menu and to use eyedropper tool to choose the different range from the carving and fill the empty layer with bucket tool)

step 20 of 25
Make new layer from Layers menu>New Layer or use left key combination Ctrl+Shift+N.
Go to Select Menu>Color Range and select the range you wish to make it with different color. Go to swatches ot background color from the toolbox (or go to Window Menu choose Swatches) choose the color you wish and with the bucket tool fill the empty layer and the selection will be filled. Choose the color range from select menu and with eyedroper toll click the heaven (before you go to this layer do the same in previous steps to choose different ranges from the hand, shrinked finegrs clung to the palm and nails for filling every new layer with the color you wish to use)
When you create new layer and fill it with your wished color press left Ctrl+D to diselect the new filled layer, i forget to mention in previous steps. (Repeat the next following steps till you have andy warhol style. Do not forget to use the color range option from select menu and to use eyedropper tool to choose the different range from the carving and fill the empty layer with bucket tool)

step 21 of 25
Make new layer from Layers menu>New Layer or use left key combination Ctrl+Shift+N.
Go to Select Menu>Color Range and select the range you wish to make it with different color. Go to swatches ot background color from the toolbox (or go to Window Menu choose Swatches) choose the color you wish and with the bucket tool fill the empty layer and the selection will be filled. Choose the color range from select menu and with eyedroper toll click the heaven (before you go to this layer do the same in previous steps to choose different ranges from the hand, shrinked finegrs clung to the palm and nails for filling every new layer with the color you wish to use)
When you create new layer and fill it with your wished color press left Ctrl+D to diselect the new filled layer, i forget to mention in previous steps. (Repeat the next following steps till you have andy warhol style. Do not forget to use the color range option from select menu and to use eyedropper tool to choose the different range from the carving and fill the empty layer with bucket tool)
Go to Select Menu>Color Range and select the range you wish to make it with different color. Go to swatches ot background color from the toolbox (or go to Window Menu choose Swatches) choose the color you wish and with the bucket tool fill the empty layer and the selection will be filled. Choose the color range from select menu and with eyedroper toll click the heaven (before you go to this layer do the same in previous steps to choose different ranges from the hand, shrinked finegrs clung to the palm and nails for filling every new layer with the color you wish to use)
When you create new layer and fill it with your wished color press left Ctrl+D to diselect the new filled layer, i forget to mention in previous steps. (Repeat the next following steps till you have andy warhol style. Do not forget to use the color range option from select menu and to use eyedropper tool to choose the different range from the carving and fill the empty layer with bucket tool)

step 22 of 25
Make new layer from Layers menu>New Layer or use left key combination Ctrl+Shift+N.
Go to Select Menu>Color Range and select the range you wish to make it with different color. Go to swatches ot background color from the toolbox (or go to Window Menu choose Swatches) choose the color you wish and with the bucket tool fill the empty layer and the selection will be filled. Choose the color range from select menu and with eyedroper toll click the heaven change the normal mode to overlay mode or screen mode, use different color modes from layers menu.(before you go to this layer do the same in previous steps to choose different ranges from the hand, shrinked finegrs clung to the palm and nails for filling every new layer with the color you wish to use)
When you create new layer and fill it with your wished color press left Ctrl+D to diselect the new filled layer, i forget to mention in previous steps. (Repeat the next following steps till you have andy warhol style. Do not forget to use the color range option from select menu and to use eyedropper tool to choose the different range from the carving and fill the empty layer with bucket tool)

step 23 of 25
Make new layer from Layers menu>New Layer or use left key combination Ctrl+Shift+N.
Go to Select Menu>Color Range and select the range you wish to make it with different color. Go to swatches ot background color from the toolbox (or go to Window Menu choose Swatches) choose the color you wish and with the bucket tool fill the empty layer and the selection will be filled. Choose the color range from select menu and with eyedroper toll click the heaven (before you go to this layer do the same in previous steps to choose different ranges from the hand, shrinked finegrs clung to the palm and nails for filling every new layer with the color you wish to use)
When you create new layer and fill it with your wished color press left Ctrl+D to diselect the new filled layer, i forget to mention in previous steps. (Repeat the next following steps till you have andy warhol style. Do not forget to use the color range option from select menu and to use eyedropper tool to choose the different range from the carving and fill the empty layer with bucket tool)

step 24 of 25
Make new layer from Layers menu>New Layer or use left key combination Ctrl+Shift+N.
Go to Select Menu>Color Range and select the range you wish to make it with different color. Go to swatches ot background color from the toolbox (or go to Window Menu choose Swatches) choose the color you wish and with the bucket tool fill the empty layer and the selection will be filled. Choose the color range from select menu and with eyedroper toll click the heaven (before you go to this layer do the same in previous steps to choose different ranges from the hand, shrinked finegrs clung to the palm and nails for filling every new layer with the color you wish to use)
When you create new layer and fill it with your wished color press left Ctrl+D to diselect the new filled layer, i forget to mention in previous steps. (Repeat the next following steps till you have andy warhol style. Do not forget to use the color range option from select menu and to use eyedropper tool to choose the different range from the carving and fill the empty layer with bucket tool)
Go to Select Menu>Color Range and select the range you wish to make it with different color. Go to swatches ot background color from the toolbox (or go to Window Menu choose Swatches) choose the color you wish and with the bucket tool fill the empty layer and the selection will be filled. Choose the color range from select menu and with eyedroper toll click the heaven (before you go to this layer do the same in previous steps to choose different ranges from the hand, shrinked finegrs clung to the palm and nails for filling every new layer with the color you wish to use)
When you create new layer and fill it with your wished color press left Ctrl+D to diselect the new filled layer, i forget to mention in previous steps. (Repeat the next following steps till you have andy warhol style. Do not forget to use the color range option from select menu and to use eyedropper tool to choose the different range from the carving and fill the empty layer with bucket tool)

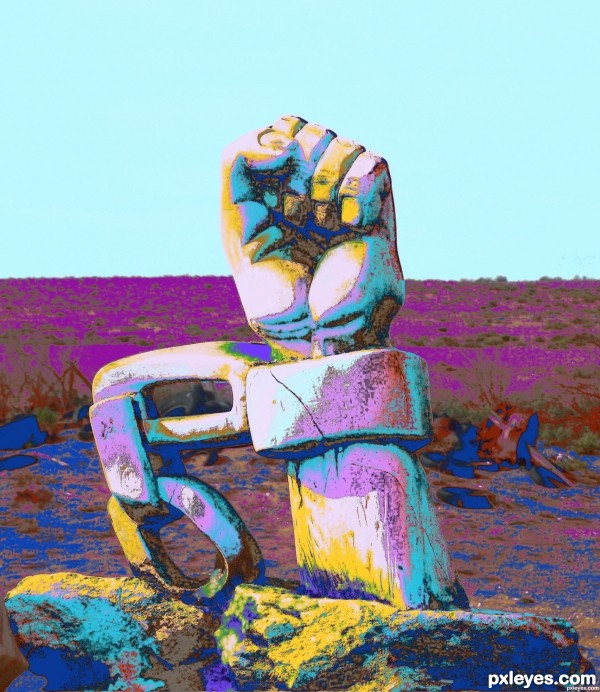
step 25 of 25
for the final image you may duplicate again the posterised layer and change the normal mode to color dodge and this is the final image. for details look at youtube photoshop andy warhol style
http://www.youtube.com/watch?v=8iloxkAG1OI
I did not used alpha channels.
http://www.youtube.com/watch?v=8iloxkAG1OI
I did not used alpha channels.

Final result
Comments
Pxleyes
Photography and photoshop contests
We are a community of people with
a passion for photography, graphics and art in general.
Every day new photoshop
and photography contests are posted to compete in. We also have one weekly drawing contest
and one weekly 3D contest!
Participation is 100% free!
Just
register and get
started!
Good luck!
Follow us:


© 2015 Pxleyes.com. All rights reserved.
this is a hell of a tutorial... but does the result worth it? good luck
(5 years and 3314 days ago)