
Original image
step 1 of 15
Town to replace mountains

step 2 of 15
children

step 3 of 15
clear cut the children

step 4 of 15
car

step 5 of 15
clear cut the car

step 6 of 15
I masked off the Mountains, some fine tuning was done later.

step 7 of 15
I inserted the town, on a layer below the supplied image. I have enhanced the colour of the sky and blurred it a little.

step 8 of 15
Added the children on a new layer at the top.

step 9 of 15
I added a shadow for the children below the previous layer. I did this by selecting the children, on a new layer I filled the outline with 50% grey set it to multiply, pulled it into shape and added some gaussian blur.

step 10 of 15
I used a gradient to create the rainbow

step 11 of 15
I deleted most of the gradient.

step 12 of 15
I bent it into shape using free transform and warp

step 13 of 15
Put the rainbow where I wanted it, reduced the size, blurred it and lowered the opacity.

step 14 of 15
I added the car, flipped it horizontal to mach the light direction, lightened the shadow, I had copied the number plate before I flipped the car, now added that in place.

step 15 of 15
some little tidy ups.

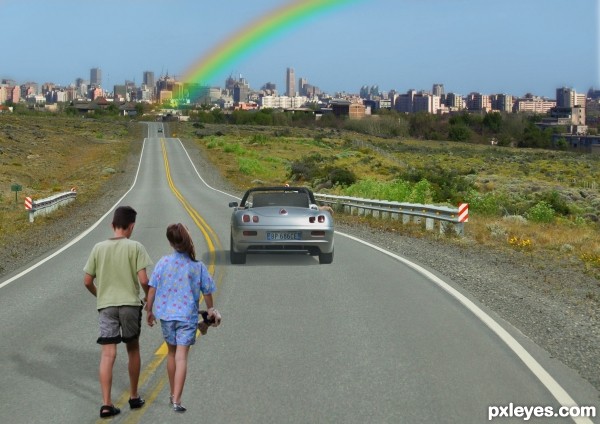
Final result
Pxleyes
Photography and photoshop contests
We are a community of people with
a passion for photography, graphics and art in general.
Every day new photoshop
and photography contests are posted to compete in. We also have one weekly drawing contest
and one weekly 3D contest!
Participation is 100% free!
Just
register and get
started!
Good luck!
Follow us:


© 2015 Pxleyes.com. All rights reserved.