
Original image
step 1 of 14
I cut out the Frog with the pen tool.

step 2 of 14
Increased the Canvas size.

step 3 of 14
I was going to make him sit on a Mushroom using only the source but later changed my mind.

step 4 of 14
So I brought in a Keyboard instead thanks to am-y at SXC.hu

step 5 of 14
Here I started working on the Perspective. Transform/Perspective

step 6 of 14
I'm happy with the perspective at this point. I got rid of any reamining Mushroom parts.

step 7 of 14
I Purchased a Tophat phot from istockphoto.com. I considered painting one but thought it might look too cartoony for this particular piece.

step 8 of 14
Bring in the Tophat.
I added Stars in the background. These stars can be made from any of the tutorials that are available on the web. I think I made this one from one Ponti did a while back.
I added Stars in the background. These stars can be made from any of the tutorials that are available on the web. I think I made this one from one Ponti did a while back.

step 9 of 14
Make a copy of your image and add a layer underneath the current copy. Edit/fill the underlying layer with Black then go to the topmost layer and select the bottom lip with the pen tool.
Use the Puppet warp (Only in CS5) and gently bring the bottom lip down
Use the Puppet warp (Only in CS5) and gently bring the bottom lip down

step 10 of 14
Begin painting in the tongue with the brush tool.
I used a medium Pink and then darkened and lightened the brush strokes as needed. Highlights on the tongue are important and are added later as you will see.
I used a medium Pink and then darkened and lightened the brush strokes as needed. Highlights on the tongue are important and are added later as you will see.

step 11 of 14
More work on the tongue and added a foggy glow to the horizon using a big soft white brush and some blur.

step 12 of 14
Added shadows around various places as needed. Guassian blur, add a layer, erase, start over, you know how it goes.

step 13 of 14
Here I popped the eyes out a little with the liquify/bloat tool a little. This is located in the filter menu. I painted in some highlights with a small brush and white paint and also a little amber to stay with the image colors.

step 14 of 14
I added your basic moon by using the eliptical tool holding down the shift key to make a circle, filled it with black, and selected the inverse and painted around it with white using a soft white brush and adjusting the opacity as needed. Paint in some gray for craters on the moon and blur..I sharpened the focal point of hte Frog and added somewhat of a vignette around the edges with a large soft black brush and reduced opacity until it looked cool. Thanks for listening!

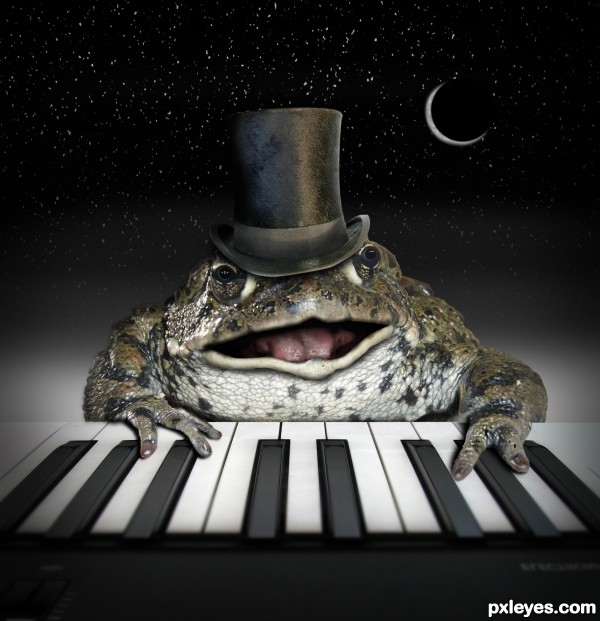
Final result
Comments
Pxleyes
Photography and photoshop contests
We are a community of people with
a passion for photography, graphics and art in general.
Every day new photoshop
and photography contests are posted to compete in. We also have one weekly drawing contest
and one weekly 3D contest!
Participation is 100% free!
Just
register and get
started!
Good luck!
Follow us:


© 2015 Pxleyes.com. All rights reserved.
Great work! Very easy to follow.
(5 years and 3420 days ago)