
Original image
step 1 of 10
i used the original image for the background.. i just removed the sign using the clone stamp tool..

- : source
step 2 of 10
i make two new blank layer.. i use the radial gradient with black and white color, i started from the bottom left part to fill it with the gradient.. on the other layer, i made rectangles using marquee tool and fill it with black colors, gaussian blur and set the radius to about 30 pixels, then i use the polar coordinates and difference clouds to make the cloud effects.. i merged the two layer and set the layer's blending mode to overlay..

step 3 of 10
i make another blank layer and paint random parts of it with brush tool... i use the color black.. this will be the additional clouds.. almost like the previous step.. i apply gausian blur, then filter clouds, and change the layer blending mode to screen

step 4 of 10
upon completing the first 3 steps.. i have this...

step 5 of 10
now i make a new blank layer, use the elliptical marquee tool to make the planet, hold down the shift button while making the selection so you will have a perfect circle. i make different layers with different effects so in there as you can see in the image.. i use linear gradient with red and orange color and give it inner glow.... the black and white radial gradient's layer blending mode is overlay.. using the brush tool and smudge tool to make some effects and also gaussian blurs, i use brush tool again with color black, apply gaussian blur and difference clouds on the layer and setting the blending mode to screen to make the cloud effects

step 6 of 10
this is what i get by merging all the layer in the previous step

step 7 of 10
same procedures go to the other planets.. but the colors and and adjustments vary a bit... for the sign board.. i use the source image.. i cut it... adjust brightness and contrast, rotate, make a selection and new layer and fill it with black and white radial gradient and set the blending to screen, adjust brightness again..

step 8 of 10
the another sign there... i use gradient for the triangle... use eraser to uneven the edges and smudge tool to finalize

step 9 of 10
i apply drop shadows to the planets after arranging them and merging them... (which end up being a big problem to me because i cant make this SBS precise because i merged them)
after i put them all together and applying shadow to the planets.. i make a new blank layer and use a radial gradient with black and white color... filing the whole layer and setting the blend mode to overlay...
after i put them all together and applying shadow to the planets.. i make a new blank layer and use a radial gradient with black and white color... filing the whole layer and setting the blend mode to overlay...

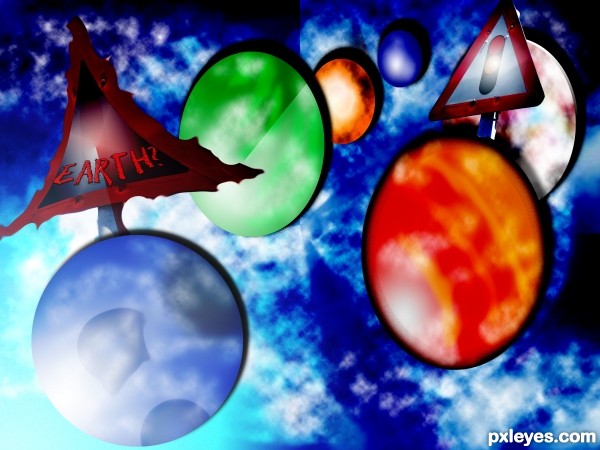
step 10 of 10
after setting the layer's blend mode to overlay... this will create a light effect... i apologize if this SBS doesn't match my entry because i made this SBS after my entry is published and the worst part is i always use merge layers to group my work.. so i just apply the methods i used in my original work... because i did not expect that i will stil be asked for a detailed SBS by moderators... now i learned my lessons...

Final result
Pxleyes
Photography and photoshop contests
We are a community of people with
a passion for photography, graphics and art in general.
Every day new photoshop
and photography contests are posted to compete in. We also have one weekly drawing contest
and one weekly 3D contest!
Participation is 100% free!
Just
register and get
started!
Good luck!
Follow us:


© 2015 Pxleyes.com. All rights reserved.