
Original image
step 1 of 17
First take the bus out of background using any tool you like, I also took out the window, because I want to add a "driver" later on for visibility and safety issues ;-)
The bus is to bright for what I want it to be, so I added two adjustment layers, one Brightness/Contrast, lowered the brightness and increased the contrast, and one Hue/Saturation layer to take out the blues, therefor I selected the BLUES and lowered the saturation and lightness on that until I was happy with the look.
The bus is to bright for what I want it to be, so I added two adjustment layers, one Brightness/Contrast, lowered the brightness and increased the contrast, and one Hue/Saturation layer to take out the blues, therefor I selected the BLUES and lowered the saturation and lightness on that until I was happy with the look.

step 2 of 17
Because we only have a front of a bus, I wanted it to look like a bus and found a stock photo of a bus interior. Transform and distort the image until it has a nice fit.
Because I want the background to show through the windows of the interior of the bus, I also masked out the windows.
I also added some sort of driver area/dashboard and painted that in with a soft brush and lowered the opacity. This gives the interior of the bus some depth.
Because I want the background to show through the windows of the interior of the bus, I also masked out the windows.
I also added some sort of driver area/dashboard and painted that in with a soft brush and lowered the opacity. This gives the interior of the bus some depth.

- : source
step 3 of 17
With the use of the elliptical marquee tool I painted the steering wheel, stroke with white and applied layer effects to it to make it look like a steering wheel. Some inner shadow, bevel and emboss to add some texture and a color overlay.
It looks a bit dark, but that will turn out just fine once we added the "driver"
It looks a bit dark, but that will turn out just fine once we added the "driver"

step 4 of 17
Used the rectangular marquee tool to add a bus sign to the blue bus. Also used layer effects, bevel and emboss, pattern overlay and stroke to finish the sign.

step 5 of 17
This bus is going nowhere, so It would be nice to know that, so lets apply some text to the sign. I used the type "Synchro LET" for this job, It has the best feel for this particular project.

step 6 of 17
What is bus without a driver, for this I used a ghost brush (see source) and warped the image until it looked good.

- 1: source 1
step 7 of 17
I turned the bus into a smart object and placed it my background picture.

- 2: source 2
step 8 of 17
With a soft brush I added a big shadow in front of the bus.

step 9 of 17
And then.... there was light.. With a soft brush, I added some white to the headlights and the top lights of the bus.
I applied outer glow to both layers, with an orange color set to screen, and the size at 250 px..
I applied outer glow to both layers, with an orange color set to screen, and the size at 250 px..

step 10 of 17
I wanted some light beams in front of the bus coming from the headlights. I painted some stripes with a soft brush, applied a gaussian blur and outer glow.

step 11 of 17
I thought rain would be a good idea, and I made that in 3 stages. On a new layer I rendered clouds, add noise and motion blur. Lowered opacity to around 20%.
On this layer I also masked out parts of the window for the windscreen wipers, to it looks like they are actually working ;-)
On this layer I also masked out parts of the window for the windscreen wipers, to it looks like they are actually working ;-)

step 12 of 17
For this part I made a rain drop brush. (Easy! just a dot and apply wind filter (stylize) to it a couple of times. In the brush presets you can change the scatter and scale to make it look like you want. )
I made one smaller "background" rain layer
I made one smaller "background" rain layer

step 13 of 17
Now for the foreground rain, the same brush, only bigger.

step 14 of 17
I thought one lonely passenger would be nice, so I placed one in the back of the bus, lowered opacity and applied some inner shadow to the lonely girl.

step 15 of 17
I wanted the sign to pop a just a bit more, I used a orange color and painted over the sign and applied a slight outer glow to it.

step 16 of 17
I wanted to give the whole image a bit of a foggy feel, so on a new layer rendered clouds and on a layer mask applied a black to white gradient.
By this time the image was finished, but descided there was still something missing. See step 17. I am not sure though if this image needs step 17. But I will let you descide, so lets see step 17.
By this time the image was finished, but descided there was still something missing. See step 17. I am not sure though if this image needs step 17. But I will let you descide, so lets see step 17.

step 17 of 17
Because I thought there was still something missing I added a "force field" to the image, to give it a more spooky feel.
I duplicated the background layer and with a elliptical marquee tool selected a circle. I applied a Radial Blur in the circle.
On a layer mask blended in the blurred part and lowered the opacity.
I duplicated the background layer and with a elliptical marquee tool selected a circle. I applied a Radial Blur in the circle.
On a layer mask blended in the blurred part and lowered the opacity.

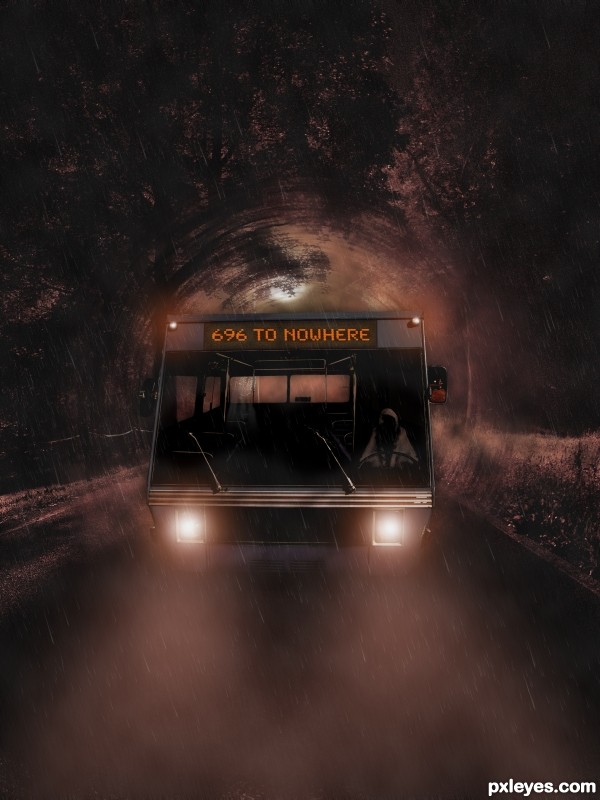
Final result
Comments
Pxleyes
Photography and photoshop contests
We are a community of people with
a passion for photography, graphics and art in general.
Every day new photoshop
and photography contests are posted to compete in. We also have one weekly drawing contest
and one weekly 3D contest!
Participation is 100% free!
Just
register and get
started!
Good luck!
Follow us:


© 2015 Pxleyes.com. All rights reserved.
I think the radial blur effect adds more of a surreal feel. Like it!!!
(5 years and 3453 days ago)