
Original image
step 1 of 9
For background, a colorful gradient layer is reshaped using the polar coordinate tool (rectangle to pol coord), then the result is stretched with scale tool onto a new canvas 10 x 20

step 2 of 9
Original hydrant source photo was liquifiy warped, then color changed for background. I zoomed in on a small portion of the warped result, then placed chopped hydrant over the background, merged layers, then used zigzag tool to distort the whole thing. (Filter/distort/zigzag)

step 3 of 9
To begin with, I just planned to use this one zigzag design with many color changes and also other filters such as textures, noise, etc. . That is what you see here, but other designs came along later.

step 4 of 9
This is one of the new variations I settled on. It has a gradient layer under a solid layer for background, then with a grid over the whole thing, circles are made using eraser tool at intersections of grid to make even rows. This design will be changed with hue/saturation tool into several color variations, and some will also be reversed with edit/transform/flip horiz tool

step 5 of 9
Another background is created with gradient layer with solid color over it, then eraser tool removes solid color to reveal the design of gradient colors.

step 6 of 9
Here is a variation of the circle erasure design, with color changes made w hue/saturation tool Hydrant has additional artistic tools used on it.

step 7 of 9
At this point, I decided to lengthen the canvas to 10 x 25 and add more variations.

step 8 of 9
Now the 12 designs are in place with attention to even placement of colors and designs to balance out the whole piece, and to keep the eye moving through it.

step 9 of 9
Here a star is drawn with brush tools, scaled to different sizes, and added. Several at the top have 'tails' added with smudge tool.
Last of all, the grid was added again to check that all the pieces are still in good alignment. Canvas is then sized down for uploading.
Last of all, the grid was added again to check that all the pieces are still in good alignment. Canvas is then sized down for uploading.

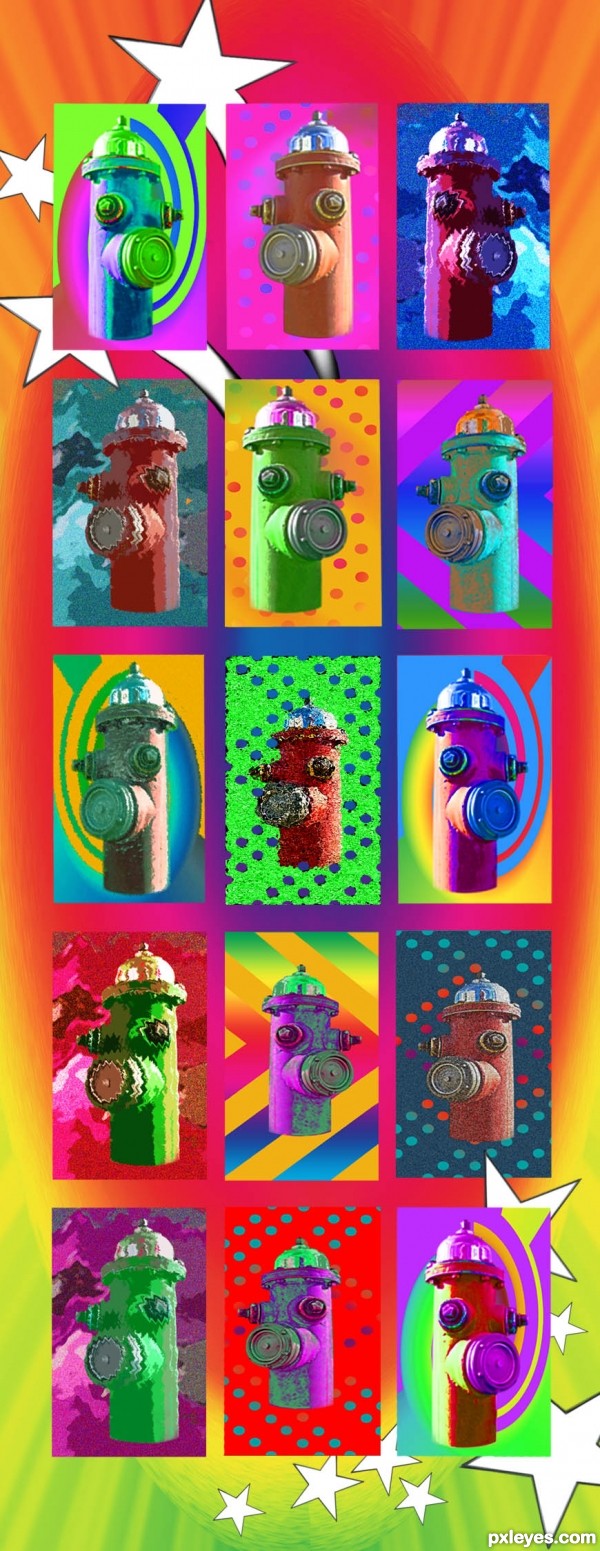
Final result
Pxleyes
Photography and photoshop contests
We are a community of people with
a passion for photography, graphics and art in general.
Every day new photoshop
and photography contests are posted to compete in. We also have one weekly drawing contest
and one weekly 3D contest!
Participation is 100% free!
Just
register and get
started!
Good luck!
Follow us:


© 2015 Pxleyes.com. All rights reserved.