
Original image
step 1 of 11
Parts are extracted here using lasso tool and will be turned into iris petals.

step 2 of 11
Petal parts have now been shaped using the liquify warp tool.

step 3 of 11
By rotating the petals and using edit tool (scale, distort,and flip) 3 different variations of an iris have been developed. Each will have petals merged so they can be used after duplicating.

step 4 of 11
Vase is started from a section of the source, The part selected is duplicated, flipped and joined together. Extra outside lines will be erased away.

step 5 of 11
Background has been started with linework from source. Two layers which are offset from each other will be used. A gradient layer will be placed over it later. The vase was elongated, but later will be cut back to shorter version to give more space for the arrangement.

step 6 of 11
Here the gradient layer is added over the line work. It is reduced in opacity to allow the line work to show through. A darker area is brushed in at bottom to represent the table.

step 7 of 11
From another small section of egg, a berry-like section is made then duplicated and joined together. These clusters will be color/hue changed for various parts of the arrangement. From the larger egg section, liquify warp is used to pull out a leaf shape. This shape is duplicated, then changed with scale and smudge tool and leaves inserted into the arrangement. They will have shadows added toward end.

step 8 of 11
After duplicating flowers and pod sections, flowers are all arranged, one flower in rear has had some yellow added, then hue/saturation tool used to make it have an orange-like glow. Clusters of pods are duplicated, some color changed, and some rotated and/or flipped horizontally to fill in areas needing an accent. Largest irises are placed nearest the bottom of arrangement to give good balance. Top half of the arrangement here has now had shadows added using the burn tool. By burning 'shadows' selection, the beautiul textures coming from the egg design will come forward, giving a more realistic look to the irises.

step 9 of 11
Color has been added to many of the flowers, using color/balance, and a little hue/saturation changing. Further burning for shadows has been done, and dodge tool has put highlights on clusters of betties and petals and leaves. Vase has been finished by scaling it to appropriate size to hold all these flowers, and duplicated and moved to look dimensional.

step 10 of 11
The entire image is merged now, and a gold filter is placed over the image. Opacity of 75%

step 11 of 11
An additional step was a last-minute thought - to satisfly a couple people who look for more signs of the source. (And I really don't mind them giving their opinions.) I fashioned a piece of fruit, some whole eggs, and some dried leaves from the egg fragments.

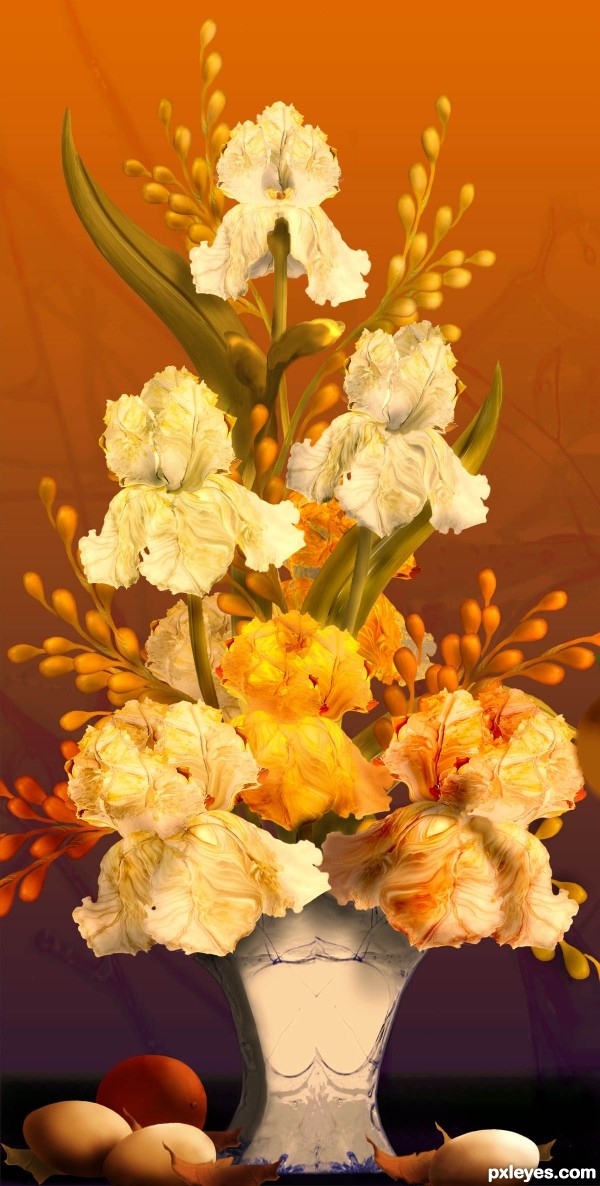
Final result
Votes
| user | voted |
| nacho124 | |
| arca | |
| pingenvy | |
| Disco | |
| Disco | |
| libertysgems | |
| hankphone | |
| xwd | |
| CrystleClear | |
| Drivenslush | |
| Score: 10 | |
Comments
Pxleyes
Photography and photoshop contests
We are a community of people with
a passion for photography, graphics and art in general.
Every day new photoshop
and photography contests are posted to compete in. We also have one weekly drawing contest
and one weekly 3D contest!
Participation is 100% free!
Just
register and get
started!
Good luck!
Follow us:


© 2015 Pxleyes.com. All rights reserved.
Great SBS! Thank you for sharing
(5 years and 3469 days ago)