
Original image
step 1 of 33
Chop out the old tap

step 2 of 33
added in my guitar photo I took on my green screen with my new Nikon Camera

step 3 of 33
Next took a few duplicate old taps and set them in for the head and hands areas

step 4 of 33
Next duplicated the tap again and placed it behind the first head tap to give more depth

step 5 of 33
More Adjustments and masking a bit on hands and healing bursh with CTA

step 6 of 33
Warped the top portions for the start of the hair like feature

step 7 of 33
Then adjusted the back layer

step 8 of 33
added in another tap layer and masked out a bit of the extra pipe threading

step 9 of 33
form was a bit weird at this point so I then decided to go into the liquify tool from here

step 10 of 33
once I touch up the back area a bit then I used the burn and dodge tools as well as the CTA again for seams a tad more

step 11 of 33
Decided to keep it a bit more stretchy here to look like it had been raining on the hair portion

step 12 of 33
Wanted to cause a spike in hair so so I didnt move any more of the bottom portions I froze the areas and pinched the top edges up a bit

step 13 of 33
So once I had the over all idea to have the rest take shape I sketched in a body to go by

step 14 of 33
Added the hands back in place and adjuste more up in the center of the page

step 15 of 33
Then I took another Tap and squished it downward and masked in a bit more to start the outer arm edges with my sketch guide

step 16 of 33
Yet again another Tap to be added in for the shoulder areas and just warped in to shoulder area then masked out portions I didn't want

step 17 of 33
More Warp

step 18 of 33
Ok now the inner and outer arm areas were taking shape and just for fun I decided to leave in the other pipe threaded area to him

step 19 of 33
Here I applied the same rule of thumb and worked on the opposite arm and shoulder areas

step 20 of 33

step 21 of 33
More warping and shaping of the outer arm areas

step 22 of 33
Ok here is where I decided to take the handle of the tap and scrunch it down and just use the it for the inner portions of the arms

step 23 of 33
Then once I had them in took another tap and added behind and then using the pen tool went around the torso area of the Rainy Rocker :)

step 24 of 33
moved the guitar away to mask in and around the belly and hip areas and heal a bit up as well

step 25 of 33
Then once I brought the guitar back in place I decided to mask and erase around some areas to make the tap handle look more like fingers a bit

step 26 of 33
Once I had that done then I again took a larger portion of the tap handle and warped it and stretched it down to fit my sketch for the pants area

step 27 of 33

step 28 of 33
Next added the threaded pipe area to the bottom of the foot area and since the stance was right on the threaded pipe area seemed to fit in as a boot

step 29 of 33
Warped out the boot and masked it in a bit more

step 30 of 33
fixed up the other finger areas on the upper neck of the guitar area

step 31 of 33
burned in and dodged in here and there with some CTA healing and proximity matching a bit

step 32 of 33
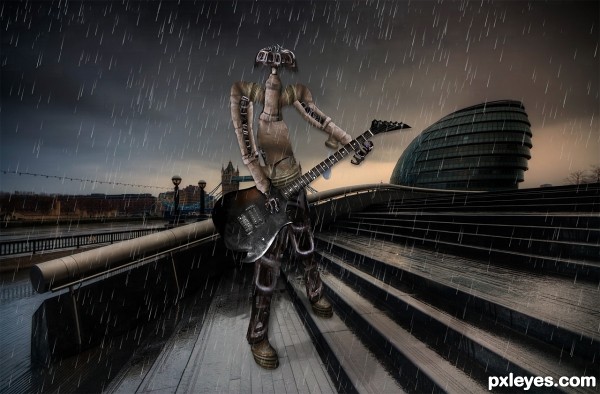
And then added in some curves and vibrancy for the color and did some toning and color adjustments again with burn and dodge.


Final result
Pxleyes
Photography and photoshop contests
We are a community of people with
a passion for photography, graphics and art in general.
Every day new photoshop
and photography contests are posted to compete in. We also have one weekly drawing contest
and one weekly 3D contest!
Participation is 100% free!
Just
register and get
started!
Good luck!
Follow us:


© 2015 Pxleyes.com. All rights reserved.