
Original image
step 1 of 23
Take background and add a Gaussian Blur to it...

step 2 of 23
Cut out the head...

step 3 of 23
Using the liquify tool, shape into place...

step 4 of 23
Select part of the forehead, copy and paste it onto the cheeck.. to maintain texture of face...

step 5 of 23
Blend in cheek texture to match overall face... select part of the background and play around with the levels as to make it lighter...

step 6 of 23
Add some white highlight on the middle of the background (for God know what reason I did this, got rid of it in step 18 :) ...anyways

step 7 of 23
Liquify more...

step 8 of 23
Warp , warp to get desired positions...

step 9 of 23
Copy and paste the half face head and add behind the original layer, warp it as to show the back layer of the half head face thingy...

step 10 of 23
Delete excess, isolate part that is hanging out and burn it to create some shadow...

step 11 of 23
This is what you would get...

step 12 of 23
Start to paint the skin pulling hook thing...
Using soft brush and smudging along the way...colour picker to get colours of head .
Using soft brush and smudging along the way...colour picker to get colours of head .

step 13 of 23
Smudge smudge...

step 14 of 23
More smudging, add colour as you go,,,

step 15 of 23
Warp into place and erase to blend in with the rest of the head.. smudge to get it really blended in...

step 16 of 23
Copy paste that skin section and add it to the end of the half head thingy ;)

step 17 of 23
Add some shadow..
Copy and paste half head effort :P and fill with black, warp transform into place and blur (gaussian blur).. add to floor...
(Ignore the rock in the front- I didn't like it and deleted it later)
Copy and paste half head effort :P and fill with black, warp transform into place and blur (gaussian blur).. add to floor...
(Ignore the rock in the front- I didn't like it and deleted it later)

step 18 of 23
Lighten shadow and get rid of that yucky white highlight in the middle of the background...

step 19 of 23
Add some highlights to face...

step 20 of 23
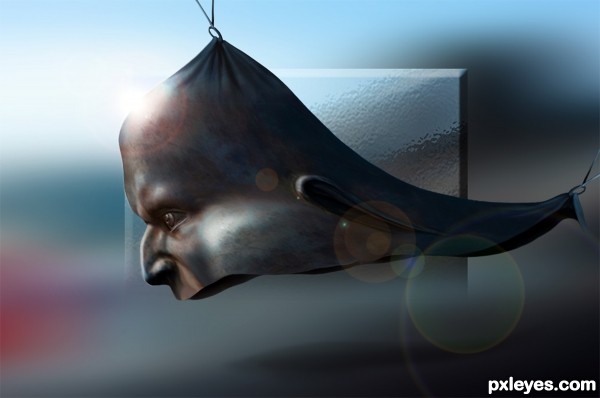
Take the background again, and reduce it to half of the screen, add a motion blur to it then distort-Glass-Frosted...

step 21 of 23
This is the result, now position it onto the middle of the image and add a bevel/emboss...

step 22 of 23
Now Render- Lens Flare, 50-30mm Zoom at 50%
then add some vibrancy.
then add some vibrancy.

step 23 of 23
Animated part:
First time I'm doing this, so it will get better with time :D
First time I'm doing this, so it will get better with time :D

Final result
Pxleyes
Photography and photoshop contests
We are a community of people with
a passion for photography, graphics and art in general.
Every day new photoshop
and photography contests are posted to compete in. We also have one weekly drawing contest
and one weekly 3D contest!
Participation is 100% free!
Just
register and get
started!
Good luck!
Follow us:


© 2015 Pxleyes.com. All rights reserved.