
Original image
step 1 of 12
Add a white layer above main image, and draw a series of soft black lines, alternating the size.

step 2 of 12
Copy that layer, and before turning off, change blend mode to Multiply. Make sure your lines extend beyond the area to be 'bent'.
Use Screen mode on the copy, and turn off for the time being.
Use Screen mode on the copy, and turn off for the time being.

step 3 of 12
Forward liquidy, then before clicking OK, save mesh to your job folder or desktop.
Please note, I tried this several times, it takes experimenting with the brush settings. (Tho I tried, could not find the original instructions.) It still didn't come out quite like I first saw it, but I felt it was adequate to upload anyway. If anyone tries this, let me know how you did!
Please note, I tried this several times, it takes experimenting with the brush settings. (Tho I tried, could not find the original instructions.) It still didn't come out quite like I first saw it, but I felt it was adequate to upload anyway. If anyone tries this, let me know how you did!

step 4 of 12
Go back to the main layer, and then Filter>Liquify>Load Mesh. (Select the mesh you saved earlier.) This may take a little while to render. This step needs to be done for the other layer with lines also. At the end of these steps, turn that layer back on (it's in Screen mode) and lower the opacity to suit your taste. This layer just makes the final image a bit softer looking.

step 5 of 12
Mask out or softly erase the lines where they go beyond the area to be 'bent'.

step 6 of 12
Here's where I veered off the original - selected the left half, then the right, and warped the centers upward some more. Take care to match those centers at the top, and keep the bottom areas down and horizontal. Also, make sure there is no gap along the top edges once you deselect.

step 7 of 12
Brought in the hand, made some brightness adjustments, also removed the tattoo, and since it would only be sized, made a smart object of it. (Later didn't use it as smart object, and re-loaded the original.)

step 8 of 12
For the statue, used pen tool on each eye, added the selections to a layer above, then filled with black. Used inner glow in green, and basic bevel/emboss.

step 9 of 12
Oops, here's where I added the glow and bevel and emboss layer styles to the eyes. Even though it's a statue, I wanted the homeless man to feel still somewhat alive, so gave his eyes some 'sparkle'.

step 10 of 12
Size and position the tunnel under the main layer. And yes, there IS a light at the end of this tunnel, hence the light under the bridge.

step 11 of 12
Adjust levels overall.

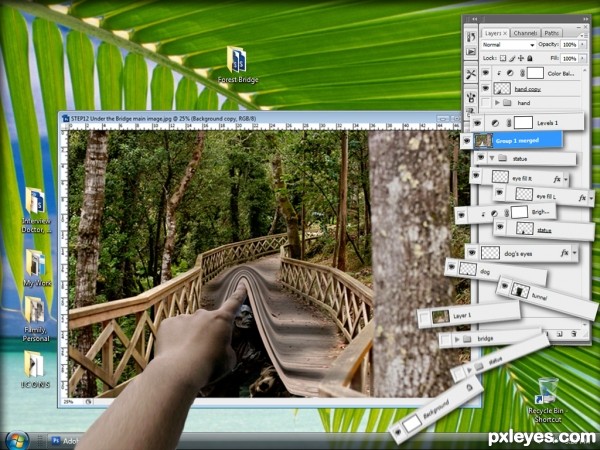
step 12 of 12
This is the main image. After this, I cleaned up my desktop, took a screenshot of it, then cropped it to use as a background for the main image. Cut up the layers, added drop shadows to them, put a gray fill to make the new layer palette appear empty behind. Lengthened the arm to get this effect, so there are two layers of the hand in there.

Final result
Pxleyes
Photography and photoshop contests
We are a community of people with
a passion for photography, graphics and art in general.
Every day new photoshop
and photography contests are posted to compete in. We also have one weekly drawing contest
and one weekly 3D contest!
Participation is 100% free!
Just
register and get
started!
Good luck!
Follow us:


© 2015 Pxleyes.com. All rights reserved.