
Original image
step 1 of 17
Penguin source photo

step 2 of 17
Niagra ice source photo

step 3 of 17
Stained glass source photo

step 4 of 17
Underwater source photo

step 5 of 17
Sunset landscape source photo

step 6 of 17
Penguin source has resolution upped, then large penguin for artist is chopped and moved into canvas.

step 7 of 17
Wing for brush is liquify warped into shape for holding brush, and will be defined more using brush and eraser tools. Wing for holding pallette is duplicated and rotated, then merged using smudge tool.

step 8 of 17
Paintbrush is made using the brush tool and smudge tools.

step 9 of 17
Artist's hat is brushed onto head, using airbrush for fluffy top and pallette shape is also brushed in using brush tools. A 'thumb' will be pulled through the hole using the smudge tool.

step 10 of 17
Colors are added to pallette with airbrush (Go to a spatter design for this step)
Colors and pallette will be highlighted with dodge tool and some shadows done with burn tool at soft settings.
Colors and pallette will be highlighted with dodge tool and some shadows done with burn tool at soft settings.

step 11 of 17
Here a scarf is brushed onto the penguins neck, some shading being done with burn tool, and some highlights with dodge tool.

step 12 of 17
Smaller penguin is added from the source photo, chopped, and scaled to fit in lower front corner.

step 13 of 17
Sunset sky is scaled to a small size to fit over the penguin, then slightly warped to fit over penguin. Then eraser tool trims up the edges. (sunset can be lowered in opacity to better see where it needs trimmed)

step 14 of 17
Here I decided to add some more color to the artist penguin, so added a layer of stained glass for his pants. Warp tool and eraser tool were used the same way as on the sunset penguin. Shadows are also added using burn tool and some edges were trimmed with the eraser tool.

step 15 of 17
A flag is started with brush tools on a new layer behind the penguin artist. It is drawn with hard brush tool and filled in with airbrush tool. To get more of a ripple effect, the burn tool is used toward middle.

step 16 of 17
Flag is completed with text tool, then a duplicate of the lower penguin is added at top and scaled smaller. An underwater design will be placed on this penguin using the same techniques as the one at the bottom. Hue/saturation tool will color change it to blues so it will not stand out as much as the artist penguin.

step 17 of 17
A new texture layer of snow is placed over entire canvas after all images are merged, then a filter in turquoise blue is added last of all and lowered to 20%.

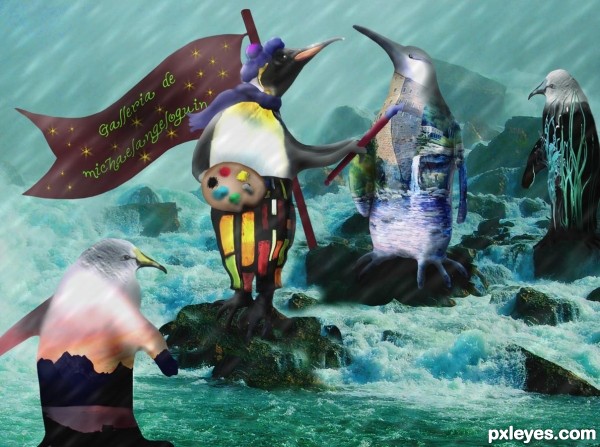
Final result
Pxleyes
Photography and photoshop contests
We are a community of people with
a passion for photography, graphics and art in general.
Every day new photoshop
and photography contests are posted to compete in. We also have one weekly drawing contest
and one weekly 3D contest!
Participation is 100% free!
Just
register and get
started!
Good luck!
Follow us:


© 2015 Pxleyes.com. All rights reserved.