
Original image
step 1 of 22
Reference for large orchids

step 2 of 22
My photo used for small orchids as reference

step 3 of 22
Lid is chopped, cut in half, then duplicated and flipped to be joined together again. I did this to make it exactly the same on both sides for constructing base and lights at top.

step 4 of 22
Lid section is duplicated with alt key, then stacked as base is being built.

step 5 of 22
Duplicated sections of base are merged, then burn tool used underneath edges.

step 6 of 22
The curved pipe from source is ready to be chopped here. It will be used for holder for the lamps at top, and also will be shaped with liquify warp tool into leaves and into line material used in arrangement.

step 7 of 22
Source photo is shaped into interesting pattern with the liquify warp tool and will be duplicated, stretched with the scale tool, and merged together in long strips to create the background.

step 8 of 22
On a new canvas 10 x 25, background has been completed with liquified strips, base for container is moved in, and gradient layer is added to background. I will change colors of background as I go along, eventually settling on a deep brown, red to complement colors used in the arrangement.

step 9 of 22
A vase for flowers has been formed using the can in the source and changing its shape with the perspective tool. Color/hue tool will change its color to greens a few steps further and burn tool will give it shadows where flowers fall over it and also on shadow side.

step 10 of 22
Little shelves at top are made from pipe section and inverted with edit/transform/flip tools and scaled to size. Line material (which is important in establishing a pleasing shape to the arrangement later) is formed from pipe section also using liquify warp tool.

step 11 of 22
Leaf shape is made from pipe section using liquify warp with some brown background left around the edges. Brown is pulled into center for color. Later, hue/sat tool will change colors of leaves (after duplicating).

step 12 of 22
A texture layer is made from the street in the source photo and used for the table cover (burn tool make shadows on it), and a pattern layer is also made from street and laid over background, then opacity lowered so that background pattern still is fairly strong.

step 13 of 22
Using another sections of the street texture, the large orchid is shaped, using reference photo to help with shape, Eraser tool does the shaping, and color is adjusted with hue/sat tool. Color will be adjust more later.

step 14 of 22
Parts are further developed for the large orchid, and lights and darks burned and dodged. Parts will be shifted here and there so that a couple designs will be made using the leaf parts created. Then each flower will have parts merged to move into scene.

step 15 of 22
Three large orchids are placed approximately where I think they will be.. Since they are large (and yellow) they need to go at bottom of arrangement to keep it in balance.

step 16 of 22
Here is creating of the little lamps. Can is scaled to small size, perspective and liquify warp tools change its shape. Candle is made same way, then desaturated and brightness tool to make it whiter. Candle flame is brushed in. Then lid is flipped into place, and little strips of the metal pipe are placed as if holding lid up. Shadows and highlights are added, then filter/render/spotlight adds light in background where lights of little lamps might light it up.

step 17 of 22
Here the light filters have been added.

step 18 of 22
Here are steps for creating small orchids, using brush, eraser, and smudge tools. Color is added later with filters and color tools.

step 19 of 22
Small orchids are being added by scaling to various sizes (smaller ones at top) and rotating some with edit/transform/rotate tool.

step 20 of 22
Color changes are made on small orchids using brightness/contrast and hue/sat tools, and yellow/orange filters added after merging small orchids.

step 21 of 22
Butterfly is created here with brush tools, eraser and smudge tools. Color is added to sections of wings using paint bucket tool, air brush and hue/sat tools.

step 22 of 22
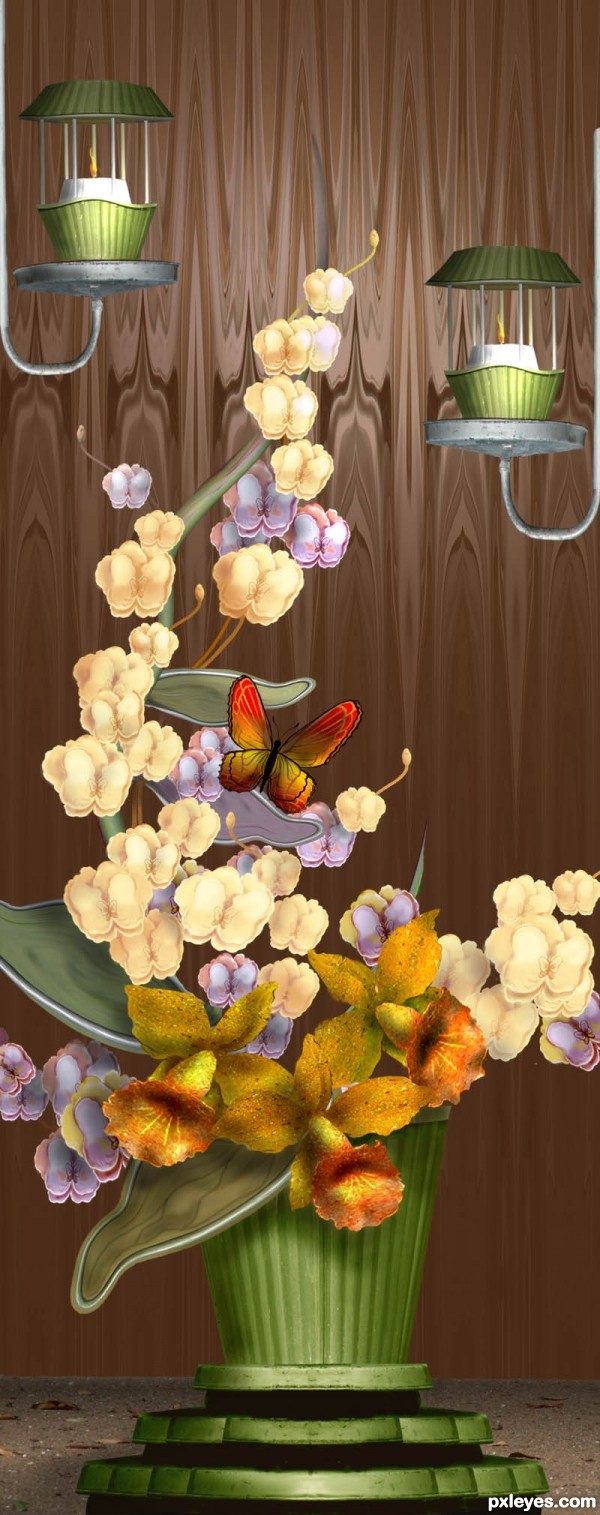
Finally the butterfly is added and rotated to pleasing angle to complement the lines of the arrangement.

Final result
Pxleyes
Photography and photoshop contests
We are a community of people with
a passion for photography, graphics and art in general.
Every day new photoshop
and photography contests are posted to compete in. We also have one weekly drawing contest
and one weekly 3D contest!
Participation is 100% free!
Just
register and get
started!
Good luck!
Follow us:


© 2015 Pxleyes.com. All rights reserved.