
Original image
step 1 of 16

step 2 of 16
Overlay image to get proportions

step 3 of 16
Crop/cut out second image as needed and position top

step 4 of 16
Puppet warp as needed.

step 5 of 16
Check alignment and perspective. Correct where needed.

step 6 of 16
More adjustments and tweaking

step 7 of 16
I decided at this point that I wanted her eyes larger, ear pointed and a more “unusual†face so went into liquefy and did worked on the ears, eyes and nose to get what I thought would work.

step 8 of 16
Rough completed with large eyes, ears and tweaked nose.

step 9 of 16
Overlay the beads … made from the source (shell) image

step 10 of 16
More bead work and started making large bead for forehead

step 11 of 16
Now I just do a bunch of clean up. Basically get rid of errant pixels and tune up blending. Alsoadded earring and shadows, brought out the eyes more and changed their colour with a levels adjustment layer

step 12 of 16
Brought complete lady into background image

step 13 of 16
Cropped image and fine tuned all. When I cropped the image I used a Fibonacci spiral or “Golden Mean†rule as a guide for where to crop … it does not always work but it can help. If not that then I try to go by the “Rule of Thirdsâ€.
See next steps for background.
See next steps for background.

step 14 of 16
Background image was created by using my own photo and a plug-in called Flood. Then I added lighting with adjustment layers.

step 15 of 16
Background image - using Flood plug-in I added the water

step 16 of 16
I then added lighting using Adjustment layers and blurring them (I use Gaussian and Motion blur). The image on this step is only partially complete.

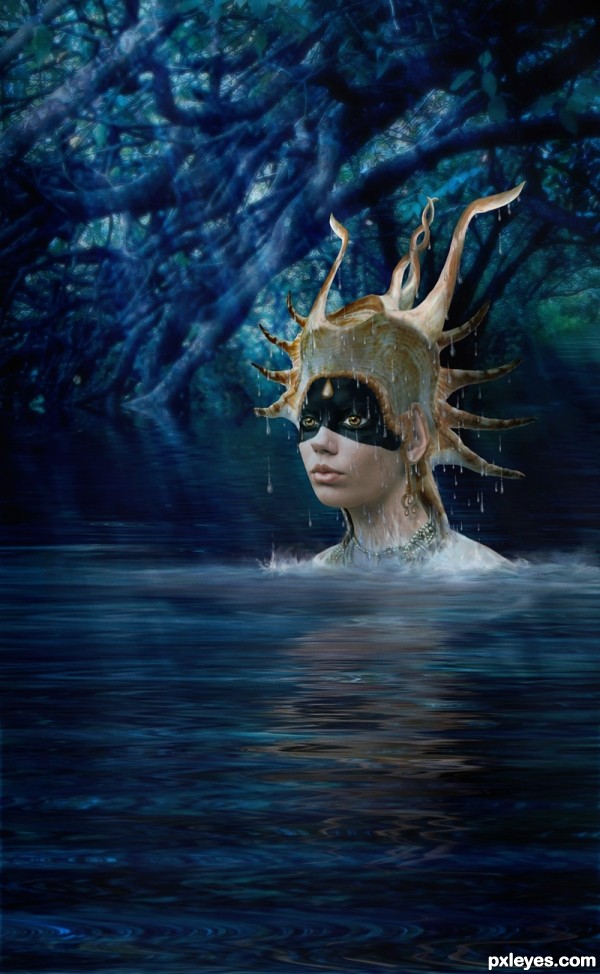
Final result
Pxleyes
Photography and photoshop contests
We are a community of people with
a passion for photography, graphics and art in general.
Every day new photoshop
and photography contests are posted to compete in. We also have one weekly drawing contest
and one weekly 3D contest!
Participation is 100% free!
Just
register and get
started!
Good luck!
Follow us:


© 2015 Pxleyes.com. All rights reserved.