
Original image
step 1 of 11
Step 1-- There was a lot of experimenting with this one and a lot of discovery. Be fearless.
I warped the trash can into a cup shape, then made a copy and warped it for the back of the cup. The pipe was copied, flipped vertically and then merged and blended to make a chain link. I had originally started with a completely different idea in which chain was involved, but changed my mind. I kept the link and used it to make the rim of the cup. I used the elliptical marquee tool with stroke to make a pattern to follow with the link and warped the link to the shape of the pattern.
I warped the trash can into a cup shape, then made a copy and warped it for the back of the cup. The pipe was copied, flipped vertically and then merged and blended to make a chain link. I had originally started with a completely different idea in which chain was involved, but changed my mind. I kept the link and used it to make the rim of the cup. I used the elliptical marquee tool with stroke to make a pattern to follow with the link and warped the link to the shape of the pattern.

step 2 of 11
Step 2-- Getting the perspective on this was challenging. I isolated the rim from the lid of the trash can, free transformed it to make it smaller and then warped the remaining lid. I used the marquee tool to copy the top of the lid for the braces. Warped a copy of the lid to place in back. Warped the bolts. I liquified the pipe into the shape of a snake, then copied and flipped it. Another copy and liquify to make the back snake.

step 3 of 11
Step 3-- For the top ring of the cup, I isolated part of the trash can, copied and flipped it, then blended them together. I reduced the size of the ridges and then warped it into a ball shape. The bottom ring of the cup was the source, cleaned up, reduced in size and warped. I liquified the snake's head a little more, then used dodge and burn. Tip: If you're trying to burn a predominately light part of an object, but the light part hardly changes while the dark parts get very dark, try this. Up at the top, where it says Range and Exposure, click on the menu for Range and choose Highlights. That should help.

step 4 of 11
Step 4-- I reduced the pipe and liquified it, taking copies of it to build the branches. I used layer masks on the different branches to trim them. I also used brightness/contrast adjustment layers, both lighter and darker to make the ball appear more spherical.

step 5 of 11
Step 5-- I used the pen tool to cut leaf shapes from the pipe, warped them and merged them. I started working on the shading by using brightness/contrast and levels adjustment layers.

step 6 of 11
More shading.

step 7 of 11
Shading completed.

step 8 of 11
Some examples of how I experimented with Layer > Layer Style > Color Overlay, Multiply, and Overlay layer styles.

step 9 of 11
How to make the jewels. I used the elliptical marquee tool to take a section from the ridges. Copied and turned them 45%. Elliptical marquee tool to cut out the center. Color overlay with the default red set to Overlay at 50%. Above that is Layer > New Adjustment Layer > Brightness/Contrast set to -10 for brightness and 30 for contrast. Convert and rasterize the color overlay and merge the adjustment layer down. Copy that, reduce by 80% and rotate 45%. Copy that one, reduce by 70% and rotate 45%. Merge the 3 layers. Use the clone tool to blend the edges. Copy and use layer style overlay. Now you have a bright red gem. My example doesn't look exactly like the one I used because I had to remember what I did. That's the problem with experimenting.

step 10 of 11
To make the gold around the gems, I created a new layer, filled it with yellow and used the add noise filter. I cut a section from that layer, increased the size and brightened it up. Used the elliptical marquee tool to get a round section and a layer mask to form. I made a copy of the gem, placed it under everything and used gaussian blur.

step 11 of 11
Over a black background, I layered the source, added a slight blur then used color adjustments to change one copy to rust and another copy to green. Above those layers, I added adjustment layers color balance, levels and brightness/contrast. I inverted the layer masks on the rust and green layers and used a wet medium brush to dab at the layer masks.
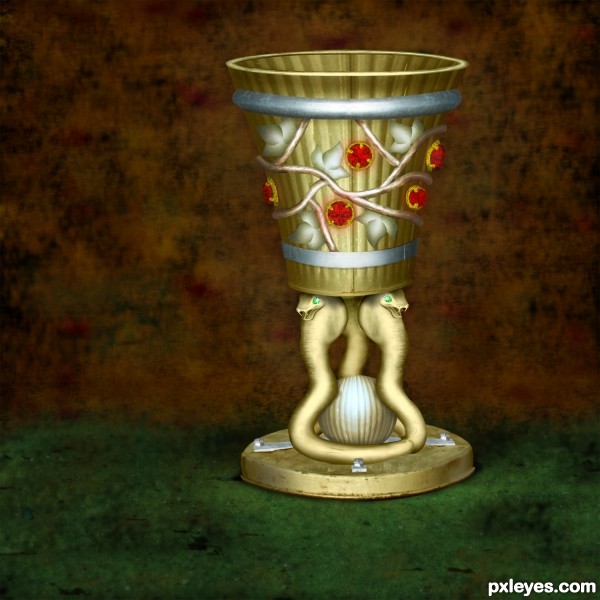
Ta da!
Ta da!

Final result
Pxleyes
Photography and photoshop contests
We are a community of people with
a passion for photography, graphics and art in general.
Every day new photoshop
and photography contests are posted to compete in. We also have one weekly drawing contest
and one weekly 3D contest!
Participation is 100% free!
Just
register and get
started!
Good luck!
Follow us:


© 2015 Pxleyes.com. All rights reserved.