
Original image
step 1 of 16
Crested birds used only as a reference source.

step 2 of 16
First the source photo of roots is flipped 180 degrees, then left side is cropped to use.

step 3 of 16
Source for water (my own photo) Section toward middle right is removed to use for ripples over the reflections of trees.

step 4 of 16
Here the water ripple area is cropped to use over tree reflections.

step 5 of 16
Trees are duplicated, with the duplication flipped vertically (edit/transform/flip vert.)

step 6 of 16
Color change is made with hue/saturation tool to blues, then water and reflection are switched to put water on top where it is lowered in opacity to allow the trees to show through. Smudge tool will be used to create more ripple action by breaking up tree design.

step 7 of 16
Leaf branch is cropped out of source and chopped, then scaled larger and color changed with hue/saturation tool. This will be duplicated and some placed on far side of water and larger ones placed in foreground. Burn tool creates shadows within the leaves. Some highlights are also made with the dodge tool.

step 8 of 16
Section of roots is lassoed and cropped loosely to be liquified to start the bird's head and neck. Eraser and smudge tools will finish off the edges.

step 9 of 16
From another small section of roots, the crest is started by shaping the section to shape needed for crest using the eraser tool. Then, the smudge tool is used to draw the feathers of the crest.

step 10 of 16
Crest is finished by duplicating the last step two times, placing them on top of each other to form more solid crest. Edges will be finished off with eraser tool and blur tool. Later, burn and dodge tools will add light and dark areas as needed.

step 11 of 16
Eraser tool and smudge tools are used to refine shape of the head, start the eye. Next, head is desaturated, a touch of red added, and then dodge and burn tools create the darks and lights needed.

step 12 of 16
Details of head and crest are further along with the reference source to refer to. Body will be created next.

step 13 of 16
From a very dark section of root source photo, feather shapes are created. These will be used in different sizes, and some will be darkened with burn tool.

step 14 of 16
Three sections of feathers have been applied (each section has the feathers merged down into a unit) Feathers are duplicated, some sized a little larger with the scale tool, and sometimes rotated with the edit/transform/rotate tool so that they will fill in at the proper angle.

step 15 of 16
Bird has had all rows of feathers added, then is merged into a single unit and moved into the tree/water background. Legs are completed and bird is placed as if feet are in the water. Legs are mirrored in the water by using the clone tool. Leaf units are placed in foreground in front of legs. A lot of final little details are touched up now, including a lot of attention to burning in shadows in feathers, highlights in the eyes,

step 16 of 16
Whole scene is merged, then fairly bright blue filter is placed over it at 70% opacity, and a reddish brown filter also is used at 50% opacity.

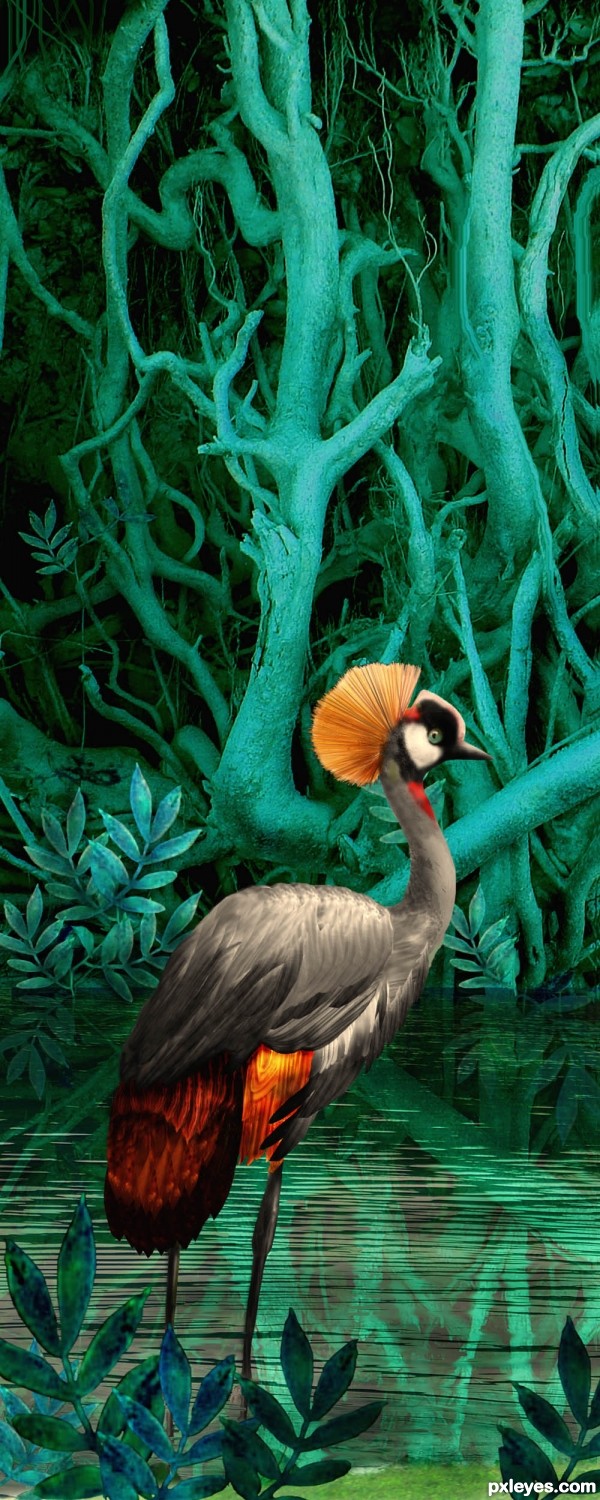
Final result
Pxleyes
Photography and photoshop contests
We are a community of people with
a passion for photography, graphics and art in general.
Every day new photoshop
and photography contests are posted to compete in. We also have one weekly drawing contest
and one weekly 3D contest!
Participation is 100% free!
Just
register and get
started!
Good luck!
Follow us:


© 2015 Pxleyes.com. All rights reserved.