
Original image
step 1 of 12
Source photo for background of carving

step 2 of 12
Wood source is trimmed to fit canvas, then set to 120 resolution.

step 3 of 12
Buffalo image set to higher resolution, then is brought into scene to be chopped and scaled to size. The cloning tool is used to remove the labels and bar, etc.

step 4 of 12
The buffalo is now duplicated (alt key), and flipped horizontally. Here, the duplicated buffalo has been traced around with the brush tool at small, hard setting, then deleted. Next, the buffalo at bottom right will be traced then deleted.

step 5 of 12
Drawing with brush tool is added here for the mountains and large tree. The log in the foreground is later turned into a pool of water.

step 6 of 12
Now one buffalo has been 'carved'. A soft airbrush in a color lighter than the actual drawing is used along each of the lines to give the impression that it is recessed into the wood. Some highlights with dodge tool give more 'curve' to the areas which would have the light hitting them and also add more shape. Burn tool also is used on shadow areas and also adds more shape.

step 7 of 12
Same steps could be repeated for second buffalo, however, I made a copy of the layer, lassoed out the finished buffalo and flipped it. Of course, lighting had to be reversed, and I added some features that made it just a little different than the first one.

step 8 of 12
Lake is added at the bottom and lines for background scenery made stronger ready to airbrush and 'carve'.

step 9 of 12
Now the airbrush has been used on mountains and tree; some highlights have been added with dodge tool and some darker areas with burn tool.

step 10 of 12
Plants, water, rock have been developed as with mountains - airbrush, dodge, and burn tools. Color is brought up to highlight scene better.

step 11 of 12
I decided finally to change the water and add more plants in the foreground. Here they are brushed in ready to do the edges.

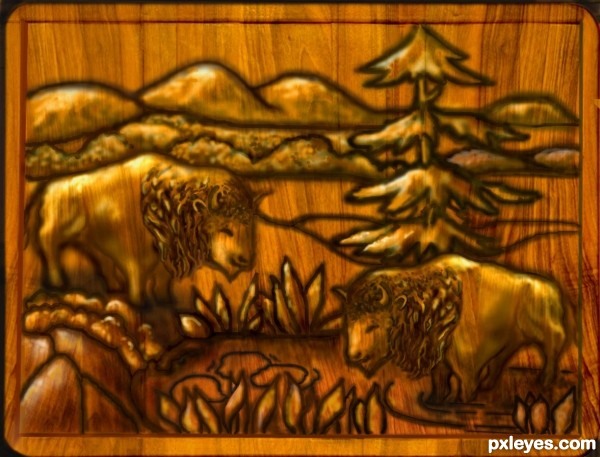
step 12 of 12
Now the plants and moving water have been edged with the soft airbrush tool and highlights and shadows added.

Final result
Pxleyes
Photography and photoshop contests
We are a community of people with
a passion for photography, graphics and art in general.
Every day new photoshop
and photography contests are posted to compete in. We also have one weekly drawing contest
and one weekly 3D contest!
Participation is 100% free!
Just
register and get
started!
Good luck!
Follow us:


© 2015 Pxleyes.com. All rights reserved.