
Original image
step 1 of 11
I found a couple of sky images I wanted to use to help make the sky look more fierce. Let's start with the lightening image.

- : source
step 2 of 11

step 3 of 11
House layer has been cut out from the sky in the original image. Distort and Warp the house until you get a shape you like.
Adjust Levels and Curves to darken the house and grass.
Adjust Levels and Curves to darken the house and grass.

- 2: source 2
step 4 of 11
Pathway, our source image.
Adjust the Levels and Curves like the previous step as well as Distort and Warp the path in order to get it to lay "flat".
Add some blending options, drop shadow-adjust the angle, distance, spread and size until you have your desired results.
Adjust the Levels and Curves like the previous step as well as Distort and Warp the path in order to get it to lay "flat".
Add some blending options, drop shadow-adjust the angle, distance, spread and size until you have your desired results.

step 5 of 11
Now add another field to help give some depth to the grass and to make the house and path the focal point for the eyes.
Now add posts from your source image. I cut them out using the Pen tool. Repeat the adjustments to the Levels and Curves as well as Distort and Warp the posts to blend.
Adjust Blending options
Drop Shadow following previous layers for settings.
Now add posts from your source image. I cut them out using the Pen tool. Repeat the adjustments to the Levels and Curves as well as Distort and Warp the posts to blend.
Adjust Blending options
Drop Shadow following previous layers for settings.

step 6 of 11
Now I want to add another element to make it a little scarier....the Gargoyle!!
I want to create a blank layer above the gargoyle and I am going to use it for shading and shadowing. I am not a fan of the Dodge and Burn tools so this is how I create the same effects without losing pixels!
I use a soft round brush, set to Overlay and Opacity 10% and Flow 10% so I can control how much or how little I have. Paint until you feel you have blended things to your liking.

- 3: source 3
step 7 of 11
I want to have some rain in this image so what I am going to do to each layer is use the Render-Fiber Filter set at 53 and 48. I chose Black and White for the colors.
After applying the Fibers, go to Edit and Fade the Fibers to about 48% and change from Normal to Overlay.
DO NOT FORGET this step must be applied to ALL LAYERS!
After applying the Fibers, go to Edit and Fade the Fibers to about 48% and change from Normal to Overlay.
DO NOT FORGET this step must be applied to ALL LAYERS!

step 8 of 11
Adjust the Gaussian Blur to all the layers to help blend them together.
Flatten all layers and go to Filter-Render-Clouds.
Apply the Clouds and go to Edit-Fade Clouds change to Overlay at 50% opacity.
Flatten all layers and go to Filter-Render-Clouds.
Apply the Clouds and go to Edit-Fade Clouds change to Overlay at 50% opacity.

step 9 of 11
After a suggestion by CMYK, I went back and added pieces of the pathway to the house like siding. I adjusted the Levels and Curves to help blend and erased here and there to give a weathered look.

step 10 of 11
I went back and cut out portions of the pathway and changed the Levels and Curves to make the portions darker. You can see the sections I picked because of these adjustments.

step 11 of 11
I then took the sections I cut out and applied them in different places on the house like siding. I duplicated the layers many times to be able to place them where and how I wanted.

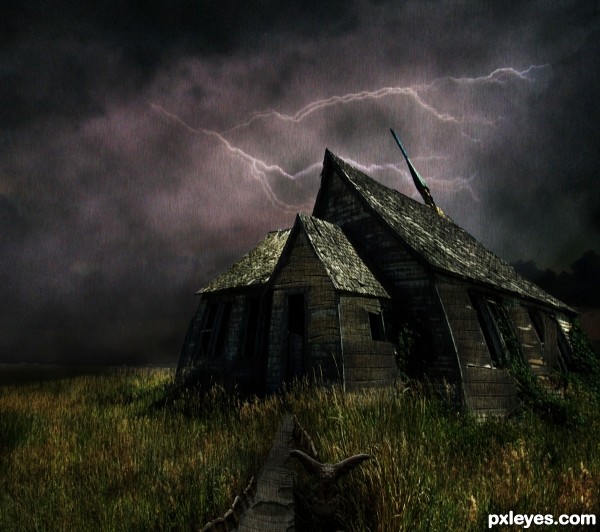
Final result
Pxleyes
Photography and photoshop contests
We are a community of people with
a passion for photography, graphics and art in general.
Every day new photoshop
and photography contests are posted to compete in. We also have one weekly drawing contest
and one weekly 3D contest!
Participation is 100% free!
Just
register and get
started!
Good luck!
Follow us:


© 2015 Pxleyes.com. All rights reserved.