
Original image
step 1 of 1
1. Start by going under the
File menu, choosing New, and creating
a new document that is 800x600 pixels
at a resolution of 72 ppi. Get out Buddha image on our file. Name this as Buddha Layer
2. Now, get the Eyedropper tool (I), and click it once on a lighter area of Buddha
to make that
color your Foreground color.
3. In the Layers panel, click
on the Background layer, then fill this
layer with that selected Foreground color
by pressing Option-Delete (PC: Alt-
Backspace), Name this as Background Colour
4. Click on the Create a New Layer icon at the bottom of the Layers
panel to create a new blank layer. We’re going to add some
horizontal lines using the Halftone
Pattern filter, but that filter won’t run
on an empty layer—you have to have
something there for it to run on. So,
click on the Foreground color swatch,
set a medium gray as your Foreground
color, and then fill this new layer with
gray using the same shortcut you used
to fill the Background layer.
(This layer will be the Middle layer between Background and Buddha) Rename it as Lines
5. Go under the Filter menu,
under Sketch, and choose Halftone
Pattern. When the dialog appears,
from the Pattern Type pop-up menu
on the right, choose Line (as shown
here), then leave the Size set to 1 (to
get the smallest lines), and set the
Contrast to around 23.
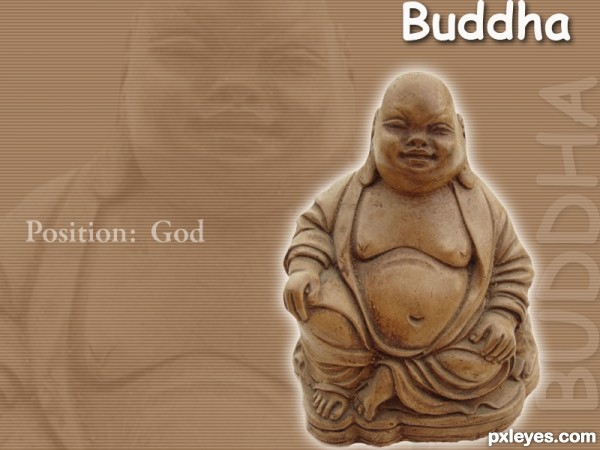
6. Now add the text buddha, Rotate
the text sideways by going under the
Edit menu, under Transform, and choosing
Rotate 90° CCW, then switch to the
Move tool (click on it in the Toolbox),
drag this text up against the right side of
your image window, and then lower the
Opacity to around 10%.
7. Create some more text. Use Opacity for the this effect.
8. Click on your Buddha
layer in the Layers panel, then press
Command-J (PC: Ctrl-J) to duplicate
the layer. Bring up Free Transform
again, press-and-hold the Shift key,
grab a corner point, and drag out until
this copy of the player is really huge. Now, press Return (PC: Enter)
to lock in your resizing. Rename this layer has Giant Buddha. place this layer under Lines Layer.
File menu, choosing New, and creating
a new document that is 800x600 pixels
at a resolution of 72 ppi. Get out Buddha image on our file. Name this as Buddha Layer
2. Now, get the Eyedropper tool (I), and click it once on a lighter area of Buddha
to make that
color your Foreground color.
3. In the Layers panel, click
on the Background layer, then fill this
layer with that selected Foreground color
by pressing Option-Delete (PC: Alt-
Backspace), Name this as Background Colour
4. Click on the Create a New Layer icon at the bottom of the Layers
panel to create a new blank layer. We’re going to add some
horizontal lines using the Halftone
Pattern filter, but that filter won’t run
on an empty layer—you have to have
something there for it to run on. So,
click on the Foreground color swatch,
set a medium gray as your Foreground
color, and then fill this new layer with
gray using the same shortcut you used
to fill the Background layer.
(This layer will be the Middle layer between Background and Buddha) Rename it as Lines
5. Go under the Filter menu,
under Sketch, and choose Halftone
Pattern. When the dialog appears,
from the Pattern Type pop-up menu
on the right, choose Line (as shown
here), then leave the Size set to 1 (to
get the smallest lines), and set the
Contrast to around 23.
6. Now add the text buddha, Rotate
the text sideways by going under the
Edit menu, under Transform, and choosing
Rotate 90° CCW, then switch to the
Move tool (click on it in the Toolbox),
drag this text up against the right side of
your image window, and then lower the
Opacity to around 10%.
7. Create some more text. Use Opacity for the this effect.
8. Click on your Buddha
layer in the Layers panel, then press
Command-J (PC: Ctrl-J) to duplicate
the layer. Bring up Free Transform
again, press-and-hold the Shift key,
grab a corner point, and drag out until
this copy of the player is really huge. Now, press Return (PC: Enter)
to lock in your resizing. Rename this layer has Giant Buddha. place this layer under Lines Layer.

Final result
Pxleyes
Photography and photoshop contests
We are a community of people with
a passion for photography, graphics and art in general.
Every day new photoshop
and photography contests are posted to compete in. We also have one weekly drawing contest
and one weekly 3D contest!
Participation is 100% free!
Just
register and get
started!
Good luck!
Follow us:


© 2015 Pxleyes.com. All rights reserved.