
Original image
step 1 of 20
Made a basic sketch and scanned it.

step 2 of 20
Used mostly the patch tool to wipe out the rope in front of the orange section. Some clone, but patch is smoother.

step 3 of 20
Used the patch tool again to obliterate the background.

step 4 of 20
Positioned the piling in front of the temple. First intention was to use the texture here, but later decided against it, and used it elsewhere.

step 5 of 20
Transformed the white rusty section of the piling for use on the rocket body. There were four pieces, one for the body, then three for each of the rocket supports, cut separately. Used multiply blend mode for each.

step 6 of 20
Warped the white section for the supports.

step 7 of 20
Position the background.

step 8 of 20
Patch the sky and position the rocket.

step 9 of 20
Position the Sledgehammer Rocket for its fiery exhaust.

step 10 of 20
Select and warp only the bottom portion of the smoke and exhaust fumes.

step 11 of 20
Adjust the rust texture with a photo filter.

step 12 of 20
Filter>render clouds (purple/black), then made a levels adjustment layer. Also used a layer mask to graduate the intensity of the deep purple/black sky from the lower background area.

step 13 of 20
Used a slight Filter>blur>Gaussian blur here. The rocket is moving, after all.

step 14 of 20
Here's where I used the layer mask for the sky, also painted some in black with a soft low-opacity brush.

step 15 of 20
Filter>render lighting (omni)and used the patch tool. This was an image that I did some work on, but ended up not using.

step 16 of 20
Used the ellipse marquee tool to take a section of the rusty texture to make the planet. The tutorial that I used is here: http://dinyctis.deviantart.com/art/Planet-Tutorial-3131869 . I copied the image to my desktop for easy reference. Most steps worked just fine, others I had to fiddle with and work around. It's quite lengthy, but pretty cool to do.

step 17 of 20
Inner glow on the planet.

step 18 of 20
Inner shadow on the planet.

step 19 of 20
The planet with all its steps, before placing in chop.

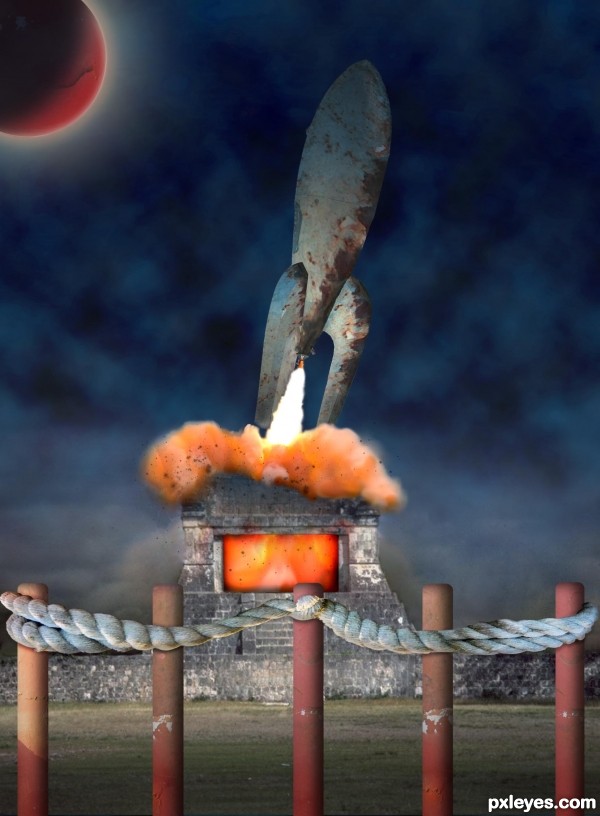
step 20 of 20
Made the 5 posts by using the rounded corner rectangle tool, and different sections of the orange rusty area on the source. Used a gradient shadow and some burning. Cut two sections of the rope, warped into position. Final tweaks with burning, some dodge and intensifying the fire in the temple. There are about 4-5 layers of the fire and smoke up there. Also lowered the brightness of the temple itself. Added an extra outer glow to the planet once in place.

Final result
Pxleyes
Photography and photoshop contests
We are a community of people with
a passion for photography, graphics and art in general.
Every day new photoshop
and photography contests are posted to compete in. We also have one weekly drawing contest
and one weekly 3D contest!
Participation is 100% free!
Just
register and get
started!
Good luck!
Follow us:


© 2015 Pxleyes.com. All rights reserved.