
Original image
step 1 of 20
Cut out the bird.

step 2 of 20
Laid the bird on the new mountain background.

step 3 of 20
Cut out the wings for the Roc from my eagle photo. The screenshot only shows the right wing. I later cut the left in pretty much the same manner.

step 4 of 20
As you can see here, I simply erased the old wings of the bird and added in the two new ones from the eagle.

step 5 of 20
Selected the head and cut out the beak and used hue/sat to colorize them individually.

step 6 of 20
Generated a block of clouds with Filter > Render > Clouds, and arranged it over the body layer.

step 7 of 20
Made the clouds into a clipping mask against the body layer, set the blending mode to hard light, and lowered the layer opacity.

step 8 of 20
Here I used a smudge tool with a special cloud brush I acquired a long time ago. (I'm including the link to the site where I had found them, even though the site now no longer exists.)
I used the smudge brush to smudge the texture of the clouds layer and also on the body layer to push out a few streaks of fur and feather on from belly.
I used the smudge brush to smudge the texture of the clouds layer and also on the body layer to push out a few streaks of fur and feather on from belly.

- : source
step 9 of 20
After much smudging, I've managed to blend the color of the head into the body and added alot more fur. I've also used a bit of the feather texture from the eagle photo to add a very faint overlay of feathers on parts of the belly.

step 10 of 20
Used puppet warp (yay CS5!) to lengthen and hook the beak.

step 11 of 20
Transformed the overall size of the beak to make it larger and cleaned up the edges with the eraser.

step 12 of 20
Still on the beak layer, cut out a small, beady chunk that seemed to look like an eye and colorized it with hue/sat.

step 13 of 20
Next, I cut out the tail and legs from the eagle and pasted them over the bird. Note that the bird's real feet have been erased.

step 14 of 20
More puppet warp (I love puppet warp) to lengthen the tail and legs.

step 15 of 20
Then there was masking...

step 16 of 20
...and erasing, to blend the feet and tail into the fur of the bird.

step 17 of 20
This is the final image so far. The bird is pretty much complete in terms of structure.

step 18 of 20
And here is the final image after alot of lighting and curves adjustments. A bit of shine is added to the beak and the wings get an extra luster.

step 19 of 20
Finally, a nice, sinister red glow to the eye to finish it off.

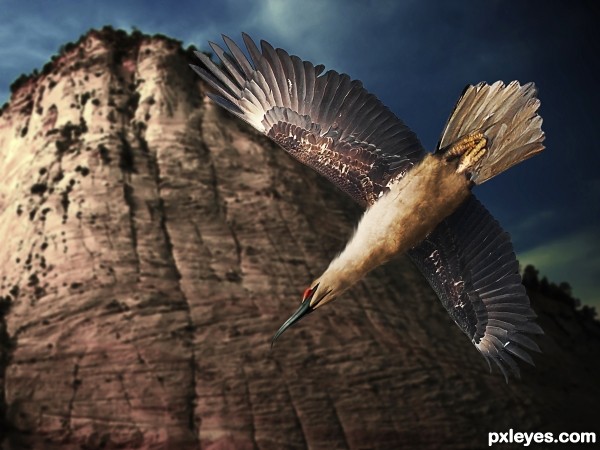
step 20 of 20
At this point, the image WAS complete until Langstrum kindly pointed out that my background image was unusable. So I scrapped it, and replaced it with this new one. A few minor lighting details and sharpening effects to finish the whole image.

Final result
Pxleyes
Photography and photoshop contests
We are a community of people with
a passion for photography, graphics and art in general.
Every day new photoshop
and photography contests are posted to compete in. We also have one weekly drawing contest
and one weekly 3D contest!
Participation is 100% free!
Just
register and get
started!
Good luck!
Follow us:


© 2015 Pxleyes.com. All rights reserved.