
Original image
step 1 of 10
Cut out girl & seal

step 2 of 10
Cut in iceberg background. It did not originally start off as round, but I made several blending adjustments and curves adjustments to this layer by duplicating and merging the layers.

step 3 of 10
Behind the iceberg layer, I added a layer filled with 50% gray and then put a gradient overlay on it for the lighting effect. I then changed the blending mode for the iceberg layer to overlay
For the seal, I duplicated the layer, flipped it, the copied a section of the head into a new layer, flipped it horizontal again, and them asked them back together. This worked well because it let me wrap it around her leg by sandwiching the girl between the upper and lower sections of the sea lion.
For the seal, I duplicated the layer, flipped it, the copied a section of the head into a new layer, flipped it horizontal again, and them asked them back together. This worked well because it let me wrap it around her leg by sandwiching the girl between the upper and lower sections of the sea lion.

step 4 of 10
Added a couple of light rays in the back

step 5 of 10
Created new eyes for the seals

step 6 of 10
Added a layer with rendered clouds and set the blending mode to overlay, opacity 30%

step 7 of 10
To create the rings I made an elliptical selection, stroked it 100px in black, then added the following effects: inner and outer glow, bevel and emboss with textured beveling, a drop shadow and a gradient overlay.

step 8 of 10
Added a black background with an inner glow set to double ring.

step 9 of 10
Added sparklies

step 10 of 10
Added a vibrance adjustment layer and another curves adjustment layer to blend.

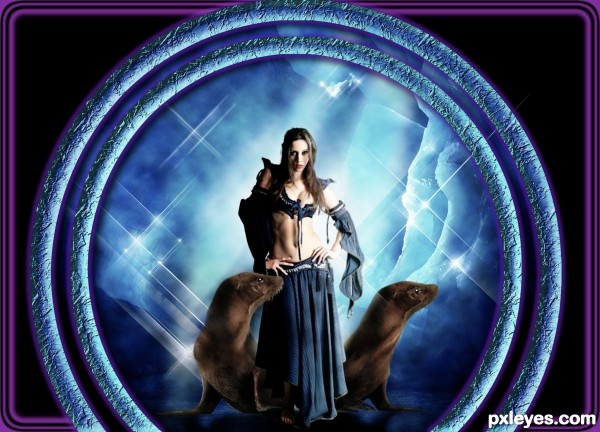
Final result
Pxleyes
Photography and photoshop contests
We are a community of people with
a passion for photography, graphics and art in general.
Every day new photoshop
and photography contests are posted to compete in. We also have one weekly drawing contest
and one weekly 3D contest!
Participation is 100% free!
Just
register and get
started!
Good luck!
Follow us:


© 2015 Pxleyes.com. All rights reserved.