
Original image
step 1 of 45
First I chopped out this portion of the picture

step 2 of 45
Distort and shrink down

step 3 of 45
Duplicate and merge together

step 4 of 45
Duplicate the double duplicate and flip and merge

step 5 of 45
again duplicate the duplicates and as before shrink down again

step 6 of 45
next take a single and warp over

step 7 of 45
Stretch it out and duplicate again

step 8 of 45
Distort,and warp into a ball to start on the unfinished rabbit toy head

step 9 of 45
next use a single piece and warp to make ears

step 10 of 45
Warp behind the main head and blend in and burn a bit where needed

step 11 of 45
Now you have the head complete so just do a bit of burn for some color

step 12 of 45
Duplicate the head for the body and stretch out a little and place behind the head

step 13 of 45
Next take a single again and repeat the same as with the ears (warp,distort,burn,etc.)
will be used for the paws/hands
will be used for the paws/hands

step 14 of 45
another single for the foot pads
warp,distort, and shorten up a bit
warp,distort, and shorten up a bit

step 15 of 45
The other foot pad

step 16 of 45
Next I chopped out part of the ground to use for the leg areas

step 17 of 45
I will use this for the leg and duplicate warped ones two times to make the legs and then spot heal them and burn up a bit as well as clone stamp to make it a bit more furry looking

step 18 of 45
Warping of the legs

step 19 of 45
Duplicate it and add it in to the bottom half portion of the leg area

step 20 of 45
Duplicate the leg and add to the other leg while warping it to fit in

step 21 of 45
Then clone stamp,and use healing tool to heal up the little seam areas and do some burning

step 22 of 45
Over the next steps you will see the process of using the dodge tool on the black background areas that give it a silvery look to it by using shadow on about 24 to 27 setting then once dodged you will go back and use some burn back in place with some midtones and highlights

step 23 of 45
Here is the process of some burning after the dodging

step 24 of 45
Rinse and Repeat for the remainder of the Rabbit

step 25 of 45

step 26 of 45

step 27 of 45

step 28 of 45
Now same for the ears

step 29 of 45
Now all dodging and burning should be complete

step 30 of 45
Next we use the rock portion to start on the chair

step 31 of 45
Mask and clean up the edges and do some clone stamping to smooth it out a bit then we will combine 2 parts and duplicate the bottom and top half of the chair

step 32 of 45

step 33 of 45
Again duplicate your bottom chair after you warp it and get it looking like a chair with some burning again where needed and cloning

step 34 of 45
Once I had it this way I decided to make the legs look a bit fuzzy and wanted to adjust it so I liquefy it with pinch on the legs a bit and some bloat for the seat and such

step 35 of 45
Then I do some burning and adjustments to the chair and color

step 36 of 45
more burning and adjustments

step 37 of 45
Here I wanted to check on the color and make adjustments with hue/saturation to make sure the browns would not clash too much

step 38 of 45
The chair looked a bit lopsided so I took the good half of the chair and duplicated and masked the 2 good sides together and blended them back together

step 39 of 45
I used this larger portion on top to start on a floor and some wood panels for the background

step 40 of 45
Once I had this part I did a motion blur to it on just about the highest setting

step 41 of 45
Next I adjusted the blurred flooring by adjusting the perspective and distortion where needed and stretched it out a bit

step 42 of 45
I then duplicated another regular piece of my blurred portion and transformed it down and gave it an inner shadow to make the separations for the wall

step 43 of 45
Here is the inner shadowing

step 44 of 45
Then I just duplicated the panels to go across the back and added each behind the other

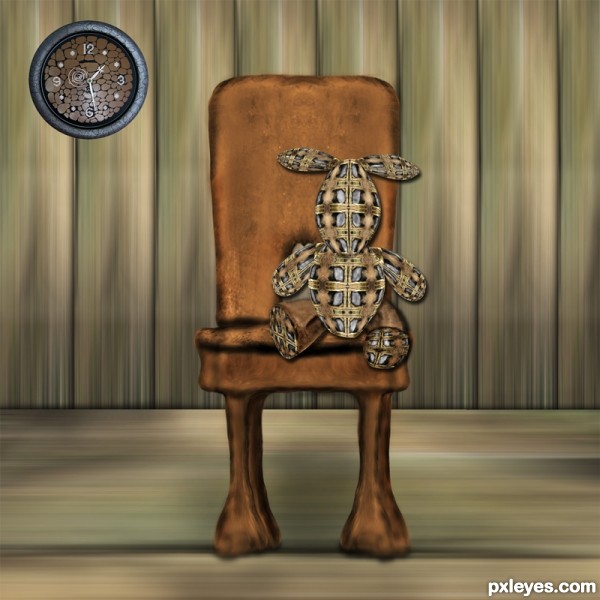
step 45 of 45
And just as an added touch to the wall I applied a nice clock from http://www.sxc.hu/photo/1045582 to the wall in the background

- : source
Final result
Pxleyes
Photography and photoshop contests
We are a community of people with
a passion for photography, graphics and art in general.
Every day new photoshop
and photography contests are posted to compete in. We also have one weekly drawing contest
and one weekly 3D contest!
Participation is 100% free!
Just
register and get
started!
Good luck!
Follow us:


© 2015 Pxleyes.com. All rights reserved.