
Original image
step 1 of 12
Extract the trail marker. Clone out the grass shadows on the smooth side.

step 2 of 12
Extract just the ground portion from the desert source. Flip horizontally so the shadows better match the trail marker.

step 3 of 12
Preliminarily position the trail marker and some copies to provide an initial starting point for the final layout.

step 4 of 12
Widen the canvas. Draw the horizon line on a new layer. Draw triangles in different colors, each on its own layer. Distort each triangle to map out the vanishing points.

step 5 of 12
Skew trail marker to make it more vertical. It can be made to fit (trim the top) the right-hand vanishing points, but it doesn’t conform very well to the left-hand vanishing points, however. Therefore, separate the three visible sides. Distort and warp the top and the left side and then recombine them with the front side to create a reoriented trail marker.

step 6 of 12
Position copies of the trail markers consistent with the vanishing points, skewing and distorting as appropriate to get a reasonable fit. The base edges are not critical; refine their contours with layer masks.

step 7 of 12
Cut out a circle from the asphalt in the source image. Spherize at 100% twice to curve the straight lines.

step 8 of 12
A duplicate of the circle layer with a Linear Burn blend makes the circle seem more like part of our landscape. Use the circle to create spheres on top of the trail markers. So the spheres aren’t identical, cut out the smaller circles from different parts of the big circle. Sizes need to be consistent with the vanishing points. Dodge and burn the circles to make them seem spherical. Add shadows under the spheres using a soft brush. Add ground shadows (apply Gaussian blur, adjust opacity).

step 9 of 12
Adjust the color of the ground using curves and reduce the brightness. Select the channels where the lava will flow. Copy to new layer and apply Gaussian blur. Duplicate into a stack of layers (from bottom): normal 50% opacity; overlay; hard mix 20% opacity with inner glow; white fill overlay; multiply 15% opacity with inner glow.

step 10 of 12
Cut out a circle from the cyclone fence in the source image. Spherize at 100% twice to curve the straight lines.

step 11 of 12
Use the cyclone-fence circle to create a planet. Rotate so brightest spot is towards the light source. Adjust with various blending layers and blurring. Add shadow.

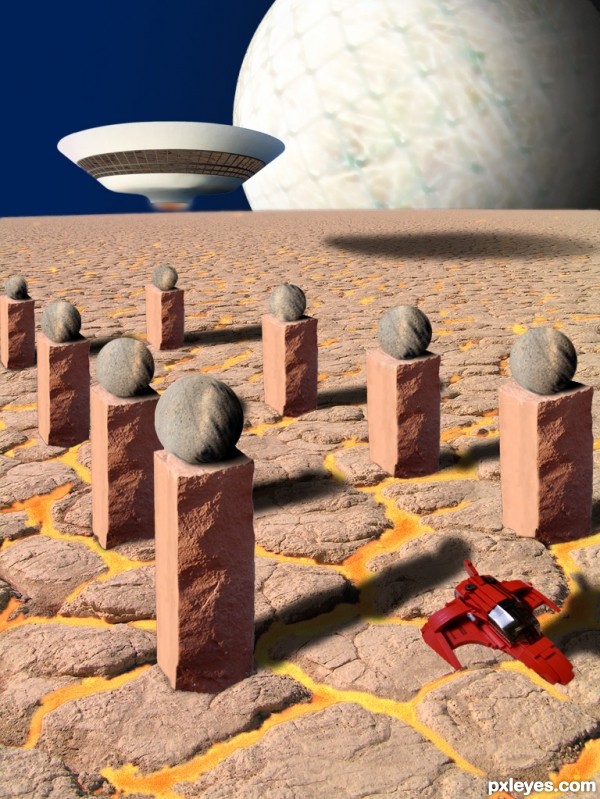
step 12 of 12
Cut out the mother ship from its source and use that source to determine placement relative to the horizon. To fit into scene, need to remove water reflection, change reflection in windows, and add shadow. Cut out fighter from its source, horizontal flip, and place where perspective works. To fit into scene, need to add shadows on the fighter and ground.

Final result
Pxleyes
Photography and photoshop contests
We are a community of people with
a passion for photography, graphics and art in general.
Every day new photoshop
and photography contests are posted to compete in. We also have one weekly drawing contest
and one weekly 3D contest!
Participation is 100% free!
Just
register and get
started!
Good luck!
Follow us:


© 2015 Pxleyes.com. All rights reserved.