
Original image
step 1 of 33
Selected the railroad-esque strip of windows from the dome.

step 2 of 33
Pasting the windows into a seperate document, I began to erase the actual windows and cut-paste the steel dividers to make it look like a rail track.

step 3 of 33
Finished result of step 2.

step 4 of 33
Here shows the railing from step 3, next to the roof of the dome which I cut out.

step 5 of 33
I warped the roof piece into the shape of a hill and used hue/saturation adjustments to turn it a green.

step 6 of 33
Duplicated the hill 4 times; used transform and flip to make them look varied. Also added a grass texture to it.

step 7 of 33
I created two curve layers with masks: one making the hills very bright, and the other, very dark. I filled in both layers with black, then used a large, soft, white brush to reveal portions of the masks. The dark mask is revealed at the shadowy bases of the hills, while the bright mask is revealed near the tops where the light would hit. Selecting the individual hills prior to painting made for a much cleaner edge.

step 8 of 33
The finished result of step 7. A final overall curve layer was added for contrast.

step 9 of 33
Here I simply copied the tracks a few times and pasted them over the hills, warping and erasing some of the edges for them to fit.

step 10 of 33
Here I added the sky pic and gave a slight drop shadow to the rails. Note that the rails are given shading because they are under the curves masks.

- : source
step 11 of 33
With the hills finished, I went back to the source pic and extracted a small piece of grey. This will be the texture on which I build the train.

step 12 of 33
Warped the grey sliver into a usable chunk.

step 13 of 33
With much copy, pen tool, hue/saturation adjustments, and pasting, I create several small components which I give different shades of red and assemble them into a train. The headlight effect was created with the Luce filter (see source links).

- 1: source 1
step 14 of 33
Here is the more-or-less finished skeleton of the train.

step 15 of 33
Cut out the front part of the building.

step 16 of 33
Here I extracted the grate-like windows from the building front, copied it, and used perspective transformation to turn them into a cow catcher for the train. (Yes, they really call it a cow catcher.)

step 17 of 33
Using the same piece as for the cow catcher, I make a circular ornament which will serve as the wheels.

step 18 of 33
Stuck the wheels to the train. The bolts on the wheels are made from scratch; the metal strips are warped copies from from the railroad.

step 19 of 33
Began to shade in the train with dodge and burn.

step 20 of 33
Here's the finished result of the shading. The bolts on the train are the same ones used on the wheels.

step 21 of 33

step 22 of 33
Here I made a black-filled copy of the train and distorted it into a rough shadow.

step 23 of 33
Used guassian blur on the shadow, changed opacity, and made a seperate layer ontop where I drew under the train with a slightly darker brush to make a convincing shadow.

step 24 of 33
Some final warp and transform adjustments on the train to make it better fit the tracks. I also raised the train roof a bit to give it a slight bevel.

step 25 of 33
With the train finished, work begins on the hot air balloons. I copied one of the hills, along with its track, and pasted a smaller copy of it up in the sky.

step 26 of 33
Did some extensive warping on the hill to give it the rough shape of a balloon (I fixed it with the eraser and further warped it as I went along). Also copied the track and warped it as well, flipping it onto the other side of the balloon.

step 27 of 33
Here I did some more warping, cutting, and eraser work on the mirrored tracks to make them appear as if they're encircling the balloon.

step 28 of 33
Here I used the same shading and shadow process as I did earlier on the hills to give the balloon a 3D feel. Drop shadow on the rails.

step 29 of 33
Now I copied another small piece of the hill and warped it into a bottom piece for the balloon (I removed the former grass texture on this piece). Gave it new texture, dodge, and burn as I did with the train parts, and colored it a light red with hue/saturation.

step 30 of 33
Here I added a few strings with the line tool (with a bit of inner glow) and copied the balloon bottom at the end of the strings. I then created a large square on a seperate layer and added to it a cross-stitch texture.

step 31 of 33
Made a clipping mask with the texture square over the basket and warped it to fit. Also colored the basket brown with hue/saturation.

step 32 of 33
A bit of final shading to the basket. Also copied the basket piece without the texture and warped it as the back of the basket on a seperate layer behind.

step 33 of 33
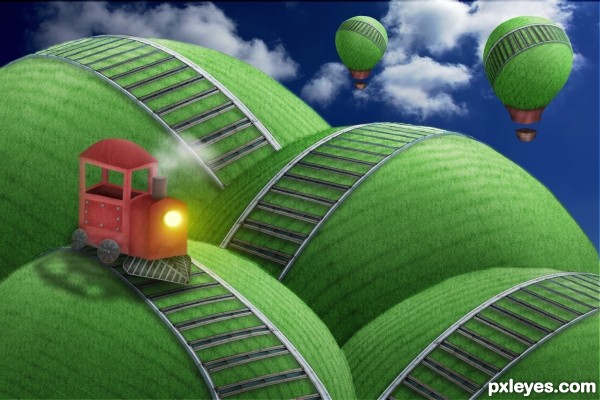
All that was left was to duplicate the balloon and paste it somewhere in the distance. I then rotated the railing on the balloon copy for a bit of variation. And it's done!

Final result
Pxleyes
Photography and photoshop contests
We are a community of people with
a passion for photography, graphics and art in general.
Every day new photoshop
and photography contests are posted to compete in. We also have one weekly drawing contest
and one weekly 3D contest!
Participation is 100% free!
Just
register and get
started!
Good luck!
Follow us:


© 2015 Pxleyes.com. All rights reserved.