
Original image
step 1 of 23
To make the background you will need 5 layers.
1.
1.

step 2 of 23
black and white

step 3 of 23
black and white

step 4 of 23
first fill with white, then apply the filter

step 5 of 23
this is to lighten the background

step 6 of 23
1.crop the eye
2. with the elipse tool select part form the eye
3. copy and reflect the eye
2. with the elipse tool select part form the eye
3. copy and reflect the eye

step 7 of 23
just crop some good part of it

step 8 of 23
almost the same thing

step 9 of 23
also, separating them a little more than there makes a better effect

step 10 of 23
also note that it makes a little finger the hand. and to make that things look more solid you can copy the part of the image then put it as soft light and reduce the opacity

step 11 of 23
Just continue doing the same things, deleting the parts you dont like,

step 12 of 23
also look step 16. you can use any of both

step 13 of 23
to make a smooth blend i use warp and eraser with around 40-60 opacity depending on the objects (here i used arounc 58%

step 14 of 23
i erased some parts but like really small parts

step 15 of 23
also you can look step16

step 16 of 23
any part helps

step 17 of 23
i deleted some parts to make the horns look better

step 18 of 23
also to make the corners circular, make a better cropping

step 19 of 23
thats the base. I just worked on blending object more with the eraser and warp tool.. also i used watermark

step 20 of 23
after this i just added the background. also you can add another insect and put it as soft light and decrease its opacity or fill.

step 21 of 23
Extra things.... this is just to add more taste. Also this goes between the image and the reflection. (the reflection goes behind both)

step 22 of 23
also to make the gradient straight, use shift while doing it (90 degrees) also use black and white to make this so the reflection with the vector mask looks great

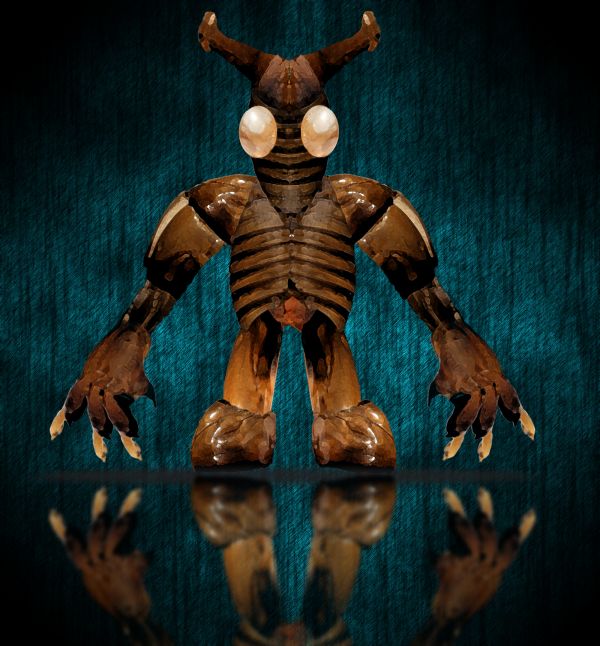
step 23 of 23
here is an example of how you can modify the image.. i copied the fly bot and used accented edges on the copy.... put it as lighten and reduced its opacity.
thats all... any doubt or suggestions just message me =) i will reply as soon as possible
thats all... any doubt or suggestions just message me =) i will reply as soon as possible

Final result
Pxleyes
Photography and photoshop contests
We are a community of people with
a passion for photography, graphics and art in general.
Every day new photoshop
and photography contests are posted to compete in. We also have one weekly drawing contest
and one weekly 3D contest!
Participation is 100% free!
Just
register and get
started!
Good luck!
Follow us:


© 2015 Pxleyes.com. All rights reserved.