
Original image
step 1 of 8
I took ideas from many different tutorials in magazines and photoshop top secrets so am unsure how to do the sbs. Will post pics of the process.

step 2 of 8
Once I had cutout the dog from the original picture, I created a copy and stretched the copy out to give me a guide as I cut tiny pieces from the original and pulled them out until I had the effect of particles in space. I made several successive images of the image that I had pulled the particles out. Adding different stages of motion blur and blending modes to give the notion of speed. As a finishing touch at this stage, I made one more copy above and applied the wind effect using stagger then used another blending mode to create yet more movement. Adding a layer mask I was able to soften the effect in essential areas such as the face.

step 3 of 8
In creating the cape, I pulled out a square shape filled out with a pleasing shade, then used the canvas texture to make it look like cloth. I then proceeded to use the warp tool to shape it to fit the dog and appear to be flying behind him. Once done with that, I added some burning and dodging to give the appearance of folds and gathers. I then made a copy.

step 4 of 8
On the copy of the cape, I applied the motion blur and the wind effect to give it the same look as motion, this copy is placed beneath the original cape. I used after pulling out the back of the copy I erased the areas that shouldn't be having that effect. Then adjusted the opacity.

step 5 of 8
Used bas relief then used polar coordinates prior to creating planet.

step 6 of 8
created 3d sphere from previous layer after adding gradient overlay then adjusted lighting and added a colored shadow to the 3d image to create a pleasing glow around it.

step 7 of 8
Created the shooting comets I used various sizes of soft brush and varying levels of colors. Once I was happy with that, I used the smudge tool to pull out the tails using successive pulls to create a long gradual tapering. To give the curved shapes of the tails, I used the warp tool. Once done I adjusted colors with a gradient overlay. Placed them around with different blending modes. I used a soft 17 brush with adjustment made to the shape dynamics, scattering and spacing to create the small star trails and ring around the planet.

step 8 of 8
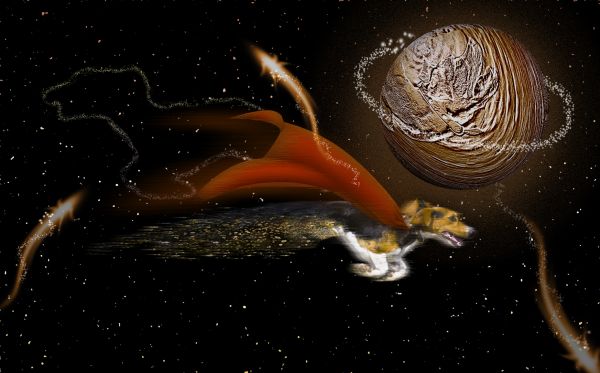
I selected out the original layer of the masked out dog and created a border in the selection and used the custom brush from the step prior to make the bowser constellation.

Final result
Pxleyes
Photography and photoshop contests
We are a community of people with
a passion for photography, graphics and art in general.
Every day new photoshop
and photography contests are posted to compete in. We also have one weekly drawing contest
and one weekly 3D contest!
Participation is 100% free!
Just
register and get
started!
Good luck!
Follow us:


© 2015 Pxleyes.com. All rights reserved.