
Original image
step 1 of 19
Cut up the wall source image and used perspective adjustments on the left and right portions so that the background isn't so flat.

- : source
step 2 of 19
Used the clone stamp to smooth the transition between the walls and cropped off the top and bottom.

step 3 of 19

step 4 of 19
Added the tennis ball onto the pedestal.

step 5 of 19
Used the dark strokes filter on the tennis ball and painted white over the ball streaks. Adjusted curves and on the pedestal and dodge and burned it a bit.

step 6 of 19
Hue and saturation adjustments on the ball to turn it gold. I copied the pedestal onto a clipping mask over the ball and warped it slightly. This will be the reflection.

step 7 of 19
Used Glass filter on the reflection and set blending to hard light.

step 8 of 19
Repeated step 6-7 with a bloated copy of the wall. Parts of the wall reflection that overlap the pedestal reflection are erased, as well as near the top of the ball where the light source will be. Also added a subtle glow effect to the ball.

step 9 of 19
Layed the ivy image over the wall background will blending mode set to overlay. Desaturated the ivy slightly.

- 2: source 2
step 10 of 19
Repeated step 9 on the pedestal.

step 11 of 19
Used clone stamp to hide the lines of the old bricks on the pedestal ivy. I repeat this step later on with the wall ivy. Used clone stamp on the pedestal itself to delete the carvings that interfere with the ivy.

step 12 of 19
Pasted four darts into the scene. Turned them red with hue and saturation adjustments, but later changed my mind and made them green.

- 3: source 3
step 13 of 19
Fixed the positioning of the darts and turned them green. Added motion blur both to the dart itself, and to a duplicated dart beneath each. The duplicated dart has a much greater blur to mimic a blurry flight trail.

step 14 of 19
Added a bright spotlight from above, and added guassian blur to both the background and the two middle darts to give the illusion of a dramatic lens focus.

step 15 of 19
After merging everything, I duplicated it all. On the duplicate layer, I brought down curves to max to make this over-contrasted image. Some parts at the top were deleted.

step 16 of 19
Used 100 px radial zoom blur on the over-contrasted copy.

step 17 of 19
Set blending mode of the over-contrasted layer to screen. Finished off by lowering its opacity and touching up with a large, soft eraser.

step 18 of 19
As you can see, the hands were an afterthough. I just cut the one hand out and mirrored it onto the other side.

- 4: source 4
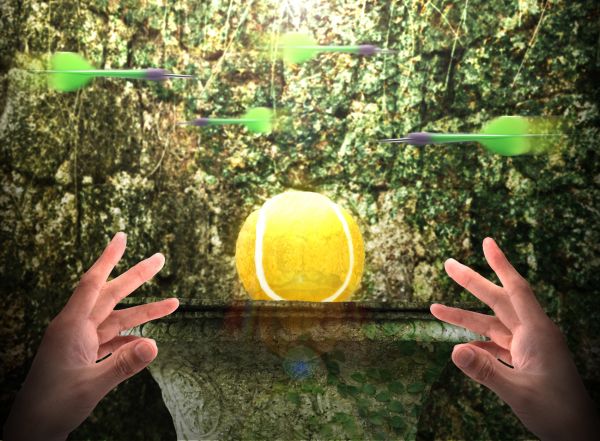
step 19 of 19
Final dodge, burn, and curve adjustments on the hands.

Final result
Pxleyes
Photography and photoshop contests
We are a community of people with
a passion for photography, graphics and art in general.
Every day new photoshop
and photography contests are posted to compete in. We also have one weekly drawing contest
and one weekly 3D contest!
Participation is 100% free!
Just
register and get
started!
Good luck!
Follow us:


© 2015 Pxleyes.com. All rights reserved.